*** IMPORTANT*** Swingarm and linkage bearings servicing***

Where all the workshop knowledge lives together.
User avatar
Wicky
Posts: 7895
Joined: Sat Feb 11, 2006 2:43 pm
Location: Colchester Essex
Contact:

Post by Wicky »

http://www.vtr1000.org/phpBB3/viewtopic.php?t=12310

Link to my thread on rear suspension refurbishment - illustrated and with helpful advice and tool tips from forum members.


Image
Last edited by Wicky on Tue Nov 27, 2012 6:08 pm, edited 2 times in total.
Hankie
Posts: 194
Joined: Sat Apr 12, 2008 9:42 pm
Location: Macclesfield

Post by Hankie »

Wow nasty. If anyone goes to the trouble of removing the bolt and bearings it might be an idea to drill and tap for a grease nipple or 2. You can buy em cheap (http://cgi.ebay.co.uk/ws/eBayISAPI.dll? ... 0228787843). Be a good idea for those that ride year-round in all weathers anyway.
Chris
User avatar
RedStormV
Posts: 1372
Joined: Thu Jun 07, 2007 9:41 pm
Location: West Yorks (Bronte Country) - Home of the Negro Lesbian Cornet Players
Contact:

Post by RedStormV »

Nice one Chris you beat me to it, but not to fitting them :D


Image

Image

10 year old bike, have they been done before or not? I'm the 2nd owner my bruv being the 1st .....


Image
Image

Well the anser is yes, they had been done at some point, but looking at the spacer from the existing sub assembly, it needed doing again! Can you guess which one I took out? Yes that is heavy pitting on the LHS :?

Thankfully neither as bad as the post above by Wicky :lol:

Image

Old and new, well new ish

Got a local garage to bead blast the better looking one and fit grease nipple cost me £10 - well worth it cos it was covered in surface rust.

Image
Image

Better pictures - fitted the washers while I sprayed it up to protect the bearings and seals as they were fine. Oh, and I smeared the grease nipple in grease - to protect it from paint, just wiped it off when paint had dried.

Fitting washers is a good tip for wheels too if you're going to get them sprayed or powder coated - although your best removing seals and bearings, you still need to protect where they seat.

Image
Image

Thought I'd have a go myself - handy things pillar drills, unless you have a steady hand. 5.5mm drill (after drilling pilot hole) 6mm tap and a grease nipple (pence from motor factors - or free from a mate).

Image
Image

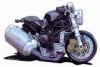
Finished and back on the bike - massive improvement I think you'll agree and apart from the single bearing at the rear of the connecting rod or tie bar, easily maintained in future.

BTW - no I didn't polish the tie bar, me bro must've done, why? I don't know, he was anal about these things, even though you don't see it - and how the hell do you get to it to re-polish it? 8O

Bugger :roll:

Thanks for that bruv :lol: :lol: :lol:

*Edit*

Just adding this as there's been one or two queries where it might have been advantageous to refer to it.

Image

*Edit End*
Last edited by RedStormV on Tue Mar 31, 2009 5:51 pm, edited 1 time in total.
User avatar
bikerpiker
Posts: 1823
Joined: Sun Mar 23, 2008 9:59 pm
Location: Ayrshire - Scotland .

Post by bikerpiker »

Excellent pics :!: ......will get round to checking mine out sometime :roll:
Stevie
User avatar
bikerpiker
Posts: 1823
Joined: Sun Mar 23, 2008 9:59 pm
Location: Ayrshire - Scotland .

Post by bikerpiker »

Finally got round to doing it, it wasn't too bad at all, nothing really seized, all came apart easily.

Bolts in shock linkage etc, just starting to very lightly corrode, ie ,getting a bit white and powdery, but nothing to worry too much about at all, swinging arm/engine pivot bolt was free and in good nick as well,so swinger is off and will get a good clean-up. A few gentle taps with the hammer,and all bolts came out.


The long hollow tubes/spacers (don't know their proper names ) that the bolts go through, and which run on the bearings were free of any corrosion whatsoever,and only very faint roller marks were visible.
Looks like i've been lucky when i see some of the other pics :!:


Bike had Honda FSH when i bought it,so maybe,just maybe, its all been done as part of a service :!:

Glad i checked anyway,after the scary story's 8O , its a wee bit piece of mind :!:
Stevie
Beast
Posts: 232
Joined: Sun Apr 25, 2004 8:49 pm
Location: Brighton, UK

Post by Beast »

Well for the last week i've had a horriable squeek which has now turned into a creaking noise... :?

Luckily i have a whole spare backend and linkages from my old Storm which i will be rebuilding and fitting soon.

Linkages look in good shape so must be the bearings...
Beast
Posts: 232
Joined: Sun Apr 25, 2004 8:49 pm
Location: Brighton, UK

Post by Beast »

Well... mine is all back together and only took a couple of hours. :)
Just one seized and knackered bearing but the rest were good.
The horriable creak noise has gone but i still have a squeek! 8O
Don't know what else it could be and its annoying.

I found that by cutting a couple of lenghs off 2x4 the right size and wedging them between top of swing arm and subframe bar (the round one that travels accross under the battery tray) i didnt have to jack the bike up in anyway. ;)
And with the right tools nothing else had to be removed.
JohnD
Posts: 120
Joined: Tue Apr 15, 2008 6:32 pm
Location: London

Post by JohnD »

Am gonna check & re-grease these when I fit my new shock...

...what type of grease do people recommend for the job?
User avatar
RedStormV
Posts: 1372
Joined: Thu Jun 07, 2007 9:41 pm
Location: West Yorks (Bronte Country) - Home of the Negro Lesbian Cornet Players
Contact:

Post by RedStormV »

Grease used was Molybdenum Disulphide, or at least contains it:

Image

Image

Apparently Honda recommend this type of grease for that purpose. (thanks to Sirch for that little nugget of info :wink: )

As for supporting the bike, forgot to mention in my post.

I used paddock stands front and rear initially, but to support the rear for undoing the linkages etc I removed the seat, threw an inch wide torsion / ratchet strap over one of the 3" X 2" beams in the garage and hooked each end of the strap to the loops under the seat.

Image

It was suspended like this for over a week while I cleaned up all the nooks and crannies, with no problems whatsoever. The front was still maintained on 'head stock' type paddock stand during this time (I wouldn't trust an under the forks one!).

Not only does this give you the ability to hoist the rear end nice and high to get at the rear of the engine etc better, it also makes for easy fine tuning of height adjustment when putting it all back together again.

HTH guys.
User avatar
firestorm_al
Site Admin
Posts: 754
Joined: Mon May 20, 2002 9:56 am
Location: Aberdeen (Scotland - UK)
Contact:

Re:

Post by firestorm_al »

bikerpiker wrote:Is it a simple matter of taking the nut off, knocking the bolt out, and re-greasing, or is there more to it than that :?:
stevie
It can be a nightmare of a job if the bolts have seized. The roller bearings can collapse and the corrosion can bind everything together.

If you push down the back of the bike and it seems stiff in any way or worst still squeeks then you want to get the linkages stripped ASAP.
User avatar
bikerpiker
Posts: 1823
Joined: Sun Mar 23, 2008 9:59 pm
Location: Ayrshire - Scotland .

Re: *** IMPORTANT*** Swingarm and linkage bearings servicing

Post by bikerpiker »

I done them a while back Al,thankfully everything was fine with very little corrosion :)
Stevie
Twinpotter
Posts: 332
Joined: Sun Sep 21, 2008 2:34 pm
Location: Houghton Regis

Re: *** IMPORTANT*** Swingarm and linkage bearings servicing

Post by Twinpotter »

Ach, a squeek developing, I'm tackling mine now and the rear bolt (7 / 20 on the fiche) was a bugger to shift. I popped a nut (17) onto the bolt (12) and had to batter it. I found the bearing left hand side collapsed about half a mil off-centre, brown and bone dry! With some persuasion (and a socket plus a weighty 'corrosion assessment tool', out came a mess comprising rollers, red oxide powder and a very nasty looking collar (6). Not as bad as Wicky's (my bearings hadn't gone through the outer shell) but bad enough. :roll:

Jings, DS are out of stock 7/20 (Part# 91072KT7003) so I found Simply Bearings about a pound more than DS,
http://simplybearings.co.uk/shop/p9703/ ... _info.html
And DS don't carry stocks of the collar (6) Part#52463-MBB-000 either, I've a wait on my hands who knows.

Whether one rides around all year or not, I agree with you chaps on the nipples - looks wicked and makes such a lot of sense. How about fitting each nipple with rubber brake nipple caps to finish them off? Now I'm wondering if fabricating a 'heat shield' for that Arm sub assembly might also help. Thoughts welcome.

Pics'n'all coming soon.

Best regards
Starts with a R. Rrrrrrrr. Motorbike!
tony.mon
Posts: 15928
Joined: Wed Jul 25, 2007 10:46 pm
Location: Norf Kent

Re: *** IMPORTANT*** Swingarm and linkage bearings servicing

Post by tony.mon »

Rubber nipple caps definitely necessary, as the position they'll need to be in so that you can get a grease gun to them on the bike will mean that they're hung in the mud and crap.

Only problem is seeing what comes up on the computer when you search for them........ :D
(wait till the wife's out of the room, and don't forget to delete your browsing history!!!
It's not falling off, it's an upgrade opportunity.
Twinpotter
Posts: 332
Joined: Sun Sep 21, 2008 2:34 pm
Location: Houghton Regis

Re: *** IMPORTANT*** Swingarm and linkage bearings servicing

Post by Twinpotter »

All done.

And another great rapido service from David Silvers once again.

Here's a few snaps:

1. The offending bearing assembly with new ones:
Image

2. The linkages:
First the old ones:
Image

The new ones:
Image
Image
Cost a grand total of £25.
Kudos to Richard at Watford Coatings (http://www.watfordcoatings.co.uk - a former Storm owner no less. Yep, he misses them) for bead blasting & painting and to Hartom Engineers in Borehamwood for fitting the grease nipples. Good stuff.

I used two brake bleed caps to keep the nipples protected.

3. Fitted:
Image
The grease nipples are easily accessed (outlined red).

One can also can see why these bearings dry out - come to a halt or park up and those two bearings get it. What I'm set on doing very soon is placing a 1mm steel plate 'heat deflector' shield in there once I've decided how to cut, shape and attach it. A straight forward job me thinks.

And back on the road with new cush drive rubbers as well...
Image

Woo hoo. No squeak, solid, awesome.
Starts with a R. Rrrrrrrr. Motorbike!
User avatar
Pete.L
Forum Health And Safety Officer
Posts: 7208
Joined: Fri Sep 26, 2003 5:09 pm
Location: Bristol

Re: *** IMPORTANT*** Swingarm and linkage bearings servicing

Post by Pete.L »

:D :D :D
Now there's a good, professional Job :cool2

Nice one TP :P
Pete.l
My new ride is a bit of a Howler and I love to make her Squeal
Post Reply