[quote]
CV Carb Tuning High RPM engines
1- Top end (full throttle / 7.5k to redline ) Select Best Main Jet
Best Main Jet must be selected before starting step 2 (needle height)!
To get the best, most even top end power (full throttle/after 7500 rpm), select the main jet that produces the highest top speed / pulls hardest at high rpm. If the bike pulls harder at high rpm when cold and less hard when fully warmed up, the main jet is too large. Install a smaller main jet and retest until you find the main jet that pulls the hardest at high rpm when fully warmed up If the bike doesn't pull well at high rpm when cold and gets only slightly better when fully warmed up, the main jet is too small..
This must be done first - before moving on to the other tuning ranges. In order to properly tune the midrange and low rpm carburetion, THE MAIN JET MUST FIRST BE PROPERLY SELECTED after 10 to 15 minutes of hard use!
Do not pay too much attention to the low-end richness when you are changing main jets - you still need to be using the main jets that produce the best power at high rpm. You will deal with the low-end / cruise later - after step 2.
2-Midrange (full throttle/5k-7K
Step I (Best Main Jet) must be selected before starting step 2!
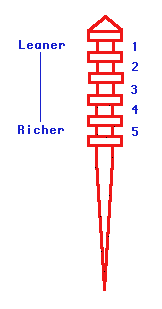
Select best needle clip position
To get the best power at full throttle / 5k-7k rpm, adjust the needle height, after you have already selected the best main jet.
If the engine pulls better or is smoother at full throttle/5k-7k in a full throttle roll-on starting at <3k when cool but soft and/or rough when at full operating temperature, it is too rich in the midrange and the needle should be lowered. If the engine pulls better when fully wanned up but still not great between 5k-7k, try raising the needle to richen 5k-7k.
If the engine pulls equally well between 5k-7k when cooler as compared to fully wanned up, the needle height is probably properly set.
Do not pay too much attention to the low-end richness when you are changing needle clip positions - you still need to be using the clip position that produces the best full throttle / 5k-7k power in conjunction with the main jets (Step 1) that produce the best power at high rpm. You will deal with the low-end / cruise next.
3. Low end (full throttle / 2k-3k)
Step 1 (Best Main Jet) and Step 2 (needle height) must be selected before starting step 3!
Float height
To get best low-end power, set float height (fuel level) so that the engine will accept full throttle, without missing or stumbling, in 2nd gear from 2.5k to 3k rpm at minimum.
Float heights, unless otherwise specified in the installation guide, are measured from the "gasket surface" of the carb body to the highest part of the top of the float - with the float tang touching but not compressing the float valve spring.
PLEASE NOTE- Storm floats are not adjustable, according to Haynes- you have to buy a new one if it's not set correctly
If the engine has a "wet" rhythmic, soggy area at full throttle / 3k-4k rpm, that gets worse as the engine heats up, lower the fuel level by resetting the float height 1mm greater (if the original was 13mm - go to 14mm). This will lower the fuel level, making full throttle / 2k-3k rpm leaner. If the engine is "dry" and flat between 2k to 3k rpm, raise the fuel level.
Example: change float height from 15mm to 14mm to richen up that area. REMEMBER, since the main jet WILL affect low speed operation, the MAIN JET has to be within 1 or 2 sizes of correct before final float setting.
Warning: If the engine is left with the fuel level too high,, the engine may foul plugs on the street and will be "soft" and boggy at part throttle operation. Adjust Floats to raise/ lower the Fuel Level.
Base settings are usually given if a particular application has a history of critical fuel level. The Fuel level height in the float bowl affects full throttle/low rpm and, also, richness or leanness at cruise/low rpm.
Reference: a bike that runs cleanly at small throttle openings when cold, but starts to show signs of richness as it heats up to full operating temperature, will usually be leaned out enough to be correct if the fuel level is LOWERED 1mm. Check out and RESET all: Suzuki (all), Yamaha (all) and Kawasaki (if low speed problems occur). Needless to say, FUEL LEVEL IS EXTREMELY IMPORTANT!!!
If there are low-end richness problems, even after lowering the fuel level much more than 1.5mm from our initial-settings^ check for needle wear and needle jet (part of the emulsion tube It is VERY common for the brass needle jets (in the top of the "emulsion tube") in 36mm, 38mm and 40mm Mikuni CV carbs to wear out in as little as 5,000 miles. Check them for "oblong" wear - the needle jet orifice starts out round! Factory Pro produces stock replacement needle jets / emulsion tubes for 36mm and 38mm Mikuni carbs.
4. Idle and low rpm cruise
Fuel Screw setting (AKA mixture screws)
There is usually a machined brass or aluminum cap over the fuel screws on all but newer Honda. It's about the diameter of a pencil. Newer Honda carbs have no caps, but use a special "D" shaped driver, usually supplied in the carb recal kit. We do have them available separately, too. 800 869-0497 to order -
( Storms are adjustable with a flat-bladed screwdriver, no "d" shaped tool necessary- or at least, mine is)
Set for smoothest idle and 2nd gear, 4k rpm, steady state cruise operation. Set mixture screws at recommended settings, as a starting point. For smoothest idle, 2nd gear 4000 rpm steady state cruise, and 1/8 throttle high rpm operation. Pilot fuel mixture screw settings, float level (but, you've already "fixed" the fuel level in Step 3!) AND pilot jet size are the primary sources of mixture delivery during 4000 rpm steady state cruise operation.
If lean surging is encountered, richen mixture screws (turn out) in 1/2 turn increments. Alternative pilot jets are supplied when normally required.
Pilot fuel mixture screw settings, float level and pilot jet size also affect high-rpm, 0 to 1/8 throttle maneuvers. Too lean, will cause surging problems when the engine is operated at high rpm at small throttle openings! Opening the mixture screws and/or increasing pilot jet size will usually cure the problem.
NOTE: A rich problem gets worse as the engine heats up. If the throttle is lightly "blipped" at idle, and the rpm drops below the set idle speed, then rises up to the set idle speed, the low speed mixture screws are probably set too rich: try 1/2 turn in, to lean the idle mixture.
NOTE: A lean problem gets better as the engine heats up. If the throttle is lightly "blipped" at idle, and the rpm "hangs up" before dropping to the set idle speed, and there are no intake leaks and the idle speed is set at less than 1000 rpm, the mixture screws are probably too lean: try 1/2 turn out, to richen mixture. Be sure there are no intake leaks and the idle speed is set at less than 1000 rpm!
Carb Kit Design is a combination of science, art, intuition and and at times, a fair dose of wizardry. There is no dyno that "tells" one how to assemble or modify the carb to deliver proper power and response.
Perfect Carb Kit TUNING requires patience and perseverance and "reasonable" feel to feel the changes - of which - most motorcycle riders have a good ability to do.
When a dyno "operator" says he/she has to ride the bike after dyno tuning to do the final tune for cruise smoothness - that's what they are doing. Avoid any dyno operator who says that they don't have to do that!!!
The only dyno that I know of that will duplicate and visually display the engine smoothness is the EC997 dyno (yes, 1 know, we make it) -that's one reason why, if you can, you'd like to use one for tuning - a smoother engine IS getting the best mixture. Other dynos claim to "tune to an "A/F Ratio" - probably the biggest marketing scheme in the dyno industry at this time - and they never can equal the quality of tune as designed -These tuning kits have been thoroughly tested to ensure easy, trouble-free, optimized performance.
------------------------------------------------------------------------------------------------------------
This info is supplied with Factory Pro jet kits, which can be bought in the UK from Straightline Racing-
Straightline Racing 102-103 London Road King's Lynn Norfolk PE30 5ES
Telephone: 01553 772774.
Fax: 01553 765176
e-mail: sales@straightlineracing.co.uk.
http://www.straightlineracing.co.uk
They also sell the ignition advancer which helps as well.- less than £50!
Or buy direct from Factory Pro in the US- just type it into your browser.
/quote]
Carb Tuning guide (setting up a Dynojet or Factory Pro kit)
Carb Tuning guide (setting up a Dynojet or Factory Pro kit)
Last edited by tony.mon on Wed Dec 19, 2012 10:35 pm, edited 1 time in total.
It's not falling off, it's an upgrade opportunity.

Re: Carb Tuning guide (setting up a Dynojet or Factory Pro k
FUEL SCREW/MIXTURE ADJUSTMENT
QUESTION ONE: WHEN DOES THE FUEL SCREW COME INTO PLAY?
Considering that most of racing takes place while you're on the gas (and thus on the carburetor's needle and main jet circuits), the fuel mixture circuit might seem to be of little importance. Au contraire. It is very important (even though it comes into play off idle). If the fuel mixture is mis-adjusted, your bike will run rough and stumble across the whole range. The adjustment of this circuit is so crucial that there are both external and internal ways to tune it.
QUESTION TWO: WHERE DO I FIND THE SECONDARY BYPASS?
Under the slide. The secondary carburetor starts at that little hole pointing straight back from the bottom behind the slide. These holes channel air into the fuel mixture circuit where it is mixed with gas. This circuit controls how the bike runs off idle and into the midrange. It's adjusted by the fuel mixture screw—a tapered needle that opens or closes the flow of mixed air and gas.
QUESTION THREE: HOW DO YOU ADJUST THE FUEL SCREW?
You turn it. By turning the screw in and out, it's possible to adjust how much fuel mixes with the air racing down the bypass hole.
QUESTION FOUR: ISN'T A FUEL SCREW A GLORIFIED AIR SCREW?
No. Two-strokes have air screws. Four-strokes have fuel screws. The air screw is on the side of the carburetor and meters the amount of air that makes it to the pilot jet nozzle. A fuel screw is located underneath the float bowl and meters the amount of fuel that makes it to the carb's main body.
QUESTION FIVE: WHY DO FOUR STROKES USE A FUEL MIXTURE SCREW?
Because they don't have enough low-speed vacuum for an air screw. At low rpm, four-strokes create less engine vacuum than two-strokes. It's the vacuum created by the engine that sucks fuel out of the float bowl and into the engine. Since a fourstroke doesn't have as much vacuum, it can't draw enough air to make the mixed fuel flow well enough to keep a thumper running. By metering fuel, which is easier to draw through the orifices with low vacuum pressure, a four-stroke is able to start more easily and run cleanly at its very low rpm idle speed.
QUESTION SIX: ISN'T THERE AN AIR/FUEL SCREW?
No. That is just another name for the fuel screw. Forget it! It's an air screw on a two-stroke and fuel screw on a four-stroke. Don't mix metaphors when mixing fuel and air.
QUESTION SEVEN: WHY DON'T THEY CALL IT A GAS MIXTURE SCREW?
Fuel is not gasoline. It is the combi¬nation of gasoline and air mixed together. Gasoline, while highly volatile, couldn't be a fuel without air.
QUESTION EIGHT: HOW CAN I TELL A FUEL SCREW FROM AN AIR SCREW?
It is possible for a four-stroke to have an air screw. Many vintage thumpers used two-stroke carbs— and thus have air screws. Here is how you can tell if the carburetor has a fuel mixture or air mixture screw. (1) Look at the carburetor from the side that has the mixture screw on it. (2) Draw an imaginary line down the carb's slide to visually split the carburetor into two. (3) If the screw is located on the airbox side of the carburetor, it is an air screw. (4) If the screw is situated on the engine side of the carburetor, it is a fuel screw.
QUESTION NINE: ARE THEY ADJUSTED THE SAME WAY?
No. An air screw meters air before it reaches the pilot jet. Turning an air screw in restricts the air flow and richens the mixture (turning it out leans the mixture by letting more air in). Conversely, a fuel mixture screw meters gas after it has been mixed with air, thus it works the opposite of an air screw. Turning the fuel screw out lets more fuel into the engine and creates a richer mixture. Turning the fuel screw in limits the flow of gasoline and leans the jetting.
QUESTION TEN: HOW DO I REACH THE FUEL SCREW?
The under-the-float-bowl location of the fuel screw makes it next to impossible to reach. It takes a special screwdriver (Pro-Tec and Motion Pro offer them). Ty Davis' Zip-Ty Racing offers an adjustable fuel screw that can be turned by hand (without the use of tools).
QUESTION 11: HOW DO I ADJUST THE FUEL SCREW?
Not so fast. Before you ever touch the fuel mixture screw, you must first warm the engine up. That means riding the bike around a bit, not just starting it up. Once the bike is warm, you need to bring it up to a fast idle.
QUESTION 12: HOW FAST IS A FAST IDLE?
How fast is a fast idle? As a rule of thumb, it is about 1800 rpm. The best way to get a fast idle and keep it is with the idle adjustment screw.
Some race mechanics simply crack the throttle by hand and hold it there. This is common, but it's much more accurate to set the fast idle with the slide stop.
QUESTION 13: WHAT IS THE NEXT STEP?
With the bike holding a steady, high idle, use the adjustment tool to slowly screw the fuel mixture screw in. Continue tightening the screw until the engine rpm drops (and nearly dies). Now, slowly turn the screw back out. You will hear the engine rpm begin to speed up and the exhaust note will become crisper.
QUESTION 14: WHEN DO I STOP TURNING THE SCREW OUT?
Stop turning the fuel mixture screw at the exact moment when the engine hits peak rpm. Peak rpm is when the engine runs the cleanest and fastest. When you reach that point, the idle won't become faster the more you turn the fuel mixture screw out. If you keep turning the screw, the rpm will stay up but the exhaust note will become dull, flat and lumpy.
QUESTION 15: WHAT'S A FLAT. DULL AND LUMPY EXHAUST NOTE?
It's not defined by speed but rather by crispness. When engine rpm just peaks, the exhaust note is sharp and crisp. As you continue to turn the fuel mixture screw, the exhaust note will become choked by too much fuel and will lose that snappy sound.
QUESTION 16: BUT WHEN DO I KNOW TO STOP?
Once you've trained your ear to hear what peak rpm sounds like— and have a good idea of the point where turning the screw out farther hurts performance—you might test your setting by turning the fuel screw in the opposite direction (until the rpm drops). Stop at that instant and turn it back in again. If you're not 100 percent certain you have peak idle, start counting the turns out from the spot you think is peak idle. If the engine rpm doesn't pick up after a 1/4 twist, turn it back to the original spot.
QUESTION 17: HOW DO I TELL WHAT MY SETTING IS?
Count the turns. With the engine off, turn the fuel mixture screw in while carefully counting in l/8th turn increments. Keep counting until the screw lightly bottoms. Now, turn it out the identical number of l/8th turns. That is your fuel mixture adjustment and it's usually between 1/2 to two turns out.
QUESTION 18: WHAT IF I HIT PEAK RPM AT THREE TURNS?
As you turn the fuel mixture screw out, the slow speed mixture circuit is metering more and more fuel to the engine. If the engine doesn't reach peak rpm until the screw has been turned more than two turns, it might indicate that the pilot jet is too small (lean). Try the next larger pilot and retest the fuel mixture adjustment. Conversely, if peak rpm is reached before you turn the fuel mixture screw out a half turn, it could mean that the pilot jet is too rich. Try the next smaller size.
QUESTION 19: IS THE PILOT JET THE BEST FIX?
No. Even if the fuel mixture screw is set at 2-1/2 turns out, the bike might not run as well with the next size richer pilot. But you still need to try it in order to rule it out. Always try a respective leaner or richer pilot if the fuel mixture screw's best setting is on either side of the one-half or two and one-half turn adjustment range. Pay attention to how the bike runs at the crack of the throttle. Switch back and forth if necessary. Do not rule out the needle clip position or needle taper. All can affect off-throttle performance—even with the correct fuel mixture screw setting.
QUESTION 20: HOW OFTEN SHOULD THE FUEL SCREW BE CHECKED?
Every race day. Twice a day if it is cool and overcast during practice and bright and sunny for the first moto. When the track dries out and the sun breaks out, you'll want to set the mixture screw back to a leaner setting.
QUESTION 21: WHAT CHANGES NECESSITATE FUEL SCREW ADJUSTMENT?
Temperature isn't the only thing that affects the fuel screw. When racing in elevations above 4000 feet, the thin air will create the need for more air (turn the fuel mixture screw in). In humid climes, you might need to lean the setting in the afternoon as the day dries out. A fast approaching storm will require a richer setting (turn the fuel mixture screw out).
http://www.thumperfaq.com/fuel_screw.htm
Is It Lean or Rich?
Typical Lean Conditions:
- Poor acceleration; the engine feels flat.
- The engine won't respond when the throttle is snapped open, but it picks up speed as the throttle is closed. (A too-large main jet also mimics this symptom.)
- The engine runs hot, knocks, pings and overheats.
- The engine surges or hunts when cruising at part-throttle.
- Popping or spitting through the carb occurs when the throttle is opened. Or popping and spitting occurs through the pipe on deceleration with a closed throttle.
- The engine runs better in warm weather, worse in cool.
- Performance gets worse when the air filter is removed.
Typical Rich Conditions
- Engine acceleration is flat and uneven and loses that "crisp" feel.
- The engine "eight-strokes" as it loads up and skips combustion cycles.
- The engine's idle is rough or lumpy, and the engine won't return to idle without "blipping" the throttle.
THE BLIP TEST
1. Start by warming the bike up to normal operating temperature.
2. Blip the throttle up several thousand RPM's or up to redline if you so desire.
As it comes back down to idle one of three things will happen and these are the three results:
1. Upon return to idle it hangs. Where ever it hangs in the RPM's it is running lean. Even a slight hang just before returning to idle means it is running lean at idle.(Must return directly to idle without popping,lag, or hanging).
2. Upon return to idle it goes slightly past and below idle then returns back up to idle speed momentarily. This is a rich run condition.
3. It returns directly to idle w/o any lag, hesitation, or going below idle you have a perfect a/f mixture and run condition.
(:-})
==============================Enter the Darkside
-
Roger Ditchfield
- Posts: 181
- Joined: Tue Apr 26, 2011 6:55 pm
Re: Carb Tuning guide (setting up a Dynojet or Factory Pro k
The most accurate and comprehenive dissertation I have ever read - truly excellent 
-
lloydie

- Posts: 20920
- Joined: Mon Jan 17, 2011 11:16 pm
- Location: In the garage somewhere in Coventry
Re: Carb Tuning guide (setting up a Dynojet or Factory Pro k
Nice read :-) one question - what is the base settings for the mixture screws ?
Re: Carb Tuning guide (setting up a Dynojet or Factory Pro k
I thought it was about time this thread was awakened and built upon.  Thanks for your kind words Roger that is actually quite something to hear that from you. It's only from bits I have had to learn for myself from research and put together.
The base setting will be determined by the size of the pilot jet and the majority of carbs I have seen over here have 48's in them. I know Honda soon updated to 48's and it was only the real early ones I think that came with 45's as stock.
VTR V models......45
VTR W,X and Y....48
With a 48 pilots because this is larger and allowing more fuel flow, then the fuel screw wont need as many turns to to get an even air/fuel ratio and smooth running and would be more like Front 2.5 Rear 2 1/4 turns out
The base setting would just be a starting point as every bike will be different due to many factors including engine wear (valve lash, carbon deposits, etc.) Altitude, temperature, humidity and each engine will need to be dialled in/adjusted accordingly for accuracy.
STOCK SETTINGS
(as received from Honda)
Stock From Honda: Stock Filter/ Stock Exhaust / Stock Advancer
-Mains Jet Front 175 Rear 178
-Pilot Jet Front 45 Rear 45
-Fuel Screw (Turns Out) Front 3.0 Rear 2. 3/4
-Stock needles
With 48 Pilot jets
-Fuel Screw (Turns Out) Front 2.5 Rear 2. 1/4
For more info here's a nice write up on air/fuel ratios explained.
http://www.bristoldyno.com/tech/airfuel.htm
(:-})
Good question as in the workshop manual it says it should be Front 3 Rear 2 3/4 turns out with 45 pilots, but this is for Canada/California. Note these are approximate settings and every bike will be slightly different.one question - what is the base settings for the mixture screws ?
The base setting will be determined by the size of the pilot jet and the majority of carbs I have seen over here have 48's in them. I know Honda soon updated to 48's and it was only the real early ones I think that came with 45's as stock.
VTR V models......45
VTR W,X and Y....48
With a 48 pilots because this is larger and allowing more fuel flow, then the fuel screw wont need as many turns to to get an even air/fuel ratio and smooth running and would be more like Front 2.5 Rear 2 1/4 turns out
The base setting would just be a starting point as every bike will be different due to many factors including engine wear (valve lash, carbon deposits, etc.) Altitude, temperature, humidity and each engine will need to be dialled in/adjusted accordingly for accuracy.
STOCK SETTINGS
(as received from Honda)
Stock From Honda: Stock Filter/ Stock Exhaust / Stock Advancer
-Mains Jet Front 175 Rear 178
-Pilot Jet Front 45 Rear 45
-Fuel Screw (Turns Out) Front 3.0 Rear 2. 3/4
-Stock needles
With 48 Pilot jets
-Fuel Screw (Turns Out) Front 2.5 Rear 2. 1/4
For more info here's a nice write up on air/fuel ratios explained.
http://www.bristoldyno.com/tech/airfuel.htm
(:-})
Last edited by VTRDark on Fri Apr 11, 2014 9:33 am, edited 4 times in total.
==============================Enter the Darkside
Re: Carb Tuning guide (setting up a Dynojet or Factory Pro k
GETTING A BETTER UNDERSTANDING
OF HOW CV CARBS WORK IN LAYMANS TERMS
From what I understand and have researched, I have put together in laymen's terms a basic write up on how the CV Carbs work with regards to jetting.
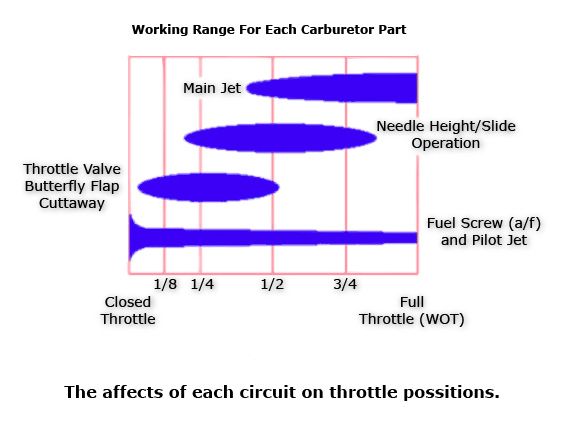
The main jet which screws into the emulsion tube is the fuelling for the top end 7.5 thou rpm upwards at 3/4 throttle to (WOT) wide open throttle. Different size main jets have a larger or smaller hole for fuel to flow through. The larger the hole, the richer it is.
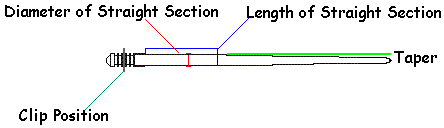
The needle in the slide controls the midrange 5 thou to 7 rpm 1/4 to 3/4 throttle. the needle height determines how rich or lean it is. With adjustable needles (standard Honda needles are non adjustable) The lower the needle is, leans it out and the Higher it is richen's it. The needle is tapered and goes inside a hole in the side of the carburettor main chamber, so as the slide opens and closes under the vacuum from the diaphragm the taper opens or closes the gap in the hole. So to richen move the clip towards the pointed end and to lean it out move the clip towards the blunt end.
The pilot or slow jet as it's sometimes known controls the bottom end from idle & 2 thou to 3 at 1/8 to 1/4 throttle opening. As with the main jet, the size of the hole in the jet determines the amount of fuel flow. The larger the hole the more fuel that flows.
The pilot works in combination with the mixture screw setting. There is a channel inside the carb that links the two. Turning the mixture screw (or to be more precise a fuel screw on these bikes as it controls fuel flow) Turn outwards/anti clockwise to richen or inwards/clockwise to lean it out. This opens or closes the gap in the channel linked between the two and gets the bike idling smooth with no fluctuations.
There is a slight overlap between between the pilot, needle/slide and main jet and it's a case of getting an even balance and appropriate air fuel ratio between them all.
The float sits on a float needle valve and works like a ballcock in a toilet cistern. The fuel gets sucked from the tank and into the carb float chamber, which is like a middle ground holding area for fuel. If the float has a hole or is broken then there would be no control on the amount of fuel going into the carb and it would flood. Also any wear and tear to the float needle valve can cause it to overfill or flood. The VTR float height is non adjustable.
Here's a rough guide to how the individual carb circuits cross paths.
This may help to get a better understanding to what is going on. I hope.
(:-})
OF HOW CV CARBS WORK IN LAYMANS TERMS
From what I understand and have researched, I have put together in laymen's terms a basic write up on how the CV Carbs work with regards to jetting.
The main jet which screws into the emulsion tube is the fuelling for the top end 7.5 thou rpm upwards at 3/4 throttle to (WOT) wide open throttle. Different size main jets have a larger or smaller hole for fuel to flow through. The larger the hole, the richer it is.
The needle in the slide controls the midrange 5 thou to 7 rpm 1/4 to 3/4 throttle. the needle height determines how rich or lean it is. With adjustable needles (standard Honda needles are non adjustable) The lower the needle is, leans it out and the Higher it is richen's it. The needle is tapered and goes inside a hole in the side of the carburettor main chamber, so as the slide opens and closes under the vacuum from the diaphragm the taper opens or closes the gap in the hole. So to richen move the clip towards the pointed end and to lean it out move the clip towards the blunt end.
The pilot or slow jet as it's sometimes known controls the bottom end from idle & 2 thou to 3 at 1/8 to 1/4 throttle opening. As with the main jet, the size of the hole in the jet determines the amount of fuel flow. The larger the hole the more fuel that flows.
The pilot works in combination with the mixture screw setting. There is a channel inside the carb that links the two. Turning the mixture screw (or to be more precise a fuel screw on these bikes as it controls fuel flow) Turn outwards/anti clockwise to richen or inwards/clockwise to lean it out. This opens or closes the gap in the channel linked between the two and gets the bike idling smooth with no fluctuations.
There is a slight overlap between between the pilot, needle/slide and main jet and it's a case of getting an even balance and appropriate air fuel ratio between them all.
The float sits on a float needle valve and works like a ballcock in a toilet cistern. The fuel gets sucked from the tank and into the carb float chamber, which is like a middle ground holding area for fuel. If the float has a hole or is broken then there would be no control on the amount of fuel going into the carb and it would flood. Also any wear and tear to the float needle valve can cause it to overfill or flood. The VTR float height is non adjustable.
Here's a rough guide to how the individual carb circuits cross paths.
This may help to get a better understanding to what is going on. I hope.
(:-})
Last edited by VTRDark on Thu Feb 28, 2013 1:27 am, edited 11 times in total.
==============================Enter the Darkside
Re: Carb Tuning guide (setting up a Dynojet or Factory Pro k
SOME INFO ON DYNO MACHINES
Things people should be aware of on a dyno run
- A dyno run probably won't 'fix' anything without more sessions to verify jetting changes/modifications worked (or got closer to where you want to be.)
- A dyno will only get you about 95% to where you need to be, when you know how to interpret results/print out from 5 band gas analyser.
- A dyno doesn't mimic real world loads or airflow, badly set up dyno room will give false readings and usually leads to lean jetting.
- A dyno operator/technician also has an influence on results, many don't know how to set carbs (They can make adjustments through the computer without removing anything other than the seat to connect the bike to the battery.)
- Quite often though dyno runs are only for 'bragging rights' (my Bike has more HP/torque than your yours type of thing) Customers are usually more interested in max HP and not driveability.
- It will give you a real good baseline though and 2~3 dyno runs will save hours of 'road testing' (assuming you can find a good straight road close to home, and relatively high speed limit and low traffic volume.)
- It's expensive to get dyno runs done in a shop but may be worth it for the time it saves to get bike running real close to optimum instead of 'just' running.
- You may get lucky and find a well set up dyno with balanced airflow and fans, then you can get to around 98~99% of jetting sorted which is good as it's ever going to get due to 'environmental variations' (temp, humidity, altitude, etc.)
How to Read the Air/Fuel Mix Chart from Dyno Run
Optimum performance = 14.7:1 Air/Fuel Ratio
Optimum longevity for engine life = 13:1
< 12:1 = Too Rich
> 15:1 = Too Lean
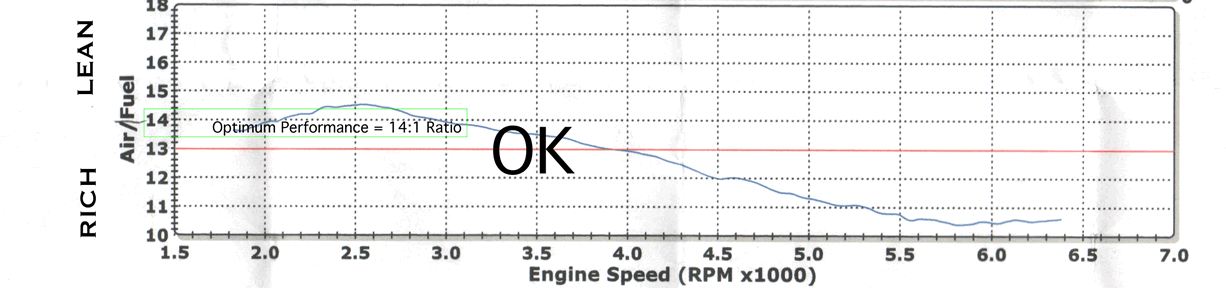
Chemically ideal mixture is 14.7:1 at sea level at 68*f with 4% humidity.
Called Stoichiometric. The best mixture at any given time is dependant on RPM, intake speed, air density, temperature and engine load.
http://en.wikipedia.org/wiki/Stoichiometry

(:-})
Things people should be aware of on a dyno run
- A dyno run probably won't 'fix' anything without more sessions to verify jetting changes/modifications worked (or got closer to where you want to be.)
- A dyno will only get you about 95% to where you need to be, when you know how to interpret results/print out from 5 band gas analyser.
- A dyno doesn't mimic real world loads or airflow, badly set up dyno room will give false readings and usually leads to lean jetting.
- A dyno operator/technician also has an influence on results, many don't know how to set carbs (They can make adjustments through the computer without removing anything other than the seat to connect the bike to the battery.)
- Quite often though dyno runs are only for 'bragging rights' (my Bike has more HP/torque than your yours type of thing) Customers are usually more interested in max HP and not driveability.
- It will give you a real good baseline though and 2~3 dyno runs will save hours of 'road testing' (assuming you can find a good straight road close to home, and relatively high speed limit and low traffic volume.)
- It's expensive to get dyno runs done in a shop but may be worth it for the time it saves to get bike running real close to optimum instead of 'just' running.
- You may get lucky and find a well set up dyno with balanced airflow and fans, then you can get to around 98~99% of jetting sorted which is good as it's ever going to get due to 'environmental variations' (temp, humidity, altitude, etc.)
How to Read the Air/Fuel Mix Chart from Dyno Run
Optimum performance = 14.7:1 Air/Fuel Ratio
Optimum longevity for engine life = 13:1
< 12:1 = Too Rich
> 15:1 = Too Lean
Chemically ideal mixture is 14.7:1 at sea level at 68*f with 4% humidity.
Called Stoichiometric. The best mixture at any given time is dependant on RPM, intake speed, air density, temperature and engine load.
http://en.wikipedia.org/wiki/Stoichiometry
(:-})
Last edited by VTRDark on Sun Aug 31, 2014 11:15 am, edited 4 times in total.
==============================Enter the Darkside
Re: Carb Tuning guide (setting up a Dynojet or Factory Pro k
A QUICK OVERVIEW ON OPENING THE CARBS
AND MAKING CHANGES
You need to pull the tank, airbox, and carbs. If lots of petrol comes out of the petcock when you take the hoses off you will need to shut the petcock with an 8mm wrench.
Take the carbs to a nice clean workbench. First take off the diaphragm covers (black). Screws can be tight. Slowly remove covers as to not tear the diaphragms. They are fragile. There's also a long spring that will pop out at you. Slide the diaphragm and carb slide out. Now take one of the cover screws and screw it into the middle part of the carb slide. This is a retainer that holds the needle in. Pull it with a pair of pliers or wiggle from side to side as you GENTLY pull and it'll come right out. Inspect the o-ring. Now remove and inspect the needle. If it has slots in it this is a good thing. That means it has an aftermarket jet kit, and is also adjustable via the little clip. If it has none then you may want to buy one. Stock needles can be raised by shimming, but not lowered. Lowering the needle will get you leaner. Raising it makes it richer. Needles control part throttle mixture from about 1/8 throttle up to about 3/4 throttle. It's also based on RPM due to the constant velocity design. Vacuum raises the slides. If the needle is aftermarket, then move the clip to the desired position. Put everything back together. To make assembly easier, compress the spring into the hole in the cap, and then slip the slide assembly over where the spring is. Install the 3 parts together on the carb. Diaphragm should be concave down. Careful not to pinch the diaphragm when installing and tightening the cover.
Next, the float bowls need to come off. These screws are super tight from the factory. I recommend using a really good screwdriver or impact driver as to not strip the screws. Now once the bowls are off, the main jets are the ones that screw in with a flat bladed screwdriver and will have a number like 178, 180, 182, etc. These will need to be replaced with ones of a different size, optimised for correct mixture and max power at full throttle. They come in sizes that change by 2 or 3, as above, or if it is a Dynojet kit then they are multiples of 5. The front and rear have different sizes, BTW. Richer in the rear to help cool that cylinder.
And just to confuse matters please be aware that dynojet mains are on a different scale from standard Keihin or Factory pro. Factory pro uses the the same as Keihin which IMO makes them a little easier to get them tuned in. So a Dynojet 180 main jet will be a different size to a Factorypro/Keihin jet 180 size. And in case you don't know, the carbs on the VTR are Keihin CV carbs.
There is a pilot jet, also flat blade, that will have a number like 45, 48, or 50 on it. This should be removed, inspected, and replaced. Most will prefer the stock jet. The pilot jet mainly controls mixtures at idle up to 1/8 throttle and is the "coarse" adjustment for this range and tapers off towards wide open/full throttle.
There are tiny holes in the emulsion tubes that need to be clean. The front and rear emulsion tubes are different. Do not get them mixed up.
After all that is done, on the bottom of the carb you'll see the mixture/fuel screw. This is easier to set while the carbs are off the bike but not ideal for accuracy. You want to adjust these to your baseline setting depending on your setup. The more turns open the richer the mixture. The mixture screws are the "fine" adjustment for this range of carburetion.
Now it's time to put everything back together and test ride. The small vacuum line does NOT go to the bottom nipple on the petcock. It goes to one on the side/back of the petcock. Common mistake there. Also, if the petcock was shut, reopen it.
When you test ride, use the choke as a testing tool. If you pull the choke out a little bit in a particular throttle/rpm range and there is more power then you are running lean. If it bogs down a little or gets "soft" then you're running rich. This is a basic way to determine seat of the pants improvements. If the bike feels good all around then there's no need to use this method of testing.
Don't expect this to be the first time you tear the carbs down. By no means should you expect perfection on the first try. Each bike is slightly different and you may end up pulling the carbs a half dozen times or more.
A few links:
How to remove the carbs from the bike
viewtopic.php?f=9&t=25822&p=223894&hili ... al#p223894
How to Strip the carbs down down.
viewtopic.php?f=9&t=25177
And while the carbs are off you may as well adjust the Throttle Position Sensor (TPS)
http://www.vtr1000.org/phpBB3/viewtopic ... 31&t=29429
Once the carbs are cleaned, jetted and back on the bike they will need syncing.
viewtopic.php?f=31&t=18430
(:-})
Last edited by VTRDark on Mon Mar 31, 2014 8:59 pm, edited 3 times in total.
==============================Enter the Darkside
Re: Carb Tuning guide (setting up a Dynojet or Factory Pro k
WHICH JET KIT AND THE DIFFERENT APPROACHES
You think you did everything right. Bought the most expensive race exhaust. Paid extra for a jet kit. Followed all the install instructions that may come with the kit to the letter. If you were lucky, your bike just might actually perform better, except, of course, for that annoying off-idle stumble or the flat spot in the midrange. Why? Because all you have is a piece of paper that gives you recommended jetting/base settings for the bike. You also have to take into consideration any mods/alterations that you have made and the conditions that you ride in ie altitude, temperature and mechanical wear. Unless you are lucky, there will be some point in the rev range where you will be too rich or too lean. Every bike will be slightly different.
WHAT IS JETTING
Jetting is providing the engine with a combustible mixture. The ideal combustible mixture ratio is 14.1 parts of air to one part of fuel, with the most power being produced around 12-13:1. While a motor can (and will) operate on a mixture that is considerably richer or leaner, power output falls off and you may have better or worse fuel economy. The amount of fuel that goes into the combustion chamber will also have an effect on cooling. The VTR generally should have a slightly larger main jet/more fuel going into the rear cylinder to help cool it off. If you happen to go leaner and ride it hard, you may end up with an over-heated engine, or worse.
WHY SHOULD I HAVE TO RE-JET?
In a stock engine, the factory has spent a considerable amount of time and money trying various jets and needles to come up with jetting that not only passes any environmental restrictions but allows the bike to be operated at roughly factory rated output without overheating. When you, as an owner, change anything to do with the intake that would remove factory built-in restrictions to air flow into the engine or, exhaust changes that would do the same for air flow out of the engine, then you will need to re-jet. Why?
A carburettor is designed with fixed size main and pilot (slow) jets. The jet needle attached to the bottom of the slide is fixed at a certain height. Only the idle mixture/fuel screw is adjustable. If you have increased air flow as outlined above, the increased volume will still be mixed with the same amount of fuel as before, resulting in a lean mixture. If you replace the main jet with a larger numbered jet, the jet's internal hole will be larger, allowing a greater quantity of fuel at 3/4-full throttle. If you raise the position of the slide needle by lowering the needle clip, you are allowing more fuel to rise out of the needle jet at a given part throttle position which is generally 1/4-3/4 open. If you replace the low speed pilot (slow) jet with a larger numbered jet, the internal hole will be larger, thus flowing more fuel at very small openings of 1/16-1/4 throttle.
I STILL FEEL I CAN JET BETTER THAN THE FACTORY CAN
Even if you went for the extra expense of a jet kit, don't expect your jetting to be "spot on" unless you are willing to experiment and try different jets. Why? Say you install the main jet the jet kit recommends and it seems to run OK. Is it truly the best for your machine in your riding conditions? It may not be, unless you experiment by going up a jet size at a time until your machine has a stumble at full throttle, indicating a too rich mixture. Then by dropping back one size you can be confident that now you have the correct jet for your bike in your riding conditions. The same thing should also be done with the needle height and slow speed pilot (slow) jet. This can either be achieved with trial and error and seat of the pants tuning or take the bike to a dyno for a few dyno runs. Where you pay for each run on for the dyno and operator/technician to make carb/jetting changes accordingly.
HOW AFTERMARKET JET KITS DIFFER FROM STANDARD
The main difference is that they supply adjustable needles with different profiles which allow you to either richen or lean off the midrange. Some combine this with different diaphragm springs which allow the slides to either open sooner & quicker and/or require extra lift holes in the slide either added or taken away. You then get a selection of larger and smaller main jets. The main jets will either be the same design as the standard manufacturers jets or some may have a different internal profile and flow rate. You may also get different size pilots (slow) jets. Some kits require physical modifications to be made to the carburettor body by either drilling out the main air jets in the top of the carbs or capping them off. All manufactures have a different approach to how they feel they should go about improving things.
WHICH JET KIT?
DYNOJET
Stage 1 Kit
Contents (UK Kit)
Main Jets x2 each 170, 180, 190
x2 Adjustable Needles with 6 Clip positions
x2 Adjusting Washers
x2 E-Clips
x1 Slide Drill
(US Kits also contain)
Main Jets x2 each 175, 185, 195
x2 Slide Springs
The Dynojet approach is to drill an extra lift hole to open the slide sooner and quicker. As standard there are two. Dynojet require a third, IMO this is not what the VTR needs. In comparison the HRC jet kits come with one of the lift holes blocked. The extra lift hole causes the slides to open when it should be still on the pilot circuit and brings the mains on too soon making it over rich and causes it to have a flat boggy acceleration instead of being crisp and smooth. By adding the Dynojet springs that come with the US kit makes things even worse. So if fitting a Dynojet kit it is recommended not to follow their instructions and drill the extra lift holes or fit shorter Dynojet springs. By all means give it a try and if you find it don't work for you then you can always block the holes back up with some epoxy resin or swap the springs back. Dynojet supply adjustable needles with their own needle profile. This has six separate clip positions to go either lean or rich. Their recommended setting is to install the clips onto clip position 4 from the top.
Dynojet supply a selection of main jets, they recommend if using the stock exhaust, then install 170's, if aftermarket with removable baffles, then install the 180's. If you are living in a high altitude area this will also have an affect on carburetion as there is less air pressure. In this case Dynojet recommend to install the 170's. Note that Dynojet uses the same size main jets in both the front and rear carbs. They don't have you install a larger one for the rear to help with cooling. The Dynojet mains are a unique design in themselves and are different in design from either Keihin or Factory Pro. Dynojet have their own range of measurement that increase in steps of 5. They are measured by flow rate and I believe the holes are tapered so the flow is forced through giving it a venturi effect. This is supposed to help with the atomisation of fuel with the air by breaking the particles up smaller which in turn helps with combustion.
This is where things get tricky. Because Dynojet have their own scale of measurement (kept as a closely guarded secret as to what they really are) this can cause confusion when deciding on what size jets to use compared to Keihin.
You will find a conversion chart here http://www.vtr1000.org/phpBB3/viewtopic ... 74#p136388
Please be aware that this is not proven and there are few debatable discussions as to how accurate it is. There's a few websites that have this particular chart, then others with slightly different conversions. It can also confuse thing's so be careful.
Here's the site where it is from http://www.4strokes.com/tech/carbjetxover.asp
Dynijet do not supply pilot jets and there is no mention of them. They do say to set the fuel mixture screws to 2 turns out.
Dynojet fitting instructions as what comes with the kit can be found at the following. http://www.dynojet.com/jetkits/motorcycle/honda.aspx
FACTORY PRO
CRB-H77-1.1-TI
Contents
Main Jets x1 each 172, (175, 178 are stock for use) 180, 182, 185, 188
x2 Adjustable Titanium Needles with 5 Clip positions
x4 E-Clips
x2 50 Pilot Jets
x8 Replacement Allen Screws for Float Bowls
x1 D Shaped Fuel Screw Driver Wrench (for use on non EU models)
CRB-H77-1.7-RK
Contents
Main Jets x1 each 172, 180, 182, 185
x2 Adjustable Needles with 5 Clip positions
x4 E-Clips
x2 50 Pilot Jets
x8 Replacement Allen Screws for Float Bowls
x1 D Shaped Fuel Screw Driver Wrench (for use on non EU models)
x1 1.4 (front) Drill Bit (for enlarging stock main air jet)
x1 1.1 (rear) Drill Bit (for enlarging stock main air jet)
The Factory Pro approach is similar to stock with exception of having adjustable needles with their own needle profile. This has five separate clip positions to go either lean or rich. Other than changing the needles there are no other slide modifications required.
Factory Pro supply a selection of main jets. These are the same style jets as Keihin and use the same range of measurement in steps of 2 and 3 ie.172, 180, 182, 185 and so on. This should make it easier to work out the jetting and get the carbs dialled in correctly. It also gives you the option of purchasing alternative sizes of Keihin jets. These can be purchased very cheaply online. Factory Pro do recommend installing a slightly larger mains in the rear carb.
Factory pro supply larger (size 50) pilot jets, which I have found are slightly on the large size and only allowing between 1 - 1 ½ turns out on the fuel mixture screws. These are too large for a standard system or aftermarket end cans. I believe Factory Pro supply these to go with a full race exhaust system including downpipes, otherwise a 45 or 48 size pilot jets will be quite sufficient.
They recommend that the Throttle Position Sensor (TPS) which is mounted on the side of the rear carb should be set to 500 +/- 10 Ohms to attain low speed cruise smoothness. For more info on setting the TPS.
http://www.vtr1000.org/phpBB3/viewtopic ... or#p222504
The 1.7-RK kit also requires the main air jet on top of the carbs to be drilled out larger. The front carb being slightly larger than the rear. I'm not sure if this is to compensate for the differences in sizes between the main jets or for the different size velocity stacks inside the airbox.
There are no instructions supplied as such with the Factory pro kits though they do give a selection of user base settings. There is also a copy of the CV Carb Tuning Guide for High RPM Engines as above in the first post or on the Factory Pro website.
http://www.factorypro.com/tech/tech_tun ... gines.html
I have heard nothing but good things about Factory Pro's before and after sales customer service, advice and guidance. I think this speaks volumes in itself in this day and age. Though I must say their website is about 30 years out of date with regards to design and not the most easy to navigate.
For more info http://www.factorypro.com/prod_pages/prodh77.html
HRC
Contents
Main Jets x2 each 140, 143, 145, 148, 150, 153, 155, 158, 160, 163, 165, 168, 170
x2 Vacuum slides (with single lift hole)
x2 Pairs of Needles
(one "lean", one rich - the latter meant, apparently, for ram-air set-up)
x4 Needle Clips
x6 Washers
x2 48 Pilot Jets
x2 Main Air Jet blocks
The HRC set up is designed for Ram Air or running with no air filter (Race applications) where the turbulence in the Airbox can cause problems. The HRC Jet Kit does not come with any baseline installation instructions as such and your pretty much left on your own. It does take a different approach from other kits and has a Main Air Jet block off cap, different slides and two different sets of needles.
The Main Air Jet Block off cap is said to be intended for running without stock filter restrictions. The blocking of the Main Air Jet then requires smaller mains around 155 front and 158 rear. Another reason for running smaller Mains with the Air Jets blocked is that when they are open you get more air with the fuel being drawn from the Mains so if blocked you have less air therefore require smaller Mains.
The slides with the HRC Kit only have one lift hole in the front where as the standard slides have two. This will depend on your velocity stack configuration. The kit does not mention two long stacks, just the stock and two short. With the stock set up then run with a single lift hole in the front, which is the shorter of the two stacks and with two short stacks, you then run a single lift hole in both stacks.
The kit also comes with two different sets of needles, one set is slightly richer and is designed for the use with either no Air Filter or Ram air. The richer of the needles are very thin and have an early transition point, just a taper for most of the slide range. The leaner has a longer narrow portion so transition to midrange occurs earlier in the slide opening.
The needle selection can be set up for the following:
a) Full Race Air Filter
b) No Air Filter
c) Ram Air
Start with the lean needle unless you are running option b or c then the rich needle will be required. The needles also come with shims, one 0.5mm for the front and two 0.5mm shims for the rear, the rear running a little richer.
ALTERNATIVE
There is an an alternative set up for street use based on the HRC set up that does not require the purchase of an aftermarket jet kit. All that is required is some epoxy resin, possibly some 48 pilot jets and 0.5mm shims. This will allow you to richen the the standard needles but you can't go the other way and lean them off any more than they are as standard. As soon as you add bigger Mains than standard or an aftermarket Air Filter then you will require adjustable needles.
See the following for more info:
http://www.vtr1000.org/phpBB3/viewtopic ... 31&t=28922
(:-})
Last edited by VTRDark on Tue Jul 30, 2013 1:57 pm, edited 13 times in total.
==============================Enter the Darkside
Re: Carb Tuning guide (setting up a Dynojet or Factory Pro k
Great work carl make this a sticky so it stays at the top of the database
Also what about a thread on smoking while making jet changes
Also what about a thread on smoking while making jet changes
AMcQ
Re: Carb Tuning guide (setting up a Dynojet or Factory Pro k
It's in the knowledgebase I have just added on to Tony's Carb Tuning thread.
As for smoking, only smoke over liquid fuel and not the vapours and don't get ash in your carbs. Also don't smoke ciggies that have had carb cleaning spray spilt on them as it don't taste very nice and is probably not very good for you
I've been meaning to do something like this for a while and as Seb beat me to the carb strip down pics I thought this would compliment them nicely.
Just going through all my notes and bookmarks so I can try and explain to the best of my knowledge the reason for jetting and differences between them so people can make an informed decision and to the pros and cons, and what works and what don't with specifically with the VTR.
(:-})
==============================Enter the Darkside
Re: Carb Tuning guide (setting up a Dynojet or Factory Pro k
Fecking hell Carl, Do you not sleep, work, eat or have bodily functions!!! Top work fella good write up.
Carpe diem, quam minimum credula postero
F3, 954 USD front, K Tech springs, Braced swinger, Penske shock, Six spoke Mockesini wheels, Harris rearsets, QaT, Flywheel diet!, A&L stacks, stick coils, K&N, FP Ti jets, lashings of Ti & CF
F3, 954 USD front, K Tech springs, Braced swinger, Penske shock, Six spoke Mockesini wheels, Harris rearsets, QaT, Flywheel diet!, A&L stacks, stick coils, K&N, FP Ti jets, lashings of Ti & CF
Re: Carb Tuning guide (setting up a Dynojet or Factory Pro k
Excellent work, well done, Carl.
Need to have mine sorted now, I've messed with the airbox enough to upset the top end but it's much stronger lower down, so I'll have a think armed with this and start playing around with jets.
Need to have mine sorted now, I've messed with the airbox enough to upset the top end but it's much stronger lower down, so I'll have a think armed with this and start playing around with jets.
It's not falling off, it's an upgrade opportunity.
-
lloydie
- Posts: 20920
- Joined: Mon Jan 17, 2011 11:16 pm
- Location: In the garage somewhere in Coventry
Re: Carb Tuning guide (setting up a Dynojet or Factory Pro k
admin can you change this to a sticky pleasetony.mon wrote:Excellent work, well done, Carl.
Need to have mine sorted now, I've messed with the airbox enough to upset the top end but it's much stronger lower down, so I'll have a think armed with this and start playing around with jets.
as its very helpful and need to be kept at the top so it can be found easy
Re: Carb Tuning guide (setting up a Dynojet or Factory Pro k
Have you seen this http://www.vtr1000.org/phpBB3/viewtopic ... on#p238423 I don't know anyone that has used these kits so shall be interesting to see how griff gets on with that. I'm thinking of getting some drill bits and having a play with my spare carbs. Drill the main air jets. I'm wondering how this will affect things. I would think bigger mains will have to go in but this don't necessarily mean that fuel economy will be worse if the AF ratio is good. I just fancy experimenting and playing with carb tuningNeed to have mine sorted now, I've messed with the airbox enough to upset the top end but it's much stronger lower down, so I'll have a think armed with this and start playing around with jets.
If admin don't sort it, I think Tony can make it a sticky as the creator of this thread, by going into edit on the first post, then at the bottom I think there is an option to make sticky.admin can you change this to a sticky please
I have some more info for the Which Jet Kit post but it's incomplete. I will add what I have got so far and if anyone sees anything that may be incorrect or is worth adding to that or any other posts please let me know.
(:-})
==============================Enter the Darkside