Airbox modding

Need advice on which oil to use or which tyre best suits you? Share your topic and get help here.
Post Reply
tony.mon
Posts: 15966
Joined: Wed Jul 25, 2007 10:46 pm
Location: Norf Kent

Airbox modding

Post by tony.mon »

Too cold to ride now, and bored sitting indoors, garage too cold also so I'm getting on with a project I had planned for later in the year.

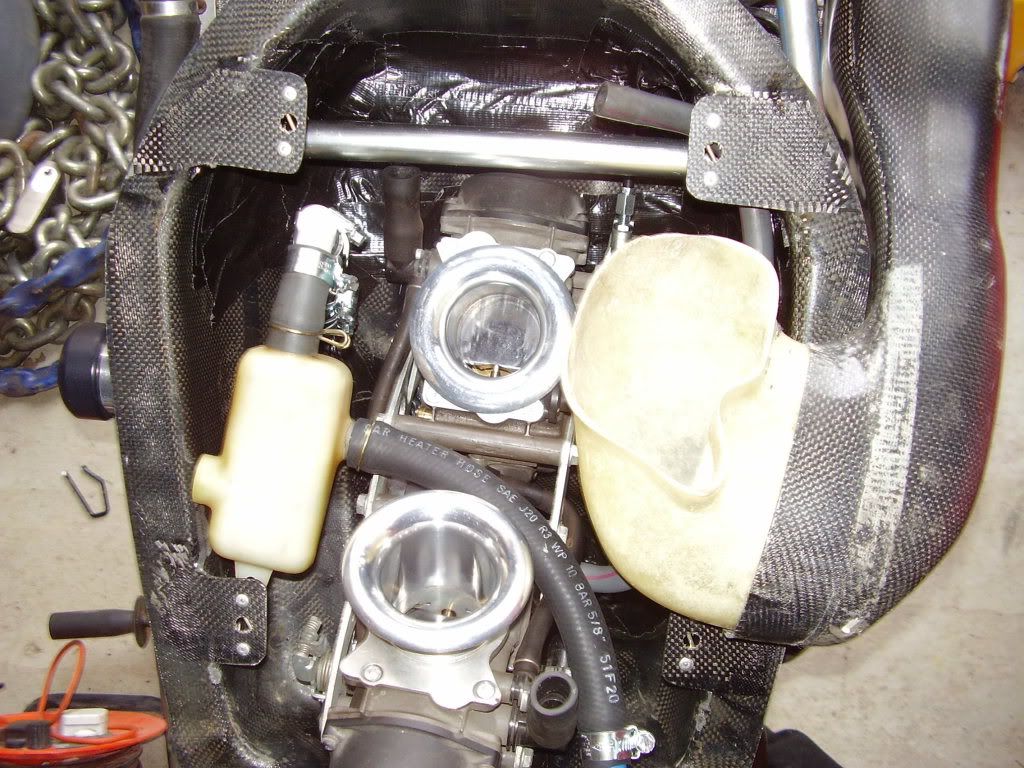
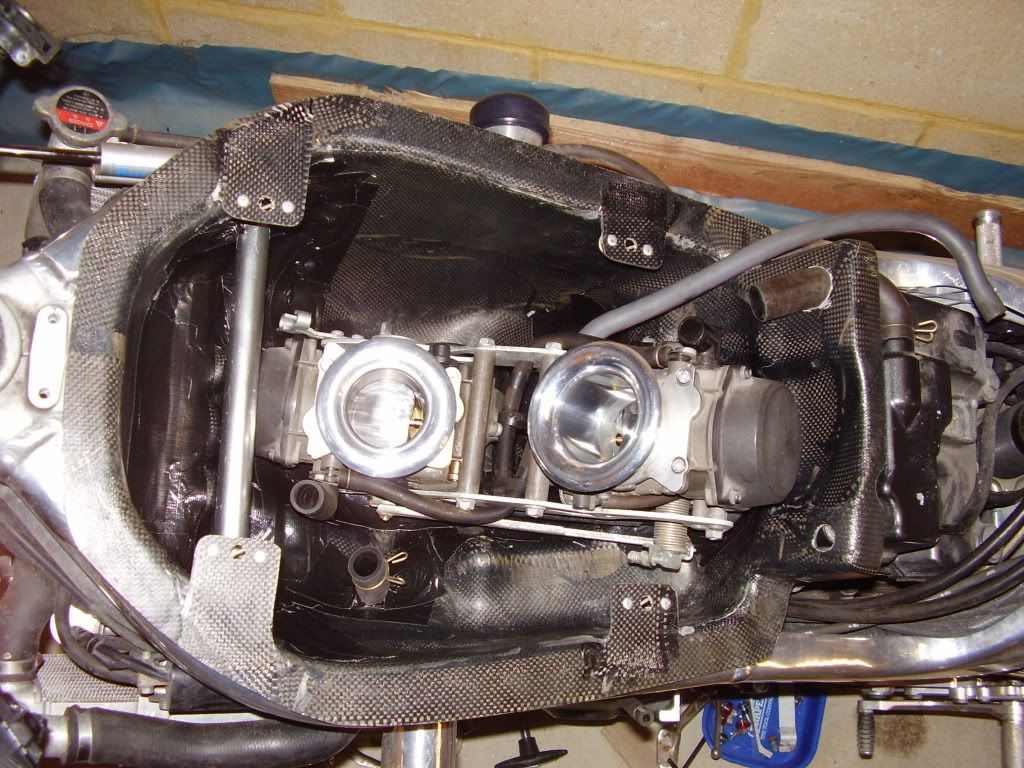
Here's an airbox I prepared earlier:
Image

I've chopped out the corner sections where the breathers go from the two cam covers; they'll be connected to individual breathers later.

I'll have a go at bodging something out of air filter foam and caps from deodorant containers, connected by some spare pipework from other engines.

The internal brace and mounting post for the pipework that lives in the airbox have been removed; won't need those any more.

And other internal bits of extraneous plastic have been chopped out.

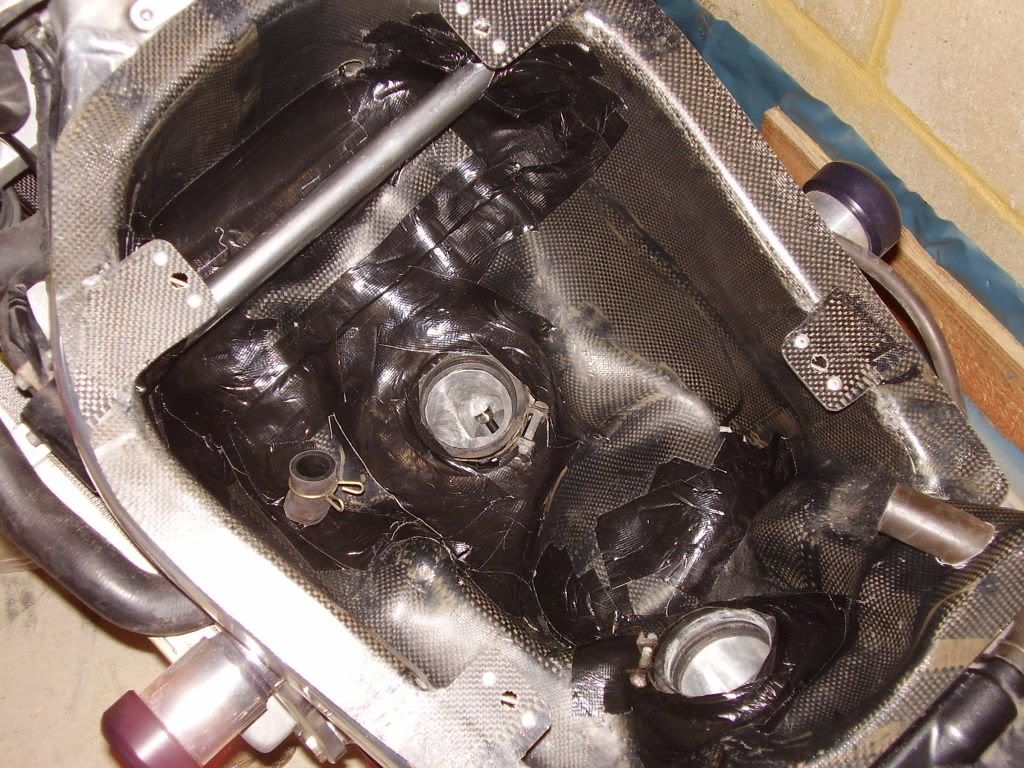
Next I'll blank off the holes; which will leave a cleaner airbox with more volume than before.

No idea if this will help. I think I'll let the dyno decide in the spring.

But it's something I can get on with indoors, at least. I'd like to get something connected to the little triangular inlets in the fairing, seems a shame to waste them; but I could do without the Moriwaki external sections if possible- cost and appearance reasons, mainly.
I was considering leaving the standard snorkel in place, but with an additional section so that the inlet faces forward instead of down. Maybe another snorkel added to the standard one?

The airbox inlet seems to me to be a little small; if you measure the cross-sectional area of the intake trumpets and the area of the snorkel the snorkel seems smaller.
I know that some people recommend removing the snorkel but that will produce a turbulent airflow, so I'd rather leave the snorkel in place but supplement the air feed into the airbox by additional flows from the triangular inlets- flexible pipes would do it; Hoover pipes, anyone?

Opinions?
Comments?
It's not falling off, it's an upgrade opportunity.
User avatar
chi kung
Posts: 188
Joined: Fri May 21, 2010 8:28 pm
Location: Bedford

Airbox modding

Post by chi kung »

I think you should use Hoover pipes. But what end will you have on it. Will it be the carpet brush or the upholstery nozzle or my favourite the little curtain nozzle that never gets used?
User avatar
benny hedges
Posts: 6110
Joined: Sun Oct 18, 2009 5:09 pm
Location: Warrington

Re: Airbox modding

Post by benny hedges »

it also sounds bloody awfull with the snorkel off tony.
no noticeable difference in performance on mine.
i settled for cutting out the divider for now but intend to cut my spare one down so ive just got the 2 mounts for the stacks, then cut down a spare pair of stacks & clip some bellmouth k&n filters direct to them.
You do not have to say anything. But it may harm your defence if you do not mention when posting something which you later rely on in quote. Anything you do say may be ripped to sh*t.
YETI
Posts: 496
Joined: Sat Mar 13, 2010 10:42 am
Location: SURREY

Re: Airbox modding

Post by YETI »

on one of mine the whole top of the airbox was cut off except for a ring of platic( using original fittings ) so that you could still keep the filter in place
and just replaced with K&N filter
if you want a piccie i can do :thumbup:
this was done by revolution racing ,and supposedly gives more bhp

dunno if anyone is interested but i do have a spare ram-air kit that i could be persuaded to part with
that is if its bhp your after ?
but if its for the road ?? maybe not , just wont work
regards
YETI..
Image
tony.mon
Posts: 15966
Joined: Wed Jul 25, 2007 10:46 pm
Location: Norf Kent

Re: Airbox modding

Post by tony.mon »

That ram-air kit sounds interesting; it's what I'm after with making something to duct air from the triangular holes in the fairing nose to the airbox. Any chance of some pics or drawings?

Obviously it'll only have an effect over seventy or so, so shouldn't affect torque at all, and unless I find someone with a powerful fan on their dyno I won't be able to prove that it has an effect, but good old seat-of-the-pants might tell me if it works.

I was joking about using hoover pipes, but some flexible ducting might work, and if so I could then try to use that as moulds for a c/fibre version, if it seems worth the effort and money.

One aspect is that I have had the bike set up before with the timing out 180 degrees, and it runs out of pull at around 5000rpm.
The reason for this, I believe, is that the airbox can'rt replenish quick enough between power pulses, as the two intake strokes are then 90 degrees from each other.
So at 5000 the airbox isn't filling quickly enough as standard to work at 5000, (and is having trouble filling sufficiently well below that) so at 10,000rpm it will need at least 180 degrees between intake strokes to work efficiently.

I think that the normal timing is set so that the strokes are 270 degrees apart, which is probably sufficient but still feels to me as though the airbox isn't filling quickly enough between intake pulses.

If this is correct, then increasing air into the box, by enlarging the intakes, increasing the volume or using a ram-air effect should solve the problem, hence my playing about.

Of course it may just be that the Honda engineers did all of the necessary calcs and got the sizes and intakes just right, so no gain is possible.
But as I've "enhanced" the engine performance in other ways, high comp pistons, cams, cans and filter, it may be the airbox is no longer quite able to cope.

We'll see!
It's not falling off, it's an upgrade opportunity.
User avatar
benny hedges
Posts: 6110
Joined: Sun Oct 18, 2009 5:09 pm
Location: Warrington

Re: Airbox modding

Post by benny hedges »

YETI wrote:on one of mine the whole top of the airbox was cut off except for a ring of platic( using original fittings ) so that you could still keep the filter in place
and just replaced with K&N filter
if you want a piccie i can do :thumbup:
this was done by revolution racing ,and supposedly gives more bhp

YETI..
i'd be interested what jets & needles he used... i spoke about this wih andy, next door to roger, who does all his dyno work & he said theyve done a lot like that, releases a lot of hp but requires in his words 'drastic mods to a stage 2 dyno kit' :think:
You do not have to say anything. But it may harm your defence if you do not mention when posting something which you later rely on in quote. Anything you do say may be ripped to sh*t.
YETI
Posts: 496
Joined: Sat Mar 13, 2010 10:42 am
Location: SURREY

Re: Airbox modding

Post by YETI »

i did fit the ram-air kit to my stage 1 , but i removed it before i had a chance to re-jet as i brought the stage 2 bike
but i did take a load of build photos which i will try and pop on here ( quite a few though ).
I had spoken to roger about re-jetting and he said he still had ample to do this :thumbup:so still viable
will have a go later with the photos
Image
tony.mon
Posts: 15966
Joined: Wed Jul 25, 2007 10:46 pm
Location: Norf Kent

Re: Airbox modding

Post by tony.mon »

job done.
I first cut out the corners, and the elbows where the breathers form the cylinder heads enter the box, along with the mounting post and support blade for the little opaque plastic collector box, and its pipes.
It ended like this:
Image

The front corner was like this:
Image
and after a patch was Araldited in looked like this:
Image

And the same for the rear corner:
Before-
Image
After-
Image

So I'll need to run two pipes from the heads into a tee piece then to a breather bottle, and see what I can do about the two short pipes that as far as I can tell are air breathers for the carbs. Those will probably be ok with a small piece of foam stuffed down the ends of the tube, with cross wires mounted into the tube to stop them being "inhaled", and a loosely fitting cap over the end to keep dirt and moisture out.

Once done I'll post the bodge, but it's too cold to be playing outside ATM.
And I'll have a look at the snorkel to see if any gains can be had.

Anyway, I want to get it installed and do back-to-back seat-of-the-pants comparisons on a dry day when I can open it up without fear of ending up on my butt!
I'll take a standard one and the modified one to the dyno when I eventually get the money together and we can see if there's any difference.
TBH I'm not expecting much difference without ram-air or something similar being involved.

(and yes, the white dribbly goo is 2-part Araldite, which I'll clean up before installing.
No, not with a tissue, you have a dirty mind).
It's not falling off, it's an upgrade opportunity.
User avatar
benny hedges
Posts: 6110
Joined: Sun Oct 18, 2009 5:09 pm
Location: Warrington

Re: Airbox modding

Post by benny hedges »

might be better placcy welding it with a soldering iron toe, as it's made of abs and welds real easy.
good luck with it bud.
all i did with the snorkel is cut the middle divider out but all i can say is it's not detrimental, but then mine was over-rich anyway...
shouldn't you be busy getting smashed??? :beer:
You do not have to say anything. But it may harm your defence if you do not mention when posting something which you later rely on in quote. Anything you do say may be ripped to sh*t.
YETI
Posts: 496
Joined: Sat Mar 13, 2010 10:42 am
Location: SURREY

Re: Airbox modding

Post by YETI »

HI
sorry for the delay getting back with piccies only have a computer at work ?? dont ask !!
so have been off for 2wks, no playing on line..
i hope these have come out ok.. this was as far as i got with the stage 1 conversion before i took it all off again ??

[*http://i1109.photobucket.com/albums/h42 ... 1294137194][http://i1109.photobucket.com/albums/h42 ... 1294137455*]
[http://i1109.photobucket.com/albums/h42 ... 1294137455*]
[http://i1109.photobucket.com/albums/h42 ... 1294137455*]
you can see in this last one how you have to get the tank modified
[*http://i1109.photobucket.com/albums/h42 ... 1294137859]
if you do fancy a set let me know
regards
YETI..
Image
User avatar
AMCQ46
Posts: 16557
Joined: Mon May 11, 2009 4:54 pm
Location: Worcestershire / Warwickshire border

Re: Airbox modding

Post by AMCQ46 »

YETI wrote:HI
sorry for the delay getting back with piccies only have a computer at work ?? dont ask !!
so have been off for 2wks, no playing on line..
i hope these have come out ok.. this was as far as i got with the stage 1 conversion before i took it all off again ??

Image
Image
Image
Image
you can see in this last one how you have to get the tank modified
Image
if you do fancy a set let me know
regards
YETI..
Fixed the images for you as I was keen to see the stage 1 :thumbup:
Last edited by AMCQ46 on Tue Jan 04, 2011 12:51 pm, edited 1 time in total.
AMcQ
User avatar
sirch345
Site Admin
Posts: 21740
Joined: Mon Aug 25, 2003 10:35 pm
Location: The West Country.

Re: Airbox modding

Post by sirch345 »

So that's how it's done, brilliant 8) 8)

Cheers for the photo's Yeti :thumbup: and AMcQ for bringing them alive :wink:

Interesting thread Tony :thumbup: Keep up the good work.

Chris.
YETI
Posts: 496
Joined: Sat Mar 13, 2010 10:42 am
Location: SURREY

Re: Airbox modding

Post by YETI »

WHAT DID I DO WRONG ???????????? :confused
im a real pleb ???
new years resolution
i must try harder to post better piccies
ps: thanks for fixing pics :thumbup:
YETI..
Image
User avatar
AMCQ46
Posts: 16557
Joined: Mon May 11, 2009 4:54 pm
Location: Worcestershire / Warwickshire border

Re: Airbox modding

Post by AMCQ46 »

YETI wrote:WHAT DID I DO WRONG ???????????? :confused
YETI..
Where you had

[*http://i1109.photobucket.com/albums/h42 ... 1294137194]

you should have pressed the "Img" button on the toolbar which gives you "[img].[/img] ", and you put your http link in between the ][ brackets.
like this
[img]insert%20your%20http%20link%20here[/img]

the http link should be in this format
http://i1109.photobucket.com/albums/h42 ... 1294137194, not sure where you got the [* from
AMcQ
YETI
Posts: 496
Joined: Sat Mar 13, 2010 10:42 am
Location: SURREY

Re: Airbox modding

Post by YETI »

THANK YOU :thumbup:
i shall write out 1000 times how to do it properly / not on here though!!
regards
YETI..
Image
Post Reply