No one appears to have noticed this in my previous post....
http://www.davidsilverspares.co.uk/part ... 084220201/
Also, am I to assume nobody knows the definitive answer as to why go through the idle drop procedure, only to end up at the same point in the end ( 1 turn out on front, 1.25 rear )
Pilot Screw Adjustment.
Re: Pilot Screw Adjustment.
" It was 2 minutes 5 minutes ago "
-
Pete.L
- Forum Health And Safety Officer
- Posts: 7226
- Joined: Fri Sep 26, 2003 5:09 pm
- Location: Bristol
Re: Pilot Screw Adjustment.
Maybe that just means your starting point was correct in the first placeleevtr wrote:No one appears to have noticed this in my previous post....
http://www.davidsilverspares.co.uk/part ... 084220201/
Also, am I to assume nobody knows the definitive answer as to why go through the idle drop procedure, only to end up at the same point in the end ( 1 turn out on front, 1.25 rear )
I've not been about regularly and have missed plenty of posts. What problem are you trying to cure?
A dynojet kit has very little affect on pilot screw settings on its own. It's more for if you change either the filter type, exhaust or both.
Pete.l
My new ride is a bit of a Howler and I love to make her Squeal
Re: Pilot Screw Adjustment.
Hard to understand the question unless you read the section in the workshop manual tbh. I don't have a problem, I'm just going back to factory setting after removing a jet kit. Wouldn't blame you for not bothering, but if you read page 5-18 of the manual, my question will make sense.......the proceedure however, seems pointless.Pete.L wrote:Maybe that just means your starting point was correct in the first placeleevtr wrote:No one appears to have noticed this in my previous post....
http://www.davidsilverspares.co.uk/part ... 084220201/
Also, am I to assume nobody knows the definitive answer as to why go through the idle drop procedure, only to end up at the same point in the end ( 1 turn out on front, 1.25 rear )
I've not been about regularly and have missed plenty of posts. What problem are you trying to cure?
A dynojet kit has very little affect on pilot screw settings on its own. It's more for if you change either the filter type, exhaust or both.
Pete.l
" It was 2 minutes 5 minutes ago "

Re: Pilot Screw Adjustment.
Oh yes we did. But that is not the Honda tool made specifically for this bike, hence my comment. That one on DS is a general purpose one like those sold on eBay. Have a look at the part number for the tool on Page 5-21 (not 5-18No one appears to have noticed this in my previous post....
This makes no sense. How would you end up at the same point considering every bike is different depending on pilot jet (mainly), needle height/profile and mains along with any other engine mods, wear and tear, climate conditions etc etc.Also, am I to assume nobody knows the definitive answer as to why go through the idle drop procedure, only to end up at the same point in the end ( 1 turn out on front, 1.25 rear )
If the fuel mixture adjustment is as follows (Front 1.5 - Rear 1.1/4 turns out) that would be the approximate mixture adjustment if running 50 pilots. If 48's then it would be approximately (Front 2.1/4 - Rear 2.5 turns out) and 45s (Front 3 - Rear 2.3/4 turns out). These are not precise but would be a good base setting to go from.
Note the pattern. The larger the pilot jet the leener (less required on) the fuel mixture adjustment. They both work together as a team. Think of the pilot jet as a course adjustment and the mixture fuel screw as a fine adjustment.
(:-})
==============================Enter the Darkside
-
Pete.L
- Forum Health And Safety Officer
- Posts: 7226
- Joined: Fri Sep 26, 2003 5:09 pm
- Location: Bristol
Re: Pilot Screw Adjustment.
Oh I see 
I don't have a workshop manual but I do still have my hard back Haynes book of lies and confusion for reference.
I can still remember the section you are on about and I would expect all the pilot screws to be set pretty much the same on all UK bikes from the factory. The machining tolerances are so good these days. So yes a pretty pointless exercise but obviously things would change as soon as you take altitude, climate or non standard components to be added.
Mine was set at what I call the 1 hour 20 minute setting on the front (from fully closed) or just over 1.25 turns out and the rear was at 1hour 40mins. I measured it and wrote it down before any messing Ahem! moding took place on the bike so as far as I'm aware that was my std base setting. Maybe a few others could add theirs and see if the theory holds true
Pete.l
My new ride is a bit of a Howler and I love to make her Squeal
Re: Pilot Screw Adjustment.
Page 5-21 shows a diagram of the cooling system ??cybercarl wrote:Oh yes we did. But that is not the Honda tool made specifically for this bike, hence my comment. That one on DS is a general purpose one like those sold on eBay. Have a look at the part number for the tool on Page 5-21 (not 5-18No one appears to have noticed this in my previous post....) in the honda manual. If you search for that in google you will find the tool costs IIRC into the £100's
I would rather pay less and get an inductive multimeter that does RPM on 2 cyl 90 degree engines (harder to find and usually the more expensive
)which has multiple uses and will get a lot more use.
This makes no sense. How would you end up at the same point considering every bike is different depending on pilot jet (mainly), needle height/profile and mains along with any other engine mods, wear and tear, climate conditions etc etc.Also, am I to assume nobody knows the definitive answer as to why go through the idle drop procedure, only to end up at the same point in the end ( 1 turn out on front, 1.25 rear )
If the fuel mixture adjustment is as follows (Front 1.5 - Rear 1.1/4 turns out) that would be the approximate mixture adjustment if running 50 pilots. If 48's then it would be approximately (Front 2.1/4 - Rear 2.5 turns out) and 45s (Front 3 - Rear 2.3/4 turns out). These are not precise but would be a good base setting to go from.
Note the pattern. The larger the pilot jet the leener (less required on) the fuel mixture adjustment. They both work together as a team. Think of the pilot jet as a course adjustment and the mixture fuel screw as a fine adjustment.
(:-})
" It was 2 minutes 5 minutes ago "
Re: Pilot Screw Adjustment.
Theres a link in the workshop knowledgebase to the manual matePete.L wrote:Oh I see
I don't have a workshop manual but I do still have my hard back Haynes book of lies and confusion for reference.
I can still remember the section you are on about and I would expect all the pilot screws to be set pretty much the same on all UK bikes from the factory. The machining tolerances are so good these days. So yes a pretty pointless exercise but obviously things would change as soon as you take altitude, climate or non standard components to be added.
Mine was set at what I call the 1 hour 20 minute setting on the front (from fully closed) or just over 1.25 turns out and the rear was at 1hour 40mins. I measured it and wrote it down before any messing Ahem! moding took place on the bike so as far as I'm aware that was my std base setting. Maybe a few others could add theirs and see if the theory holds true
Pete.l
Thats where I got mine from.
" It was 2 minutes 5 minutes ago "
Re: Pilot Screw Adjustment.
I have not had my carbs apart yet to check the jet sizes but mine were set to: front 2 1/4 out rear 2 1/2 out
Re: Pilot Screw Adjustment.
I inspected & cleaned up a set of carbs a week or so ago. They were unmolested & the mixture screws were set about one turn out, which is fairly close to what the manual says they should be.
F**k knows whats correct now
Copied & pasted from page 5-18 of the workshop manual;
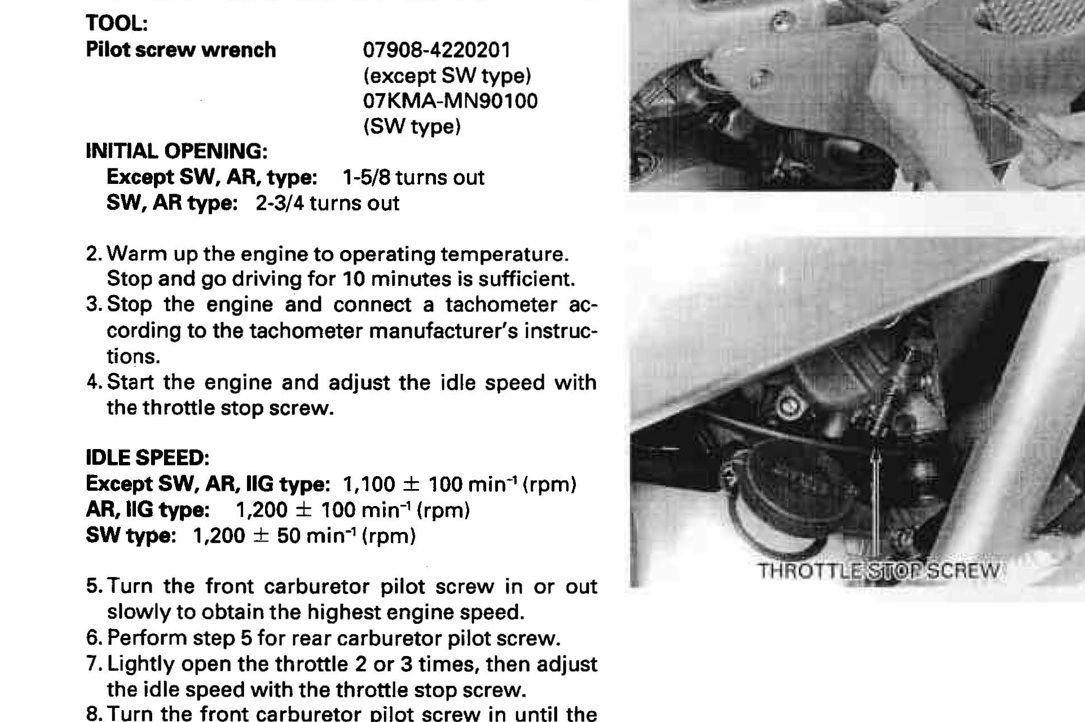
TOOL:
Pilot screw wrench
INITIAL OPENING:
07908-4220201
(except SW type)
07KMA-MN90100
(SWtype)
Except SW, AR, type: 1-5/8 turns out
SW, AR type: 2-3/4 turns out
2. Warm up the engine to operating temperature.
Stop and go driving for 10 minutes is sufficient.
3. Stop the engine and connect a tachometer according
to the tachometer manufacturer's instructions.
4. Start the engine and adjust the idle speed with
the throttle stop screw.
IDLE SPEED:
Except SW, AR, IIG type: 1,100 ± 100 min-1 (rpm)
AR, IIG type: 1,200 ± 100 min-1 (rpm)
SWtype: 1,200 ± 50 min-1 (rpm)
5. Turn the front carburetor pilot screw in or out
slowly to obtain the highest engine speed.
6. Perform step 5 for rear carburetor pilot screw.
7. Lightly open the throttle 2 or 3 times, then adjust
the idle speed with the throttle stop screw.
8. Turn the front carburetor pilot screw in until the
engine speed drops by 50 min-1 (rpm) .
9. Turn the front carburetor pilot screw out to the
final opening from the position obtained in step 8.
FINAL OPENING:
Front: 1 turn out
Rear: 1-1/4 turns out
10.Adjust the idle speed with the throttle stop screw.
11. Perform steps 8, 9 and 10 for the rear carburetor
pilot screw.
Ahhh.....Have I miss interpreted this. I think I have, fcuking Richard. Do all the idle drop malarky, then FROM THAT POINT, turn out 1 on front & 1.25 rear.
I am officially a plum !!
F**k knows whats correct now
Copied & pasted from page 5-18 of the workshop manual;
TOOL:
Pilot screw wrench
INITIAL OPENING:
07908-4220201
(except SW type)
07KMA-MN90100
(SWtype)
Except SW, AR, type: 1-5/8 turns out
SW, AR type: 2-3/4 turns out
2. Warm up the engine to operating temperature.
Stop and go driving for 10 minutes is sufficient.
3. Stop the engine and connect a tachometer according
to the tachometer manufacturer's instructions.
4. Start the engine and adjust the idle speed with
the throttle stop screw.
IDLE SPEED:
Except SW, AR, IIG type: 1,100 ± 100 min-1 (rpm)
AR, IIG type: 1,200 ± 100 min-1 (rpm)
SWtype: 1,200 ± 50 min-1 (rpm)
5. Turn the front carburetor pilot screw in or out
slowly to obtain the highest engine speed.
6. Perform step 5 for rear carburetor pilot screw.
7. Lightly open the throttle 2 or 3 times, then adjust
the idle speed with the throttle stop screw.
8. Turn the front carburetor pilot screw in until the
engine speed drops by 50 min-1 (rpm) .
9. Turn the front carburetor pilot screw out to the
final opening from the position obtained in step 8.
FINAL OPENING:
Front: 1 turn out
Rear: 1-1/4 turns out
10.Adjust the idle speed with the throttle stop screw.
11. Perform steps 8, 9 and 10 for the rear carburetor
pilot screw.
Ahhh.....Have I miss interpreted this. I think I have, fcuking Richard. Do all the idle drop malarky, then FROM THAT POINT, turn out 1 on front & 1.25 rear.
I am officially a plum !!
" It was 2 minutes 5 minutes ago "
-
lloydie

- Posts: 20923
- Joined: Mon Jan 17, 2011 11:16 pm
- Location: In the garage somewhere in Coventry
Re: Pilot Screw Adjustment.
Yours is a later model and should have 48s as standarddarkember wrote:I have not had my carbs apart yet to check the jet sizes but mine were set to: front 2 1/4 out rear 2 1/2 out
Re: Pilot Screw Adjustment.
Argh I see it's page 5-18 in wicky's OCR's version of the manual but in the Original one I got it's page 5-21. Interestingly they are slightly different. The procedure is the same but the tool numbers are slightly different and mine says USA only.
My version
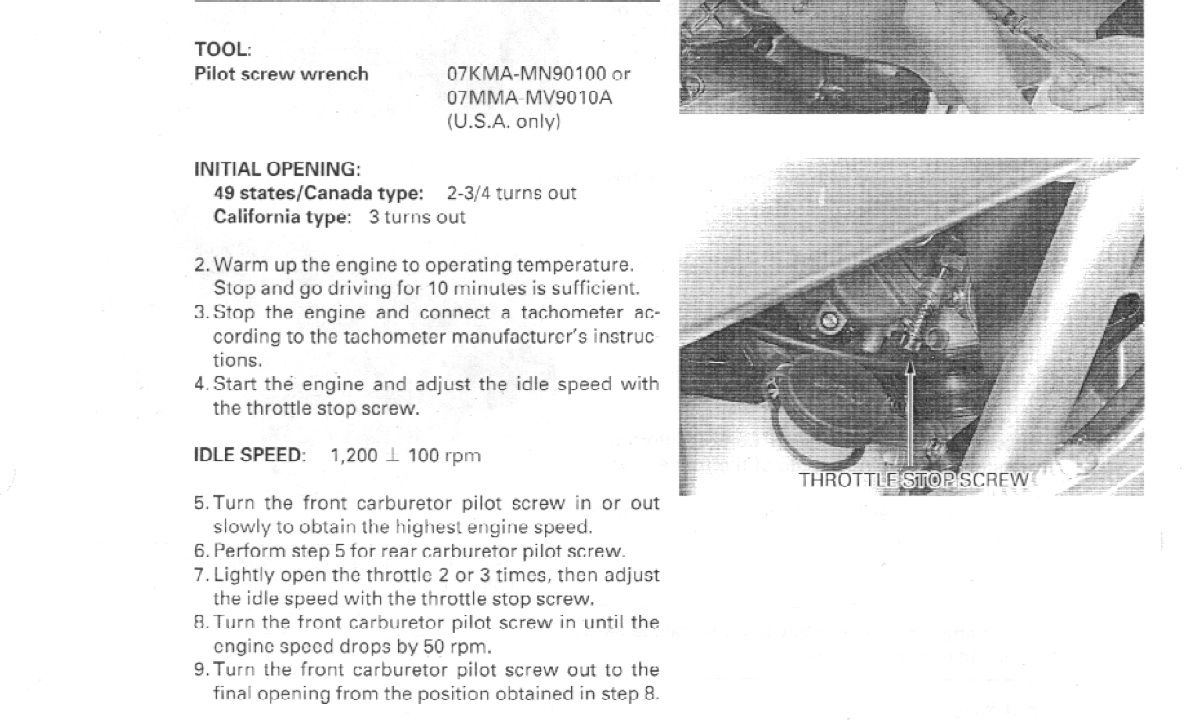
and wicky's OCR'd version
It just regionally different manuals I think but all the procedures are pretty much the same. It juts goes to show that quoting manual page numbers can be misleading.
(:-})
My version
and wicky's OCR'd version
It just regionally different manuals I think but all the procedures are pretty much the same. It juts goes to show that quoting manual page numbers can be misleading.
Now that gave me a good laugh.Ahhh.....Have I miss interpreted this. I think I have, fcuking Richard. Do all the idle drop malarky, then FROM THAT POINT, turn out 1 on front & 1.25 rear.
I am officially a plum !!
(:-})
==============================Enter the Darkside
-
Veturinkuljettaja
- Posts: 42
- Joined: Fri Nov 25, 2011 7:59 pm
- Location: Turku, Finland
Re: Pilot Screw Adjustment.
Cybercarl, is it the Superhawk workshop manual you are using? In the USA, the Superhawk's carbs have "tamperproof" D-shaped mixture screws, if I'm not mistaken? That's why there is a different tool needed...cybercarl wrote:Argh I see it's page 5-18 in wicky's OCR's version of the manual but in the Original one I got it's page 5-21. Interestingly they are slightly different. The procedure is the same but the tool numbers are slightly different and mine says USA only.
My version
and wicky's OCR'd version
It just regionally different manuals I think but all the procedures are pretty much the same. It juts goes to show that quoting manual page numbers can be misleading.
Now that gave me a good laugh.Ahhh.....Have I miss interpreted this. I think I have, fcuking Richard. Do all the idle drop malarky, then FROM THAT POINT, turn out 1 on front & 1.25 rear.
I am officially a plum !!
(:-})
'99 Firestorm a.k.a.VETURI
Pearl Lively Orange
"Self-Rogered" forks with Racetech linear springs, Yoshimura RS3 SS, DJ Kit, Krieger CCT, SHINDENGEN FH020AA R/R, MRA Racing windcreen, Tapered steering head bearings, gl_s_r brass nuts
Pearl Lively Orange
"Self-Rogered" forks with Racetech linear springs, Yoshimura RS3 SS, DJ Kit, Krieger CCT, SHINDENGEN FH020AA R/R, MRA Racing windcreen, Tapered steering head bearings, gl_s_r brass nuts
Re: Pilot Screw Adjustment.
I'm well aware of that and no your not mistaken. But you made me have a look at the front cover and yes it was a Superhawk one I was looking atSuperhawk's carbs have "tamperproof" D-shaped mixture screws, if I'm not mistaken?
But to show the craziness of Japanese manuals (their not the best layout) check the fuel screw out in the following pic from the same manual.
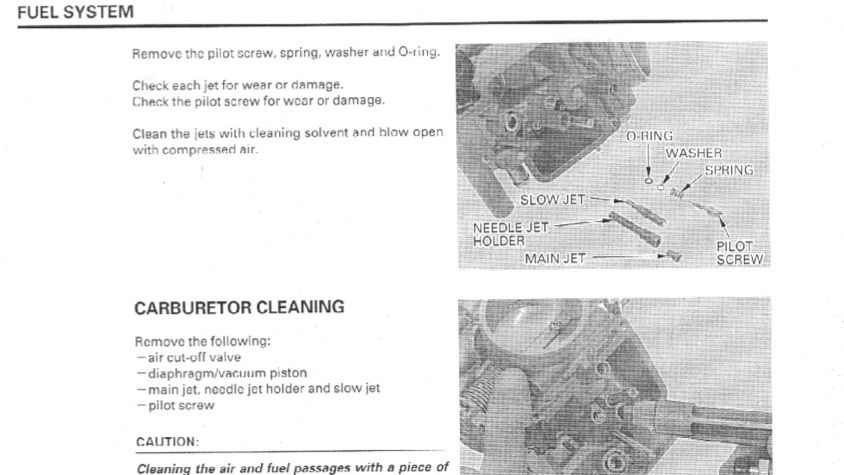
Go figure
(:-})
==============================Enter the Darkside
-
macca__macca
- Posts: 56
- Joined: Mon Mar 31, 2014 4:21 am
Re: Pilot Screw Adjustment.
Am i right in understanding that step 7 is saying to turn the idle speed screw to reduce the idle speed down to 1200rpm after raising it to the peak value in step 5, and likewise instep 10? Also since i have a DynoJet kit i assume I'll assume the final opening values for me will be the 2.5 turns as specified in the DynoJet install guidelines?
Re: Pilot Screw Adjustment.
I would prosume it would be the same procedure, the pilot circuit is the same, just needles and mains are different
and maybe an extra hole drilled in the carb slides !
Of my experience with Dynojet/K&N set up was a lot more trial and error with the adjustable needles,
There were quite a few posts about this topic. I have temporary gone back to stock (for now)
and maybe an extra hole drilled in the carb slides !
Of my experience with Dynojet/K&N set up was a lot more trial and error with the adjustable needles,
There were quite a few posts about this topic. I have temporary gone back to stock (for now)