Airbox modding

Re: Airbox modding
interestingly tho if you have a look at 1098 and 1198 airboxes they have a tiny area of space after the filter and a much larger pre filter area in there box design in know they are ram air fed but still the area of filtered air on tap looks smaller than the storms and these are 1.2 ltr twins
ヨシムラ
MOT - 10/04/2015
TAX - 30/11/14
INSURANCE - MCE - Expires 12/04/2015 (Midnight)
ACCIDENT CALL - 0871 2227910
RAC - 0800 1977830 - 03_MCECAB90013033
MOT - 10/04/2015
TAX - 30/11/14
INSURANCE - MCE - Expires 12/04/2015 (Midnight)
ACCIDENT CALL - 0871 2227910
RAC - 0800 1977830 - 03_MCECAB90013033
Re: Airbox modding
Don't forget there will be affects at the exhaust end of things too. I am not a fluid dynamics engineer, but having both cylinders firing so close to one another could possibly improve or worsen scavenging and cylinder filling..... interesting......lloydie wrote:Tony do you think more power could be had from running it 180 out with a twin air box or no air box
Might be something to try when I get board one day :-)
99 VTR1000F Firestorm, a.k.a. The Carbon Express
Re: Airbox modding
Maybe not more, but possibly better traction.lloydie wrote:Tony do you think more power could be had from running it 180 out with a twin air box or no air box
Might be something to try when I get board one day :-)
I think more may be an outcome though, if each airbox is large enough- you'd need more than half the size of the original.
But perhaps half of an enlarged one might be enough?
You'd need separate intakes, of course, they need to be completely separated.
Sounds good, though, 180 out.
It's not falling off, it's an upgrade opportunity.
-
lloydie

- Posts: 20928
- Joined: Mon Jan 17, 2011 11:16 pm
- Location: In the garage somewhere in Coventry
Re: Airbox modding
They do I remember agent p's and it sounded great .
Re: Airbox modding
Is there any reason why Ducati have gone the opposite way with their boxes making the filtered area small and pre filtered massive inside there boxes though on the 1098 and 1198
i was always under the train of thought that you need large filtered area so its on tap but i guess if you have a larger filter area and higher flowing type of filter medium then this is not a concern and the filtered area becomes less of a concern with the main interest being getting as much air as possible forced into the box above the filter so this can be sucked down though it
i was always under the train of thought that you need large filtered area so its on tap but i guess if you have a larger filter area and higher flowing type of filter medium then this is not a concern and the filtered area becomes less of a concern with the main interest being getting as much air as possible forced into the box above the filter so this can be sucked down though it
ヨシムラ
MOT - 10/04/2015
TAX - 30/11/14
INSURANCE - MCE - Expires 12/04/2015 (Midnight)
ACCIDENT CALL - 0871 2227910
RAC - 0800 1977830 - 03_MCECAB90013033
MOT - 10/04/2015
TAX - 30/11/14
INSURANCE - MCE - Expires 12/04/2015 (Midnight)
ACCIDENT CALL - 0871 2227910
RAC - 0800 1977830 - 03_MCECAB90013033
Re: Airbox modding
I've been having a little play....
For ages I've been messing around making a glassfibre airbox, with the intention of sealing it to the underside of the tank.
Not my idea, obviously , but seems worth a copy.
So I obtained a knackered tank, chopped the base off so that I could figure out what touched where. It's a bloody nightmare! No straight edges, all curves and angles, so I got bored and left it for a while. I also started thinking about ram air, using the larger of the triangular holes in the frame near the headstock. Got some spare fairing panels to chop up and play around with, but haven't really come up with a plan that I like to get the air to flow freely from the triangular holes near the headlight into the triangular gaps in the frame- yet.
But I thought I'd get on with the project a bit today.
Firstly I need to seal the area behind the headstock- it's open to atmosphere under the tank, also the heatshield below is full of holes.
So I picked up some aluminium plate and started metal bashing.
First the top section:


That'll seal nicely with some 2 and 4mm thick neoprene tape I bought; all I need to do is work out how the seal the rear edge; shouldn't be difficult.
The lower section is a bit trickier- I still need to isolate the incoming air from the main airbox section, and was considering using a flat filter just in front of the bracing bar across the frame- but that wouldn't leave much of a pre filtered area, and I wanted to maximise both sides of the filter. You can't put it behind the bracing bar, the front carb almost touches it.
So I bashed a bit more metal:


And from the side, looking in through the triangular gap in the frame:

I'll use a small single button head screw in the tongue that pokes in behind the headstock to secure it.
Now that means that the air will flow in, up, and over the dam that I've created- much like the path through the snorkel; in fact I could still fit the snorkel.
Which set me off thinking.....
Instead of sealing the new tub up to and against the underside of the tank, why not use the airbox, but with the base cut off?
That way, the air still flows in as usual, via the front of the lid, down through the filter, and into the airbox. But the GRP airbox I've built now extends down UNDER the carbs, not above them.
Good points with this are that I can now fit the GLSR stacks directly to the carbs, and there won't be a gap in the carb throat, and I can then (because I'll know where they stop rotating after they're seated) fit the Flo-Commander I bought before Christmas. I couldn't fit it before now, as I don't know where to file a cutout in the outer lip of the front stack for the F-C pipe to feed in. It'll all make sense when I'm done and post it up with pictures.
Haven't finished glass-fibring yet, but it's coming along:

(but God it looks ugly- good job it's all hidden away from view however you get the idea:

Once finished and sealed I'll cut off the airbox leaving only the top two centimetres, which will seal against the fibreglass, held by a few small screws, and allow the airbox lid and filter to fit as normal.
But before fitting I want to dyno as she is now, and again once the new airbox is in place, so it won't be fitted by the Workshop day on Saturday next.
Two factors to play with still:
1. I need to seal the two fuel pipes and the two throttle cables into the airbox- glands should do it- and
2. Some sort of pipework linking the fairing feeds to the holes in the frame.
For ages I've been messing around making a glassfibre airbox, with the intention of sealing it to the underside of the tank.
Not my idea, obviously
So I obtained a knackered tank, chopped the base off so that I could figure out what touched where. It's a bloody nightmare! No straight edges, all curves and angles, so I got bored and left it for a while. I also started thinking about ram air, using the larger of the triangular holes in the frame near the headstock. Got some spare fairing panels to chop up and play around with, but haven't really come up with a plan that I like to get the air to flow freely from the triangular holes near the headlight into the triangular gaps in the frame- yet.
But I thought I'd get on with the project a bit today.
Firstly I need to seal the area behind the headstock- it's open to atmosphere under the tank, also the heatshield below is full of holes.
So I picked up some aluminium plate and started metal bashing.
First the top section:


That'll seal nicely with some 2 and 4mm thick neoprene tape I bought; all I need to do is work out how the seal the rear edge; shouldn't be difficult.
The lower section is a bit trickier- I still need to isolate the incoming air from the main airbox section, and was considering using a flat filter just in front of the bracing bar across the frame- but that wouldn't leave much of a pre filtered area, and I wanted to maximise both sides of the filter. You can't put it behind the bracing bar, the front carb almost touches it.
So I bashed a bit more metal:


And from the side, looking in through the triangular gap in the frame:

I'll use a small single button head screw in the tongue that pokes in behind the headstock to secure it.
Now that means that the air will flow in, up, and over the dam that I've created- much like the path through the snorkel; in fact I could still fit the snorkel.
Which set me off thinking.....
Instead of sealing the new tub up to and against the underside of the tank, why not use the airbox, but with the base cut off?
That way, the air still flows in as usual, via the front of the lid, down through the filter, and into the airbox. But the GRP airbox I've built now extends down UNDER the carbs, not above them.
Good points with this are that I can now fit the GLSR stacks directly to the carbs, and there won't be a gap in the carb throat, and I can then (because I'll know where they stop rotating after they're seated) fit the Flo-Commander I bought before Christmas. I couldn't fit it before now, as I don't know where to file a cutout in the outer lip of the front stack for the F-C pipe to feed in. It'll all make sense when I'm done and post it up with pictures.
Haven't finished glass-fibring yet, but it's coming along:

(but God it looks ugly- good job it's all hidden away from view

Once finished and sealed I'll cut off the airbox leaving only the top two centimetres, which will seal against the fibreglass, held by a few small screws, and allow the airbox lid and filter to fit as normal.
But before fitting I want to dyno as she is now, and again once the new airbox is in place, so it won't be fitted by the Workshop day on Saturday next.
Two factors to play with still:
1. I need to seal the two fuel pipes and the two throttle cables into the airbox- glands should do it- and
2. Some sort of pipework linking the fairing feeds to the holes in the frame.
It's not falling off, it's an upgrade opportunity.
Re: Airbox modding
Getting there:


It's not pretty....
Got some of the glands on to allow pipes such as fuel and throttle cables in, and seal them up properly.
Just the choke and access bung for the Flo-Commander to go, then ready to rebuild.
I can't get to the clamps top and bottom of the inlet rubbers any more, so I'll fit a cable tie position to the base of the box inside and will cable tie the carb frame down. That will stop the carbs popping off thero rubbers if it backfires.
Did the baseline dyno run today, so if it's ready I'll stick it on my bike this weekend and see how it runs.
It's not falling off, it's an upgrade opportunity.
-
lloydie
- Posts: 20928
- Joined: Mon Jan 17, 2011 11:16 pm
- Location: In the garage somewhere in Coventry
Re: Airbox modding
There's a lot of sharp edges there tony that will mess up the air flow !!
Re: Airbox modding
I'll clean it up a bit if it works.lloydie wrote:There's a lot of sharp edges there tony that will mess up the air flow !!
Sebimoto do a GF airbox that looks as though it will seal up to the tank for £75 posted, but \i wanted to see if I could make one from scratch. They also do a carbon one, but it's a bit more.....
Just making it more difficult for myself, I suppose....
It's not falling off, it's an upgrade opportunity.
-
lloydie
- Posts: 20928
- Joined: Mon Jan 17, 2011 11:16 pm
- Location: In the garage somewhere in Coventry
Re: Airbox modding
Where would the fun be in buying one ?
I do respect what you are doing and like your progress your making .
I was thinking about it last night ! What if you lipped the top edge inwards and ran a thin rubber seal around it and had a flat lid that housed the k&n filter element .itll be much neater but the standard lid couldn't be used ,
Well that's if you plan on a lid but then again reading back you'd need to for ram air . I'm talking crap again sorry :ball kick:
Re: Airbox modding
It's started- I pulled to old, but larger than normal airbox off, and started getting the new huge one on.
I made some sealing plates to go under the carb rubbers

These are necessary as the holes in the airbox base have to be bigger to go over the inlet stubs. I could clean them up and file nice neat edges, but you can't see them when fitted.
Once that's done, the front pre-chamber plate goes on:

This isn't needed right now, but will be when I add the ram air.
As the airbox seals up to the front surface of the plate I wanted to get it in place from the start.
For now I am still using the standard airbox lid and snorkel, but I will try the Mik mod of grafting a filter plate into the lid at some stage.
Then the airbox itself- although i had the box fitted to a rolling chassis I have, complete with a dummy (empty) engine cases and head, I had guesstimated the positions of coolant hoses.
Those were fine, what i'd forgotten about were the two vacuum lines, so another little cut'n'shut to the sealing plates, and we get this:

That's as far as I've got for now, more activity during the week and hopefully all done by next weekend.
It's not falling off, it's an upgrade opportunity.
-
lloydie
- Posts: 20928
- Joined: Mon Jan 17, 2011 11:16 pm
- Location: In the garage somewhere in Coventry
Re: Airbox modding
Looks a lot better tony 
Re: Airbox modding
To jump back to a old post......tony.mon wrote:If you're careful the standard catch tank can be re-sited inside the hollow of the frame casting, along the LH side of the rear head.
You can't see it then, and a little breather canister fits neatly on top and sits under the tank cutout.
Like this:
And the pipes leading to it can be hidden behind the frame that way, and are only visible with the tank off.


Tony, how has this worked out? Its something Im interested in doing. But I have also heard the having some vacuum in the crankcase is of benefit.

Re: Airbox modding
http://japan.webike.net/products/9358886.htmlBut I have also heard the having some vacuum in the crankcase is of benefit.
http://www.battle.co.jp/meker/nag/vtr1000f_01.jpg
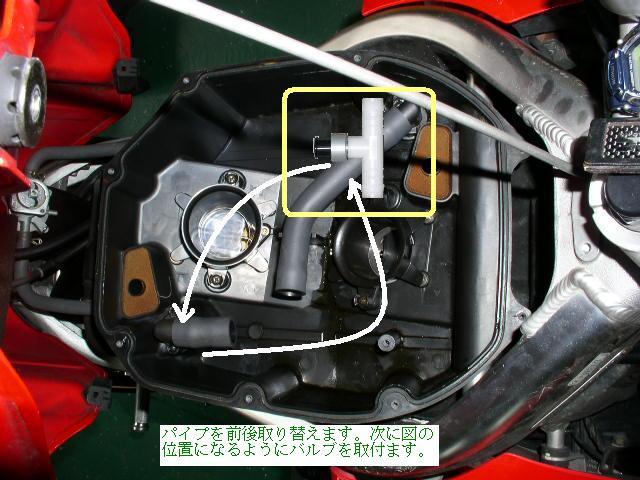
http://www.speedzilla.com/forums/honda- ... r-mod.html
(:-})
==============================Enter the Darkside
Re: Airbox modding
Thanks Man. Ive seen all those before.cybercarl wrote:http://japan.webike.net/products/9358886.htmlBut I have also heard the having some vacuum in the crankcase is of benefit.
http://www.battle.co.jp/meker/nag/vtr1000f_01.jpg
http://www.speedzilla.com/forums/honda- ... r-mod.html
(:-})
This guy seems to debunk the PCV system with multiple dyno runs, just found it. So that answers that. I will look to replicate Tony's system if it has worked for him long term.
http://www.nightrider.com/biketech/crankvent_test.htm