Airbox, CCT Stopper and Valve clearances

Need advice on which oil to use or which tyre best suits you? Share your topic and get help here.
User avatar
VTRDark
Posts: 20010
Joined: Sun Mar 18, 2012 9:24 pm

Re: How Do I Remove the Airbox Lid

Post by VTRDark »

Yes mate, theoretically it should be TDC on the compression stroke but it's not always precision as one does not get a clear view peeping down the intake and/or exhaust port. It a bit like sticking a screwdriver or something down the plug hole to find TDC and listening for the sound of compression. It will get you close but not spot on. It's all to do with timing/positioning of the piston and valves in relation to ignition timing when the plug fires at 15 degrees BTDC. When you think one can get a 2 or 4 degree ignition advancer small increments makes a difference.

TBH you have really answered your own question in the following as well:
I will remove the front cylinder valve cover to make doubly sure the crank and cams are in the correct position before removing the CCT.
it's no good having the crank spot on the mark at TDC if the valves/cam sprocket marks don't correlate to that, though it's quite common for the markings to be slightly off (no more than half a tooth I would say) and is nothing to worry about due to a little parts, mainly cam chain wear/stretch.

(:-})
==============================Enter the Darkside
User avatar
thunderbolt
Posts: 302
Joined: Wed Apr 02, 2014 9:12 am
Location: Sydney, Australia

Re: How Do I Remove the Airbox Lid

Post by thunderbolt »

cybercarl wrote:Yes mate, theoretically it should be TDC on the compression stroke but it's not always precision as one does not get a clear view peeping down the intake and/or exhaust port. It a bit like sticking a screwdriver or something down the plug hole to find TDC and listening for the sound of compression. It will get you close but not spot on. It's all to do with timing/positioning of the piston and valves in relation to ignition timing when the plug fires at 15 degrees BTDC. When you think one can get a 2 or 4 degree ignition advancer small increments makes a difference.

TBH you have really answered your own question in the following as well:
I will remove the front cylinder valve cover to make doubly sure the crank and cams are in the correct position before removing the CCT.
it's no good having the crank spot on the mark at TDC if the valves/cam sprocket marks don't correlate to that, though it's quite common for the markings to be slightly off (no more than half a tooth I would say) and is nothing to worry about due to a little parts, mainly cam chain wear/stretch.

(:-})
Thanks Carl, good explanation. I get it now - it's more important to have the two camshaft sprocket timing marks lined up than the crankshaft timing mark. That will make sure the cam chain has the correct amount of slackness to be able to remove the CCT.

Thanks again.
Cheers
Don
____________________________________________

Bikes:
1977 Suzuki GS550/700 - modified significantly
1981 Moto Guzzi 850 T4
1990 Suzuki VX800
2003 Honda Firestorm VTR1000
User avatar
VTRDark
Posts: 20010
Joined: Sun Mar 18, 2012 9:24 pm

Re: How Do I Remove the Airbox Lid

Post by VTRDark »

Not quite....it's not that it's more important but both crank and cams should be lined up on their marks as they work in sync with each other. Crank is moving your piston up and down and the cams control the opening and closing of valves. Apart from being slightly off affecting performance you can imagine what happens if it's way off as in a CCT failure. Oh... and it's nothing to do with chain tension, that is controlled by the tensioner and tensioner blade and would be the same whether the crank and cams are lined up or not. All the chain and chain tensioner does is keep them both in sync.

Yes it's important to be on the compression stroke as this is when the chain is at it's most slackest point which allow one to remove a tensioner without it jumping any teeth.

Personally I would remove the cam cover and check the cams/positioning also, it''s always good to know where something is at and you can verify it's on the compression stroke by the positioning of the cam lobes. Saying that though, as your doing the stopper mod and there is no need to check the chain tension, there is no need to remove the cam cover (Sorry I keep forgetting your not fitting MCCT's) Just make sure your on the compression stroke. You should have heard the sound of compression and felt the resistance when turning the crank over and coming around to the FT mark. If the plug is removed you should also feel and hear the compression through there.

Lock auto cct off, remove, measure and fit a stopper.

(:-})
==============================Enter the Darkside
User avatar
thunderbolt
Posts: 302
Joined: Wed Apr 02, 2014 9:12 am
Location: Sydney, Australia

Re: How Do I Remove the Airbox Lid

Post by thunderbolt »

All good, Thanks Carl.
Cheers
Don
____________________________________________

Bikes:
1977 Suzuki GS550/700 - modified significantly
1981 Moto Guzzi 850 T4
1990 Suzuki VX800
2003 Honda Firestorm VTR1000
User avatar
thunderbolt
Posts: 302
Joined: Wed Apr 02, 2014 9:12 am
Location: Sydney, Australia

Re: How Do I Remove the Airbox Lid

Post by thunderbolt »

I took the rear valve cover off tonight and rotated the crank anti-clockwise until the RT line was level with the index mark in the generator cover. The cam lobes were facing up and inwards towards each other. This should be the correct position to remove the rear CCT. Right.

When I checked the intake camshaft sprocket the RI line was a little above the upper surface of the head. I rotated the crank a little more anti-clockwise till the RI line on the intake camshaft sprocket lined up with the top of the head. When I checked the crank mark (RT) it was below the lower threads of the inspection hole by something like 1/4". This can be seen in the pictures I have attached.

Is the timing ok or should I look at retiming the camshaft sprockets to the crank? Is this much out allowable?

Image

Image

Image

Comments please or should I say reassurance.

On another slightly different subject I pulled the float bowls off the carbs while they were off the motor. The jets had a star shaped thingy in front of the jet number. Is this the Keihin trade mark? The pilot jets were marked with this star then 45S for both carbs. The main jets were rear carb 178 and front carb 175. I guess that is standard is it. What does the "S" after the 45 on the pilots mean.

Also both of the mixture screws are 3 1/2 turns out from fully seated. Is that ok or does it seem a bit much? Do they control fuel or air?

Thanks
Cheers
Don
____________________________________________

Bikes:
1977 Suzuki GS550/700 - modified significantly
1981 Moto Guzzi 850 T4
1990 Suzuki VX800
2003 Honda Firestorm VTR1000
User avatar
VTRDark
Posts: 20010
Joined: Sun Mar 18, 2012 9:24 pm

Re: How Do I Remove the Airbox Lid

Post by VTRDark »

This should be the correct position to remove the rear CCT. Right.
Yes.
Is the timing ok or should I look at retiming the camshaft sprockets to the crank? Is this much out allowable?
Looks all good to me, either a bit of cam chain stretch or you haven't quite got everything lined up square on. The RE on the rear exhaust cam can be really awkward to visually see if it's lined up, so can be a little misleading. You could try and get things more accurate by moving the chain over teeth. If you wanted to do this, you can do it once the tensioner has been removed and there is slack on the chain as you can just about slip the chain over teeth, but you will most likely find yourself caught between two teeth., so end up with the opposite to what you have now. It's very common for alignment marks to be a tad off and nothing to worry too much about. A difference of 1 tooth or more is quite a few degree's and a noticeable change, and any more than 2 teeth is time to start worrying.

You have verified that your on the compression stroke. Personally I would leave things as they lock off the tensioner and tape the key in good and proper so it don't fall out. Then remove the tensioner. When undoing the tensioner bolts, do a bit at a time alternating between the both of them. When you have them both undone slightly, give the side of the tensioner a slight tap on the side with a hammer, rachet handle, big spanner or something. This will break the seal where it's stuck to the side of the cylinder head. It also ensure that the tensioner comes out evenly without any jerky movement. You will get a spoonfull of oil leak out the rear tensioner.

As for the jets. Yes the star shaped thing is meant to be a fancy K (looks more like a star) is the standard Keihin jets. You jetting is all as standard. Interesting that you have the 45 pilot jet over there. The S stands for Slow as Pilot jets are sometimes known as the Slow jets. With 3.5 turns on your fuel screws, yes they control fuel flow, you may at some point want to consider trying 48 pilots. http://www.vtr1000.org/phpBB3/viewtopic ... 14#p238528

But if the bike runs well then why play with things. Unless of course you like to tinker and learn and/or get max performance, every last squeeze out the bike.

Get your CCT's sorted first :thumbup:

(:-})
==============================Enter the Darkside
User avatar
thunderbolt
Posts: 302
Joined: Wed Apr 02, 2014 9:12 am
Location: Sydney, Australia

Re: How Do I Remove the Airbox Lid

Post by thunderbolt »

thanks Carl, I'll pull them out tonight. You have probably seen that I have a GS Suzuki in my possession as well. On that bike I slotted the camshaft sprockets and degreed the cams. It made a big difference to the performance as the standard timing was off some on that bike too.
Cheers
Don
____________________________________________

Bikes:
1977 Suzuki GS550/700 - modified significantly
1981 Moto Guzzi 850 T4
1990 Suzuki VX800
2003 Honda Firestorm VTR1000
User avatar
VTRDark
Posts: 20010
Joined: Sun Mar 18, 2012 9:24 pm

Re: How Do I Remove the Airbox Lid

Post by VTRDark »

On that bike I slotted the camshaft sprockets and degreed the cams
You get where I'm coming from then. Yeh degreeing the cams in is by far the most accurate way to get things spot on as Honda intended or even have a play around, move peak power up or down the rev range. Well, that's limited to a degree (no pun intended) on what one can do with standard cams. Valve clearances (lash) is another important consideration. It's a shame Honda did not give us slotted sprockets as standard. It's always an option if one has the means to make some slots or there's this.

(:-})
==============================Enter the Darkside
tony.mon
Posts: 16035
Joined: Wed Jul 25, 2007 10:46 pm
Location: Norf Kent

Re: How Do I Remove the Airbox Lid

Post by tony.mon »

cybercarl wrote:
On that bike I slotted the camshaft sprockets and degreed the cams
You get where I'm coming from then. Yeh degreeing the cams in is by far the most accurate way to get things spot on as Honda intended or even have a play around, move peak power up or down the rev range. Well, that's limited to a degree (no pun intended) on what one can do with standard cams. Valve clearances (lash) is another important consideration. It's a shame Honda did not give us slotted sprockets as standard. It's always an option if one has the means to make some slots or there's this.

(:-})
Or you could just file slots into them- it's fairly easy, the metal sprockets are quite hard but able to be filed.
It's not falling off, it's an upgrade opportunity.
User avatar
thunderbolt
Posts: 302
Joined: Wed Apr 02, 2014 9:12 am
Location: Sydney, Australia

Re: How Do I Remove the Airbox Lid

Post by thunderbolt »

Yes that's what I did on my GS using a small chain saw sharpening to form the slots. I also lopped the ends off the camshafts to make the job easier - to time the camshafts.
Cheers
Don
____________________________________________

Bikes:
1977 Suzuki GS550/700 - modified significantly
1981 Moto Guzzi 850 T4
1990 Suzuki VX800
2003 Honda Firestorm VTR1000
User avatar
8541Hawk
Posts: 2066
Joined: Sat Jul 21, 2012 5:21 am
Location: Bella Vista, AR

Re: How Do I Remove the Airbox Lid

Post by 8541Hawk »

thunderbolt wrote: Friends say I am paranoid and a perfectionist when it comes to my bikes and especially my motors. I research to the endth degree. That wouldn't have anything to do with the fact I count the number of threads on the throttle cable adjustment where it attaches to the carbs when taking them off would it.

Image

Image


BTW (being paranoid) which nut is it best to back off to remove the cables from the carb attachment? The one nearest where the cable attaches to the throttle shaft or the other one? I also notice that the return cable does not have any adjustment, is this normal?

Thanks
Well I didn't see an answer for this question, what I have always done and what I think is the easy way to remove the throttle cables is to not mess with the cable adjusters at all.
Just remove the 2 philips head screws that hold the plate to the carbs and remove it as an assembly, or is simple terms, remove the 2 screws- unhook the cables and set it to the side.
No need to adjust anything :wink:
Loud pipes don't save lives, knowing how to ride your bike will save your life.
User avatar
thunderbolt
Posts: 302
Joined: Wed Apr 02, 2014 9:12 am
Location: Sydney, Australia

Re: How Do I Remove the Airbox Lid

Post by thunderbolt »

8541Hawk wrote:
thunderbolt wrote: Friends say I am paranoid and a perfectionist when it comes to my bikes and especially my motors. I research to the endth degree. That wouldn't have anything to do with the fact I count the number of threads on the throttle cable adjustment where it attaches to the carbs when taking them off would it.

Image

Image


BTW (being paranoid) which nut is it best to back off to remove the cables from the carb attachment? The one nearest where the cable attaches to the throttle shaft or the other one? I also notice that the return cable does not have any adjustment, is this normal?

Thanks
Well I didn't see an answer for this question, what I have always done and what I think is the easy way to remove the throttle cables is to not mess with the cable adjusters at all.
Just remove the 2 philips head screws that hold the plate to the carbs and remove it as an assembly, or is simple terms, remove the 2 screws- unhook the cables and set it to the side.
No need to adjust anything :wink:
GOOD Stuff Hawk,

When I got around to doing that small task that is what I ended up doing as I could not get to the bottom adjuster. I did remove the top cable from the coupling though. I think I will replace the top cable and adjuster back in the coupling before I refit the coupling to the front carb with the two aforementioned screws.

Thanks for your advice.
Cheers
Don
____________________________________________

Bikes:
1977 Suzuki GS550/700 - modified significantly
1981 Moto Guzzi 850 T4
1990 Suzuki VX800
2003 Honda Firestorm VTR1000
User avatar
thunderbolt
Posts: 302
Joined: Wed Apr 02, 2014 9:12 am
Location: Sydney, Australia

Re: How Do I Remove the Airbox Lid

Post by thunderbolt »

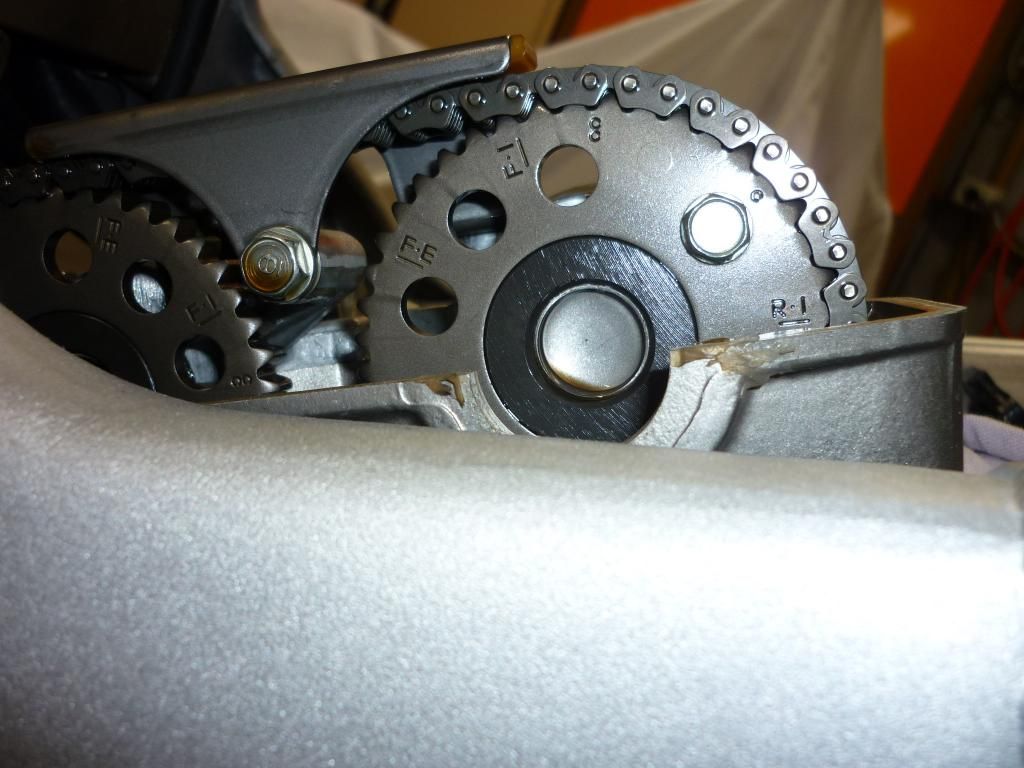
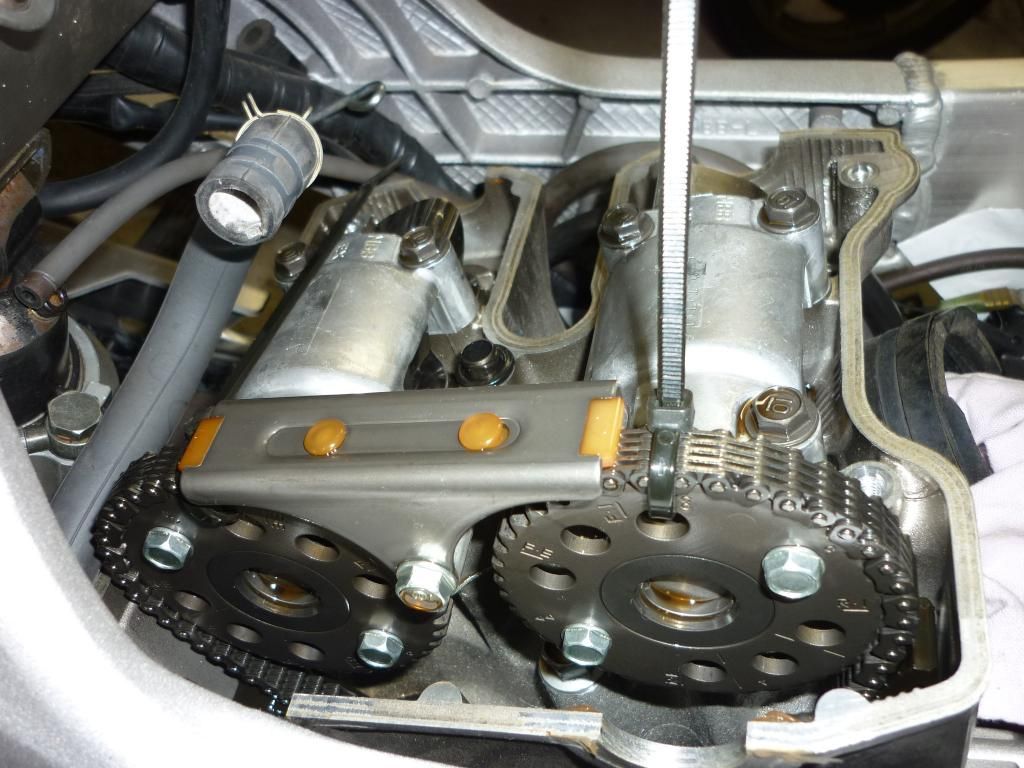
I finally got around to removing the rear CCT after securing the chain to the sprockets with cable ties.

Image

Wrapped up just like a baby. That CCT key wasn't going anywhere.

Image

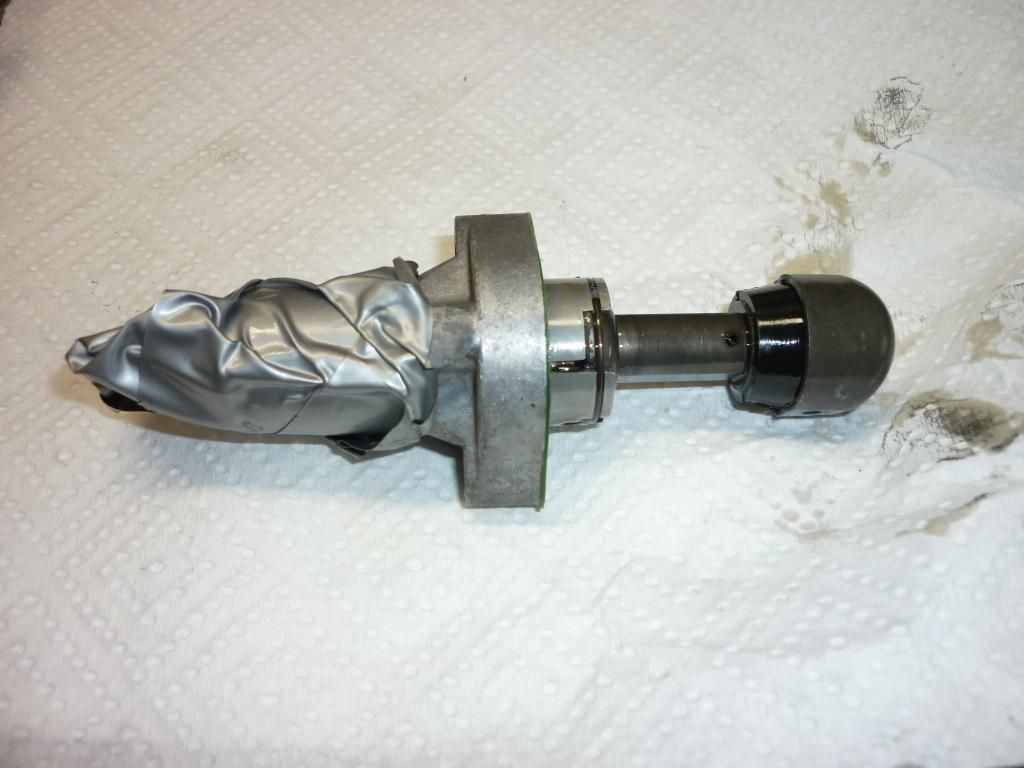
I removed the roll pin and disassembled the CCT after I measured inside the hollow shaft so if the key came out and I would be able to wind it back to the original location. Measured 17.5mm with vernier.

Image

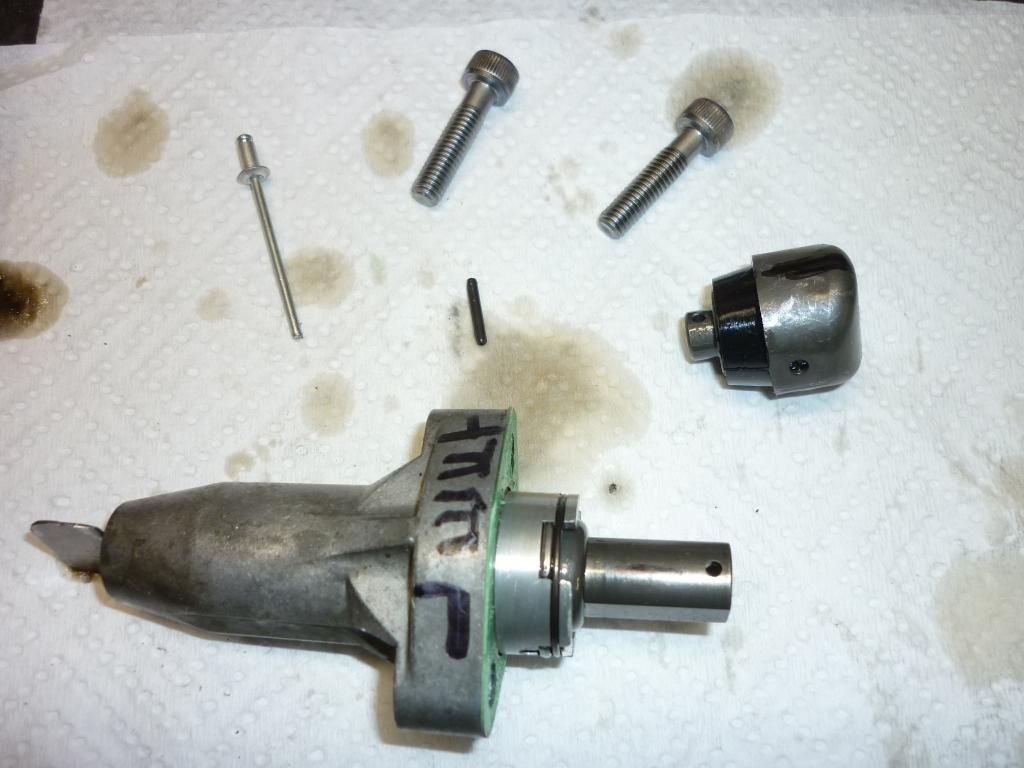
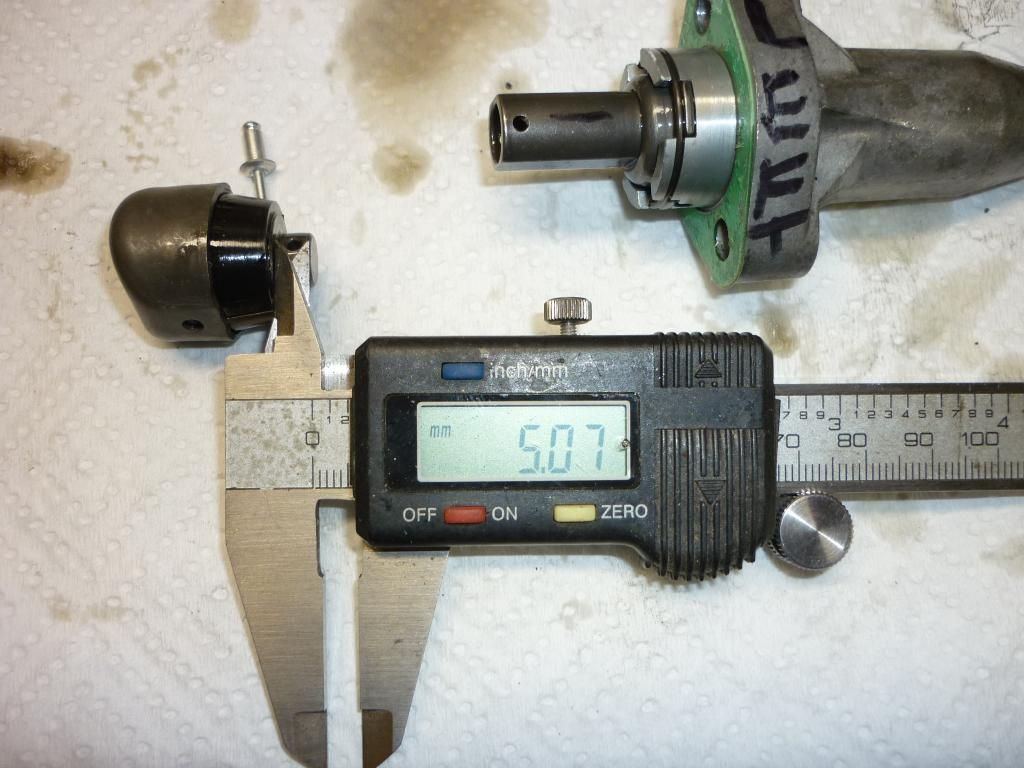
I then measured the distance of the shaft on the plunger where the roll pin goes through. It was 5mm.

Image

Image

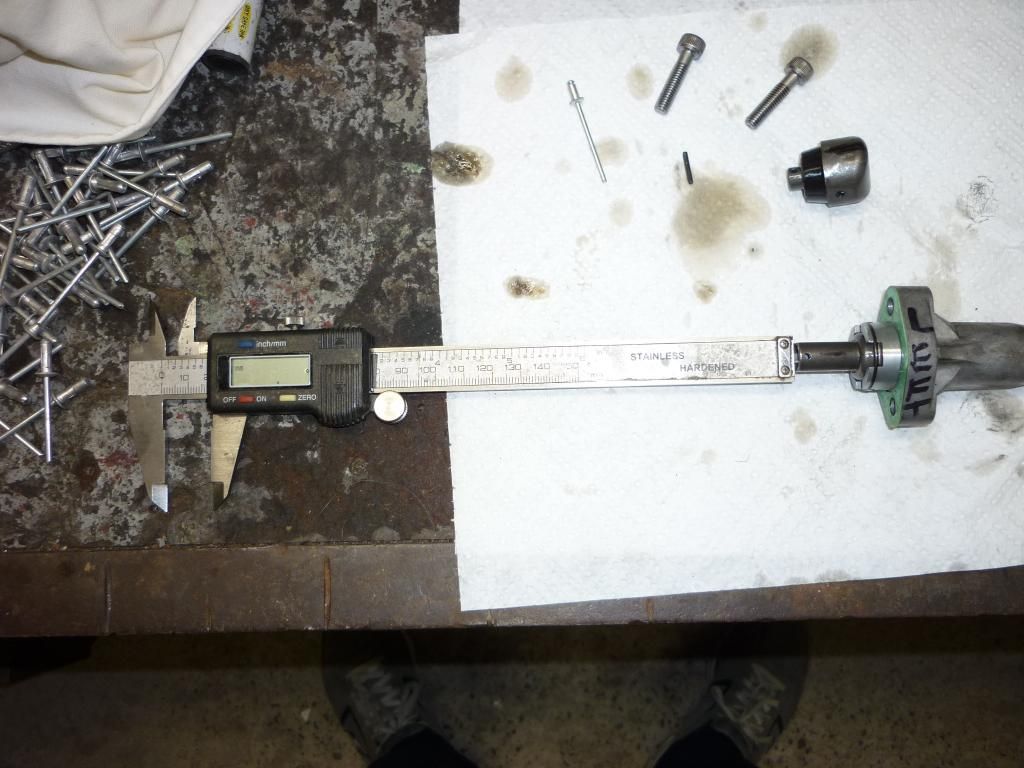
So by my calculation (wrong obviously) the 5mm needed to be subtracted from the 17.5mm which left 12.5mm which was to be the length the stopper rod needed to be. Well I made the stopper rod up, installed it and reassembled the CCT.

I reinserted the key in the back of the CCT and fully retracted it. When I installed it back on the motor the two screws would not pull it up hard against the engine case. Something wrong. So I took it off again, disassembled it and filed a couple of mm off its length. It then bolted up fine. But that took me a lot longer than I had anticipated.

Can someone give an explanation on how the CCT actually works? Does it go in and out as required to keep the slipper blade on the chain for correct tension? Or does it just inch out as needed and lock in that position until the chain becomes more slack and then inch out more as necessary to keep the chain taut?

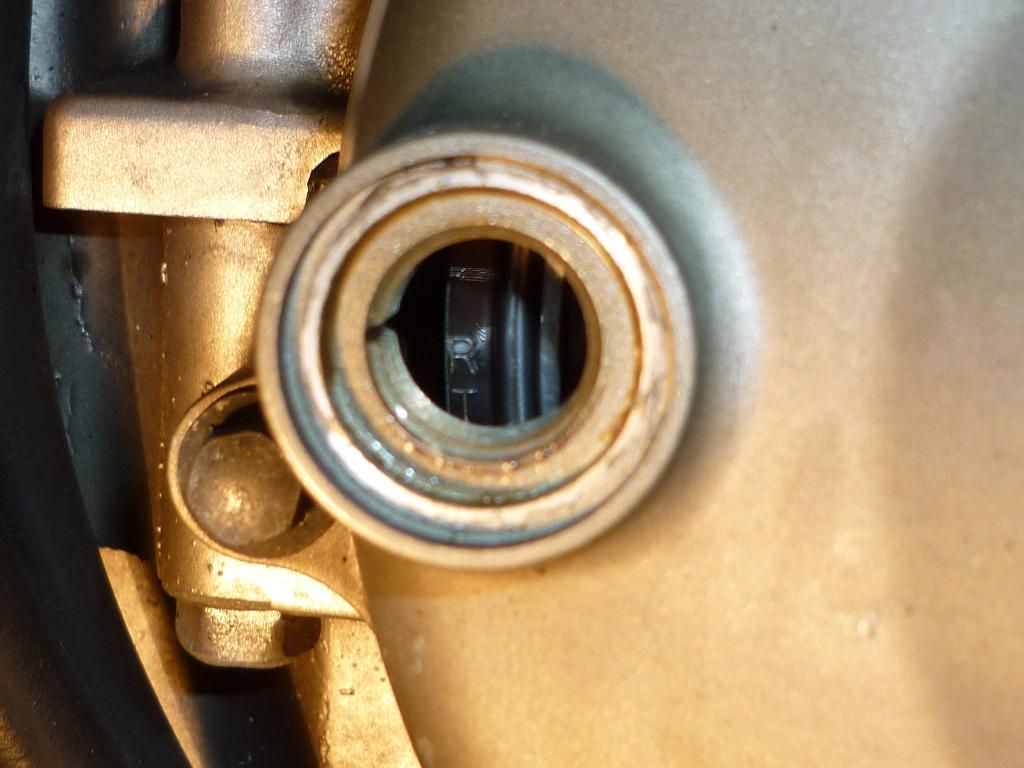
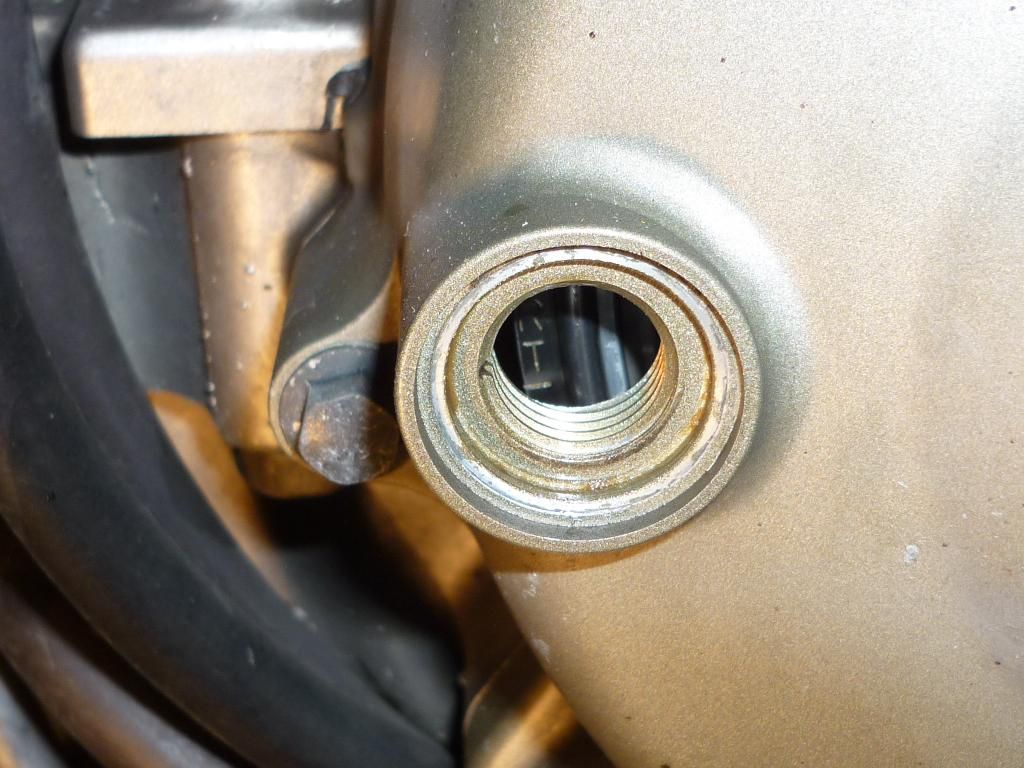
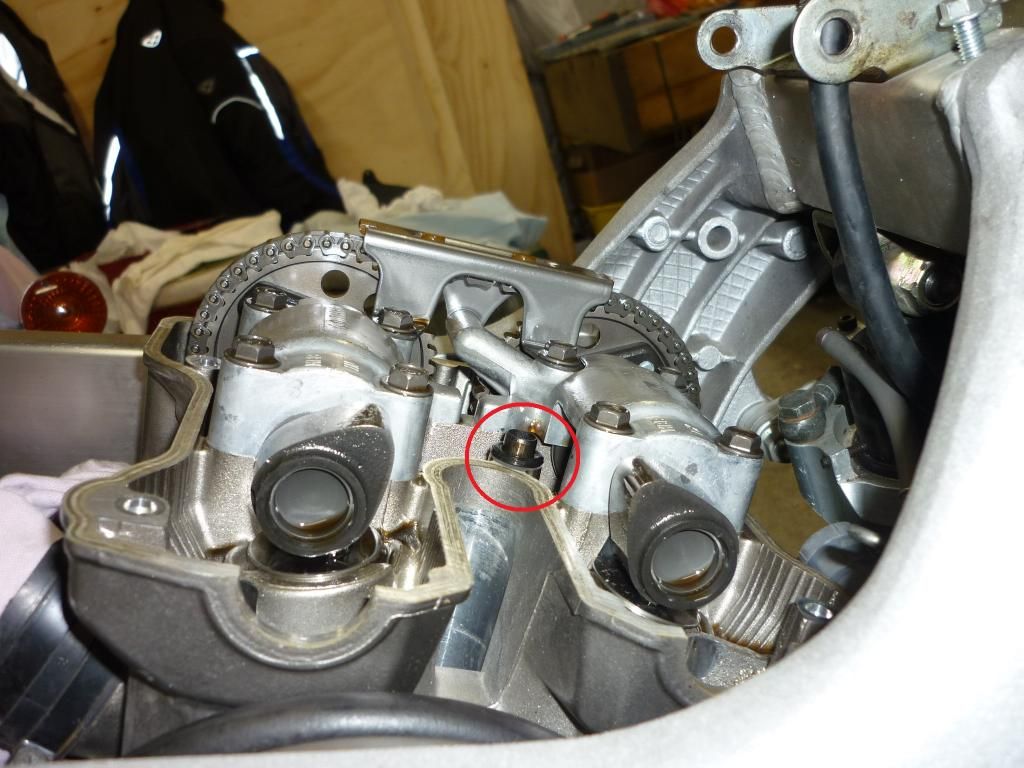
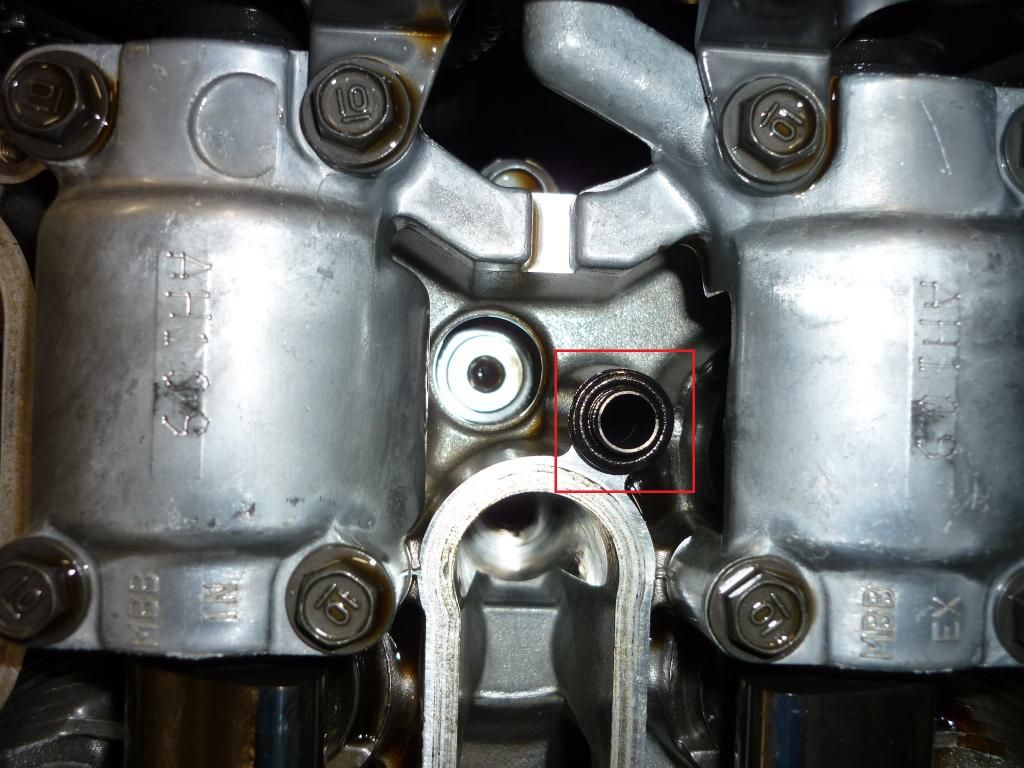
Another Question on something totally unrelated. Carl suggested I do the "Dispose of the PAIR System" while I was this far into the engine. So can anyone fill me in on what this collar and "O" ring are for? Obviously to seal some oil in from somewhere? So does oil come up through this passage to the valve cover or does it work the other way. Going down into the head? and what does it lubricate? or do?

Pictures to show what part I am talking about.

Image


Image


Thanks

P.S. I checked the valve clearances of the rear cylinder tonight as well and they were all spot on except for one intake lobe which was 0.007", but that's ok.
Cheers
Don
____________________________________________

Bikes:
1977 Suzuki GS550/700 - modified significantly
1981 Moto Guzzi 850 T4
1990 Suzuki VX800
2003 Honda Firestorm VTR1000
User avatar
VTRDark
Posts: 20010
Joined: Sun Mar 18, 2012 9:24 pm

Re: How Do I Remove the Airbox Lid

Post by VTRDark »

As for the PAIR I'm not entirely sure of the whole in's and out's of it all. I do know that if you leave the dowel and O ring out then you end up with oil in the airbox and consequently you see this in the exhaust fumes and the bike runs like sh1t. FYI the earlier non PAIR models don't have the hole down the centre of the cylinder head or dowel and is instead just a blank (capped off) in the casting with no hole.

(:-})
==============================Enter the Darkside
User avatar
thunderbolt
Posts: 302
Joined: Wed Apr 02, 2014 9:12 am
Location: Sydney, Australia

Re: How Do I Remove the Airbox Lid

Post by thunderbolt »

I got the front cylinder done last night after removing half the front end of the bike it would seem. Both radiators off, oil cooler and other things detached and moved out of the way. I found after I removed the oil cooler I still could not get the cam cover off. It was obstructed by the bracket that holds the oil cooler to the frame. When that was removed the cam cover was able to be manipulated through the front area of the bike.

I did the stopper mod to the front CCT. Much quicker the second time around. I've come to the conclusion that a 1/4 turn rear and 1/2 turn front on the CCT key is not quite enough to give the clearance on the rod when these measurements are taken. Both of the rods I made up needed to be about a 1-1.5 mm shorter than that to provide clearance when they were refitted.

I will ask the question here and if advised by the administrator I will start another thread in this section.

I checked the valve clearances on the rear head and they were all ok except for one intake which was .007".

But on the front head the right exhaust shim measured at .010", the left exhaust shim measured .012", the right intake shim measured .009" and the left intake shim was .006".

On the tight exhaust shim which was measured at .011" this was achieved with great difficulty. I really had to push hard to get that feeler in and the .010" went in quite easily. So I guess the real measurement was about 10 1/2 thou.

Are these measurements ok to run with or do I need to pull the camshafts and change a couple of the shims?

Thanks

P.S. One loose shim on the intake .009" (should be .006") and one tight shim on the exhaust .0105" (should be .012").
Cheers
Don
____________________________________________

Bikes:
1977 Suzuki GS550/700 - modified significantly
1981 Moto Guzzi 850 T4
1990 Suzuki VX800
2003 Honda Firestorm VTR1000
Post Reply