removing bodywork

removing bodywork
Hi guys how easy is it to remove the bodywork from the vtr as I need to get my mcct fitted so to save a bit of time and money on the garage doing it if I drive the bike over in a street fighter style thanks

Re: removing bodywork
About 10 minutes to remove bodywork - but to fit MCCTs all you need to do is remove seat, tank & airbox to get access to top cam cover, and for installing front MCCT. Also a good time to fit front cylinder vaccum take-off connector and hose for easy carb balancing.
Have you in preperation tried to slacken the timing cover access plug bolts?
Tony's Workshop Day > MCCT installation

Have you in preperation tried to slacken the timing cover access plug bolts?
Tony's Workshop Day > MCCT installation
It may be that your whole purpose in life is simply to serve as a warning to others.
 VTR Firestorm and other bikes t-shirts
VTR Firestorm and other bikes t-shirtsRe: removing bodywork
It's easy but one good tip is to cover the bracket (they stay mounted to the frame, only release the bolts holding the fairing to the bracket) with rags.
It's easy to scrape paint off as you "spread" the fairing side to pull it forward off and ove rhte brackets.
Secondly, lay a rage on the front mudguard before starting. That way you can rest the fairing onto the mudguard while you disconnect the sidelight.
Disconnect the headlight and indicators before undoing the fairing bolts.
Lastly don't forget to remove the little trim clips underneath and inside the rads.
It's not falling off, it's an upgrade opportunity.
Re: removing bodywork
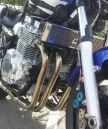
Thanks guys so wicky the way the other storms are sitting in the pic that's all I need to strip tank seat airbox the rest of the plastics can stay on

Re: removing bodywork
Yes, but if you want to pull the front cam cover remove the fairing and unbolt the rads (not remove) for better access, it doesn't take long.thomas111 wrote:Thanks guys so wicky the way the other storms are sitting in the pic that's all I need to strip tank seat airbox the rest of the plastics can stay on
For the inspection covers as Wicky said test loosen them before you start the job, have good fitting hex tools on a ratchet but give them a light tap on the tool first to break an crap and corrosion, this is your best chance of getting them off undamaged.
http://www.bidefordmotorcycles.co.uk
2014 CRMC Post classic Superbike champion.
2014 CRMC Post classic senior production champion. On a Suzuki Katana 1100
My bikes, Firestorm, Suzuki GSX-s1000 Katana, VFR800Fi. Projects, 1986 popup Katana, 3 XJ600’s
2014 CRMC Post classic Superbike champion.
2014 CRMC Post classic senior production champion. On a Suzuki Katana 1100
My bikes, Firestorm, Suzuki GSX-s1000 Katana, VFR800Fi. Projects, 1986 popup Katana, 3 XJ600’s
Re: removing bodywork
OK thanks guys
Re: removing bodywork
Little last point is to unclip the side light above the head light. To get access you will need the fairing partially pulled away so have the wife standing bytony.mon wrote:It's easy but one good tip is to cover the bracket (they stay mounted to the frame, only release the bolts holding the fairing to the bracket) with rags.
It's easy to scrape paint off as you "spread" the fairing side to pull it forward off and ove rhte brackets.
Secondly, lay a rage on the front mudguard before starting. That way you can rest the fairing onto the mudguard while you disconnect the sidelight.
Disconnect the headlight and indicators before undoing the fairing bolts.
Lastly don't forget to remove the little trim clips underneath and inside the rads.

Re: removing bodywork
Why do you have to get upset with your mudguard Tony...tony.mon wrote:It's easy but one good tip is to cover the bracket (they stay mounted to the frame, only release the bolts holding the fairing to the bracket) with rags.
It's easy to scrape paint off as you "spread" the fairing side to pull it forward off and ove rhte brackets.
Secondly, lay a rage on the front mudguard before starting. That way you can rest the fairing onto the mudguard while you disconnect the sidelight.
Disconnect the headlight and indicators before undoing the fairing bolts.
Lastly don't forget to remove the little trim clips underneath and inside the rads.
Making up since 2007, sometimes it's true...Honest...
Re: removing bodywork
carbon COSTS SO MUCH.......MacV2 wrote:Why do you have to get upset with your mudguard Tony...tony.mon wrote:It's easy but one good tip is to cover the bracket (they stay mounted to the frame, only release the bolts holding the fairing to the bracket) with rags.
It's easy to scrape paint off as you "spread" the fairing side to pull it forward off and over the brackets.
Secondly, lay a rage on the front mudguard before starting. That way you can rest the fairing onto the mudguard while you disconnect the sidelight.
Disconnect the headlight and indicators before undoing the fairing bolts.
Lastly don't forget to remove the little trim clips underneath and inside the rads.
But it's lovely lightness and I can't resist....
BUT IT COST SO MUCH........
But I can't resist......
etc
It's not falling off, it's an upgrade opportunity.