Disclaimer
Every effort has been made to ensure that this guide is as accurate as possible, by following this guide you will doing so at your own risk. If you feel that you do not have the capabilities for the job then please seek the help of a professional mechanic. In no event will this forum or myself be held liable for any damage including without limitation, indirect or consequential damage that may possibly occur.
OK that's that out the way so lets get started.
First off there are alternative ways and methods to fitting manual cam chain tensioners that don't require the removal of the front cam cover but I feel this is the most foolproof and accurate way to go about things. As long as you are pretty handy with a spanner and comfortable with doing the odd bit of mechanical work, then by following this guide even a complete novice is capable of this task. One of the biggest problems for most people is going into the unknown and the nervousness of timing knowing that if it's done incorrectly then it can possibly cause serious engine damage.
As both cam covers are being removed for this job you may also want to take a little extra time to check the valve clearances. Valve clearances should be checked while the cylinder that your working on is at TDC on the Compression stroke. For more information on valve clearances please refer to the workshop manual. You will find a downloadable copy of the Honda workshop manual here
Read through this guide completely first before attempting anything and if you have any questions or are unsure about something then please ask beforehand. When doing the work, take your time and double check everything before moving forward to the next stage.
The following link is a copy of this guide in PDF format so it can printed off to refer to whilst doing the work or to view locally on other devices.
https://www.dropbox.com/s/eu3gujutqgnat ... T.pdf?dl=0
Note some of the pictures within this guide will be on an engine that is not mounted in the frame and will be used for clarity. As you can appreciate it is not always easy to take accurate pictures while the engine is in place on the motorcycle.
Before you start anything make sure that the generator caps come undone, the timing hole inspection cap and crankshaft end cap. These have a nasty habit of seizing in place and can turn into a job in itself to remove if seized in place. Be careful when undoing them as the caps are made out of an extremely soft alloy and can round of easily if the hex socket is not securely in place.

Total Job completion time should be around 2.5 hours.
Start with stripping everything down so you have access to both cylinder heads. Unfortunately this is what takes most of the time, it should take about an hour to remove everything required.
Note if you have later facelift modal VTR1000 Firestorm with the digital dash and 19L fuel tank then the fuel tank and airbox arrangement will be slightly different. Please refer to the following guide if you have one of these modals.
http://www.vtr1000.org/phpBB3/viewtopic.php?f=9&t=21058
Remove Front Fairing and Fuel Tank
1. Remove both mirrors which are held in place by two 10mm nuts and lift the mirrors off.
2. Disconnect both front indicators from inside the fairing. These will be tucked in towards the front on the inside of the fairing and may be held by a bendy metal tab at the front towards the bottom of the headlight. They will be a bullet and receptacle (male and female) type electrical connectors that you can just pull apart. Try to pull them by the connectors and not the wires otherwise you risk pulling the wire out from the connector.
3. Remove the two hex head fairing mounting screws from each side of the fairing with a 5mm allen key or hex socket.
4. You should now be able to pull the fairing as one unit forward enough and disconnect the sidelight and headlight connectors.
5. Lift the remainder of the fairing off being careful by radiators and not to catch the fairing on the side fairing brackets. You will have to pull the sides of the fairing away slightly to lift them past. Note the position of the inner fairings how they slide around the radiators and the electrical connector at the front of the right hand side radiator. It will be on your left if facing the motorcycle from the front.
6. You should be able to remove the fairing as one complete unit. If it's a struggle then you may also have to loosen the two screws at the front of the fairing just underneath the headlight between the forks.
1. Remove the seat out of the way.
2. Remove the two 8mm mounting bolts from the front of the fuel tank. Note the top hat washers under the bolts and don't loose these.
3. Disconnect the fuel level sender wire from the main wiring harness in front of the battery.
4. Prop the tank up from the front so it hinges on the rear mounting bolt. Watch you don't loose the two rubber mounting blocks ether side at the base of the tank. Then disconnect the breather and overflow pipes from underneath the tank.
5. Turn of the fuel petcock with an 8mm spanner and disconnect both fuel hoses and vacuum pipe from the petcock. Note the vacuum pipe is connected on the outlet just behind the left hand side fuel hose.
6. Lower the tank back down and remove the rear mounting bolt with a 10mm ratchet and 10mm spanner. Don't undo the Nut completely and undo the last bit with your fingers so you don't loose the nut, then pull the bolt through the tank and mounting bracket.
7. lift the tank of the bike being carful to also lift the plastic drip flap off the rear mounting that sits around the petcock area and over the mount. Note how it folds around onto the mounting bracket.

Remove Airbox and Carburettors
1. Remove the screws that hold the airbox lid in place. You may need a magnetic pick up tool to help lift the front two out so you don't loose them. Then lift the lid and airfilter off and out the way. You will have to lift from the rear and pull rearward and give it a wiggle so the front air intake can pull through from the front of the frame.
2. Undo the two screws from each Velocity stack and remove. Note the short one is at the front and the little indicator marks (two little arrows) at mounting and on the base of the airbox.

3. Under the velocity stacks you will have eight screws on that hold the airbox to the top of the carbs. Remove these being careful not to drop them inside the carb throat.
4. The airbox is now held by two breather hoses, one each side diagonally apart. They are held by metal clips that can be squeezed and lowered out of the way so that the hose can be pulled from the airbox. The front may be a bit fiddly to get to but you should be able to lift the box enough and get you hand underneath to disconnect it.
5. The airbox is now only held by an air hose on each carb. Give the airbox a tug upwards and it should pop off from these hoses so you can remove it completely. Stuff some rag or kitchen towel inside the carbs to stop any dust or dirt falling in.

1. Now onto carburettor removal. First disconnect the Throttle Position Sensor (TPS) electrical connector from the rear carb, and while you at it remove the cable from the clip on the side of the plastic cowl.
2. Undo both throttle cables with a 10mm spanner and note how they are connected and which way around they go.
3. Loosen the choke cable at the frame and slide out sideways from the mounting bracket, you will notice that the threaded part is cut in a way that you can twist it around and slide it out.

4. Loosen off the top clamps from the carb inlet rubbers. These can be undone with a Philips screwdriver. For the front carb you can get to it from the right hand side of the bike through the hole in the side of the plastic cowl above the radiator (see in the above pic below TPS cable). The rear one can be accessed from the top from the left hand side of the bike near the carb diaphragm cap and choke cable. Also note how the rear carb choke cable is routed over the top and around the side of the carbs. Once the clips are loose you can wiggle the carbs from side to side as you pull up and they will pop out from the inlet rubbers.
5. Now to remove the two water inlet pipes, there's no need to drain the cooling system as you will only loose a teaspoon of fluid. Lean the carbs over toward the right of the bike and you will see the front hose. Squeeze the clip with a pair of pliers and lower it down the hose out the way and gently pull/pry/wiggle the hose of the front carb. Now for the rear, tip the carbs over to the left and do the same for the rear hose.
6. The carbs can now be lifted out and away from the bike, but you will have to feed the choke cable through and out from underneath the two coolant hoses that run to the thermostat housing and along the side of the coolant bottle. Once the carbs have been removed put them somewhere safe where they wont get any dust or dirt inside them. Also stuff some old rags inside the engine inlets to stop dirt or anything falling inside.


7. Now to remove the plastic cowl to gain access to the front cam cover. Remove the three trim clips that hold it in place. There will be one either side of the frame and one on the front right of the frame from underneath that holds the smaller piece in place where the throttle cable feeds through. Also note there is a small cut out at the bottom for the TPS cable to run through.


8. Once the clips have been removed pull the smaller piece by the throttle cables off and out the way, note how it clips in to the large piece. Then lifting the cowl up from the rear it should pop off past the front carb inlet rubber and you can poke the front breather hose through the hole, then puling the cowl towards the rear of the bike it will slide off the front of the frame so you can remove it.

Remove Spark Plugs
1. By removing the plugs it helps later when it comes to turning the engine over and setting the timing as you wont be fighting against the compression. Pull the HT leads off and you will need a 12mm plug spanner (there should be one in the Honda toolkit if you have one under the seat) or you can use an 18mm deep socket if the outer circumference is smaller enough to fit down inside the channel. Note that plug spanners are measured by thread size not the hex attachment.

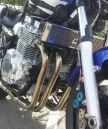
Front Cam Cover Removal
1. Remove the two 8mm mounting bolts from the top of each radiator which gives you more access to the cover and makes viewing the cams easier as you can pull them out the way.

2. It's not entirely necessary but for the sake of two 10mm bolts you may as well remove the bottom mounting bolt off each radiator as it frees everything up more and the oil cooler lines don't get caught on them.

3. Remove the two 8mm oil cooler mounting bolts, you will have to lift the coolant hose out the way to access them. Then pull the oil cooler down out the way being carful with the oil cooler lines. You should now have access to the bottom two cam cover bolts.

4. Remove the four 10mm cam cover bolts. They have a rubber washer seal on them. Sometimes these will remain in the cover or they will get stuck to the bolt, so be carful not to loose these. Note they are marked UP on one side.

5. You will have to remove the breather hose from the cam cover to be able to lift the cover off and under the frame. You will then be able to manipulate the cover up and forward and off the bike from the front. Be careful not to damage the rubber gasket.


Rear Cam Cover Removal
1. The rear cover is far more simple. Remove the four 10mm bolts from the top not forgetting the rubber washer seals and lift the cover off being careful of the rubber gasket.


That's the worst of it done and with both cam covers removed you have access to everything.

Right, it's about time for a well deserved Tea/Coffee break before starting on the timing and fitting of your manual tensioners.
(:-})