Using Lumiweld to weld a clutch casing hole and putting an extra strengthening plate on top to stop the casing getting cracked in a drop,( it was previously cracked when it fell off its stand on a forest track.)
The damage now, from a diesel spill, bike went down at 30mph and hit a high kerb backwards...
http://s585.photobucket.com/user/don41d ... sort=3&o=8
The Kit, camping stove, gas torch, lumiweld kit.
http://s585.photobucket.com/user/don41d ... sort=3&o=0
First the hole was cut out with the angle grinder and tidied up a bit.
http://s585.photobucket.com/user/don41d ... sort=3&o=6
Then a piece of alloy sheet was cut to fill the hole and bent to fit,It had to stay in place while it was heated very hot.
http://s585.photobucket.com/user/don41d ... sort=3&o=5
After scrubbing the weld area with the stainless steel wire brush supplied, the casing was put on the stove on high, also the gas torch was used on the outside face of the casing, it had to get extremely hot....
When the Lumiweld rods were able to melt when put into the torch flame, on the casing, I started to fill the join, using the stainless wire rod supplied to scratch through the puddled weld to key the casing surface.
The difference between getting the heat just right and it running off was very small, and took quite a bit of adjusting the stove to get the temperature right, using the torch to apply the last few degrees needed to melt the rod.
The problem was, when one area was ready to weld, so was the rest, so when a new part of the join was being worked on, the last bit was getting too runny.
After a few attempts, I gave up , as it was wasting too much rod.
Instead, I took some Daz modelling clay, and covered the outside of the repair area with about 15mm of the clay, and put it in a low oven for 40 mins to harden.
Now the fluid Lumiweld could not run out the join!
Now, working from the inside, I welded the casing, turning it to keep the molten weld in the correct join.
http://s585.photobucket.com/user/don41d ... sort=3&o=3
On the right you can see where the weld had been dripping out of the joint when I was working with the outer casing upward.
The Daz clay worked well enough , it cracked and flaked with the heat but did its job of stopping the molted weld escaping
The join was filled and inspected for pinholes.
http://s585.photobucket.com/user/don41d ... sort=3&o=4
Then it was ground flat, as I decided to add another extra piece of sheet over the repair to strengthen it.
Unfortunately I lost the pics!, I clamped the sheet on top of the welded repair, and put some Daz clay INSIDE the cover to hold the previous weld in place, then Lumiwelded the extra plate over the top.
The part of the casing at the bottom now has 2 layers of sheet to protect it.
After grinding down the Lumiweld, which is VERY hard..you couldn't file it..I smoothed it off with a finger of body filler, sanded it, etch primed and painted it.
http://s585.photobucket.com/user/don41d ... sort=3&o=1
http://s585.photobucket.com/user/don41d ... sort=3&o=2
The Lumiweld certainly gives a strong repair, and would be handy for damaged casings and stripped threads, but is difficult to drill and shape, as it is very hard, also the repair area needs to be extremely hot.Camping stove on full and gas torch on full for 15 mins....Just to get started!
The problem with the new weld running out of the joint when trying to work on the next couple of inches was extremely frustrating, and without lots of practice, and rods...would be very difficult, The Daz clay saved the day.
It doesn't look too bad, the only noticeable thing is the extra wide bottom casing moulding where the strengthening plate is.
Repairing and strengthening a holed clutch cover
-
rollingthunderx2
- Posts: 506
- Joined: Fri Mar 04, 2011 12:12 am
- Location: Hawick, scottish borders on A7
Repairing and strengthening a holed clutch cover
Last edited by rollingthunderx2 on Mon Jun 22, 2015 9:47 pm, edited 4 times in total.

Re: Repairing and strengthening a holed clutch cover
Nice write up, will be useful to keep this as a sticky in the workshop


Re: Repairing and strengthening a holed clutch cover
Code: Select all
[img]http://i585.photobucket.com/albums/ss300/don41d/Photo2013.jpg[/img]
It may be that your whole purpose in life is simply to serve as a warning to others.
 VTR Firestorm and other bikes t-shirts
VTR Firestorm and other bikes t-shirts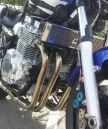
Re: Repairing and strengthening a holed clutch cover
That's one mighty fall to trash the rear-set and flatten the link pipes 
-
rollingthunderx2
- Posts: 506
- Joined: Fri Mar 04, 2011 12:12 am
- Location: Hawick, scottish borders on A7
Re: Repairing and strengthening a holed clutch cover
Sorry, I was not clear, that damage was not done falling off the stand on a forest track!
It was in town, braking for a roundabout it went down, and kept sliding, it hit the high kerb on the roundabout tailpipe first then the clutch cover/footpeg , then spun round and flipped over and hit the kerb again with the other side.
I just skinned my calf a bit, I slid for ages on the Diesel too.It was so slidy we had difficulty picking it up and pushing it to the side of the road.
This happened in a 30mph limit doing 30,or less.
And before you say that's impossible..the guy following me in a hilux ended up backwards on the verge after trying to stop on the spill, and he was about a minute behind me, I was already picking the bike up on the centre of the roundabout when he slid past me!It is a notoriously slidy roundabout, I had a few slides on my Blackbird there, so was not being careless.

http://s585.photobucket.com/user/don41d ... sort=3&o=7
It was in town, braking for a roundabout it went down, and kept sliding, it hit the high kerb on the roundabout tailpipe first then the clutch cover/footpeg , then spun round and flipped over and hit the kerb again with the other side.
I just skinned my calf a bit, I slid for ages on the Diesel too.It was so slidy we had difficulty picking it up and pushing it to the side of the road.
This happened in a 30mph limit doing 30,or less.
And before you say that's impossible..the guy following me in a hilux ended up backwards on the verge after trying to stop on the spill, and he was about a minute behind me, I was already picking the bike up on the centre of the roundabout when he slid past me!It is a notoriously slidy roundabout, I had a few slides on my Blackbird there, so was not being careless.
http://s585.photobucket.com/user/don41d ... sort=3&o=7