The starter was from a 1998 cbr900 Fireblade, this is exactly the same starter motor as the Firestorms, It was a gamble but it paid off, every part was in good working order.
Here's a list of part numbers that are all compatable with the Firestorm
all years of the following models
vtr1000f, firestorm
cbr1100xx, super blackbird
xl1000, varadero
cb1100, x11
vtr1000, sp1 and sp2
cb900f, hornet
cbr900, fireblades from 1993 to 1999 and possibly 2003
----------------------------------------------
31200-MAT-003
31200-MBB-000
31200-MBB-A41
31200-MV9-671
31200-MCJ-751
31200-MCF-003
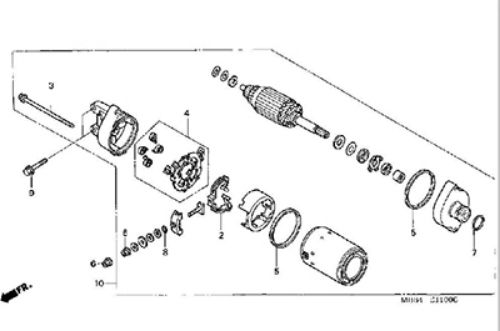
There are probably a lot more bikes using the same motor, but because of the number of Fireblades sold around the world you can buy the motors very cheaply. Here's a micro fiche picture to help understand what goes where. I have placed the corresponding numbers on this picture to certain parts within the text.
-------------------------------------------------------------------
-------------------------------------------------------------------
It's very easy to remove the starter from the bike, Only two 10mm bolts (9) hold it in place. You will also have to undo the main power cable from the starter, again this is just a 10mm nut (6). I find it best to use a 10mm socket on the outer nut, and a thin walled 10mm spanner on the inner nut, When undoing the outer nut be careful not to rotate the power cable as this can cause internal damage to the motor, You will need to peel back the rubber boot that covers the power lead connection, Then undo outer the nut. I have had the joy of finding that this particular nut/bolt is often badly corroded due to its position at the front of the engine, It's always good practice to place a good dollop of grease under the rubber boot to keep moisture from corroding the connection. If the nut and bolt are too badly corroded then you'll have to bite the bullet and cut the bolt off. Not the end of the world, As you can replace the bolt when doing the refurbishment. At this point you might want to place an oil catch tray under the starter as sometimes you will lose a little oil, Once you've wiggled the motor free it is time to take it apart. This should be, and often is extremely easy, two long bolts if I recall correctly 6.5mm (3) which hold the two end caps in place. Once again these can suffer from corrosion. Out of the four motors = 8 bolts, I had to cut three of them and they're an utter git to remove from the end caps.
So the motor splits into three main pieces, two end caps and the main body, there will also be two big rubber seals (5) that need removing from between the three main pieces of housing, these just pull off. Be careful not to lose any of the thin washers when dismantling the motor. One of the end caps has an o-ring (7) on the outside, I removed this to check it was ok, and refitted it after the washing process. The next step is to pull the main shaft out of the motor, It's very easy to do, you will feel some magnetic resistance but not much.

Again be careful not to lose the washers, and remember the order they're in. Take photo's or place them on a
Tray in the same order that they were removed in. At one end of the main body you will see a round plate with four carbon brushes and four springs (4), these will now be a tad loose as you have removed the main shaft that holds them in place.

You will need to peel back the two brushes that have a longish covered wiring, then the plate will just lift off.

Now you'll be able to get to the other end of the bolt that fits thru the main body which attaches to the main
Power cable on the outside of the motor. There will be a second 10mm nut (6) that needs to be removed from the outside, once removed the bolt will pull thru the main body. There will be several small washers and a rubber seal that needs to be removed from the bolt, once again remember the correct order of the washers. The last bit is to remove the last two brushes which is connected by a crescent shaped piece of metal (2) which sits inside a black plastic round housing, they all pull apart very easily.

Out of the four motors two had badly damaged black plastic housing, another two had broken crescent shaped
Metal assemblies, and two had damage to the inside of the main motor housing. The damage was in the same place, just under the hole for 10mm bolt. Once in pieces I put the lot in an ultrasonic cleaner on a nice hot wash. After the wash I set about cleaning the outside of the main housing plus the two long 6.5mm bolts (3). These three sections suffered from various levels of corrosion. I used a Dremel to remove the worst, then the following grades of wet n dry 240/600/2000 to give the metal a clean ultra smooth finish. As you can see in the following image, the one I bought had some corrosion.

And after it's a lot better but not perfect, fingers crossed it will stay corrosion free for some time.


I then masked up these pieces and sprayed them with a clear lacquer, hopefully that will help fight against further corrosion. I lightly cleaned the four brushes and the main shaft where it touches the brushes. You will find lots of carbon deposits that need wiping away hence the reason I used an ultrasonic cleaner, but a rag and an old tooth brush will do the job. Once happy it is time to start rebuilding. This is by far the most tricky moment with trying to get all the four carbon brushes in place and refitting the main shaft. This is almost impossible unless you remove the four springs that hold them under tension first. Just use the flat of a screw driver to lever the springs off noting the direction of the springs and how they mount. Then reverse the process of fitting the black plastic round housing, then the 10mm bolt that fits thru another small piece of the black housing and the metal crescent with the two brushes (2) which sits inside of the black plastic round housing, they can only fit one way. When you place the round plate with the two remaining brushes (4) you'll notice the little notch in the main housing lines up with a notch on the round plate. There's also two notches in the round plate (4) for the other two brushes to fit thru.
So it's all in place ready for the main shaft to be refitted, make sure all four brushes are slid into their little metal housings, then push the main shaft back thru the housing and with a little wiggling it should fit snuggly in between the four brushes. You will then need to refit the four retaining springs that hold the brushes in place. It is a bit fiddly, but they can be done by hand. I found the trick was to first make sure the spring was the correct way up, then gently place it on top of the little metal mounting, you should be able to twist it into place with some minor effort. Once in place use a screwdriver to push it fully down onto the mounting.

Almost finished now. Refit all the washers and o-ring rubber seals, then there is a metal washer with four prongs which will need to be refitted at the open shaft end, this sits on top of the three large washers with the prongs facing away from the main body of the motor.at this point I put a small amount of grease on the set of bearings mounted inside the end cap that the splined shaft runs through, Then refit the end caps and the 6mm long bolts (3). Make sure you get the end caps in the correct place. Use the photo's I have uploaded to position the end caps correctly. The shaft should move freely with some resistance from the magnets. Be very careful when rebuilding as to not get anything metal attached to the magnet on the inside of the main body as this will stop the shaft from turning, and speaking from experience because I am a complete numbty will jam the motor. When refitting the 6.5mm long bolts (3) I used some copper grease on the threaded part and a light smear of regular moly grease where it fits thru the opposite end cap. At this point I suggest checking that the shaft moves freely with a little magnetic resistance. If it doesn't you will need to completely dismantle it and look for the problem. Finally refit the washers over the 10mm bolt, did you remember which order they go in? It is best to take pictures when dismantling.
To refit the motor needs a little bit of jiggling as the splines on the main shaft have to line up properly, a little bit tricky but it only takes a minute to do, then bolt the motor back on using the two 10mm bolts (9), I also copper greased them, you can never be to careful. That's it refit the power cable remembering to put a dollop of grease under the rubber boot. Then it is time to fire it up, fingers crossed all goes well.....
Here's my one refitted to the bike.

As some of you might have noticed, I have robbed some of these pictures from a previous thread, I hope this doesn't upset anyone.
------------------------------------------------------------------------------------------------------------------------------------------------------------------
wemoto sell a starter motor repair kit, but it doesn't include the main bolt which can be destroyed if the connection to the main power cable has become heavily corroded or the black plastic circular housing that often gets broken when the main bolt gets over tightened.
http://www.wemoto.com/bikes/honda/vtr_1 ... epair_kit/