bellypan restoration
Re: bellypan restoration
Have you used heat proof mat on the inside of the belly?
Carpe diem, quam minimum credula postero
F3, 954 USD front, K Tech springs, Braced swinger, Ohlins shock, Six spoke Mockesini wheels, Harris rearsets, QaT, Flywheel diet!, A&L stacks, stick coils, K&N, FP Ti jets, Mori pipe's [colour]
F3, 954 USD front, K Tech springs, Braced swinger, Ohlins shock, Six spoke Mockesini wheels, Harris rearsets, QaT, Flywheel diet!, A&L stacks, stick coils, K&N, FP Ti jets, Mori pipe's [colour]

Re: bellypan restoration
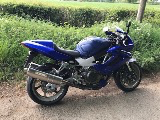
Before

After

Good job done I'd say!
Did you use cans or a spray gun for that?
(:-})
After
Good job done I'd say!
Did you use cans or a spray gun for that?
(:-})
==============================Enter the Darkside
Re: bellypan restoration
since you put it like that, it looks spanking.
i havent flattened it down yet either.
ive not used any heat proof mat or anything yet. it hasnt appeard to have needed any. with my relocation of brackets, the warmer parts of the exhaust dont go near it.
i havent flattened it down yet either.
ive not used any heat proof mat or anything yet. it hasnt appeard to have needed any. with my relocation of brackets, the warmer parts of the exhaust dont go near it.
Re: bellypan restoration
I stuck some in mine, just to be safe. Don't want to damge the paintwork.
Carpe diem, quam minimum credula postero
F3, 954 USD front, K Tech springs, Braced swinger, Ohlins shock, Six spoke Mockesini wheels, Harris rearsets, QaT, Flywheel diet!, A&L stacks, stick coils, K&N, FP Ti jets, Mori pipe's [colour]
F3, 954 USD front, K Tech springs, Braced swinger, Ohlins shock, Six spoke Mockesini wheels, Harris rearsets, QaT, Flywheel diet!, A&L stacks, stick coils, K&N, FP Ti jets, Mori pipe's [colour]

Re: bellypan restoration
What about the part of the exhaust the kinda peeps through the hole? My paint has started to crack there...will deffo be putting some heat proof stuff on it next timeKarlosVTR wrote:the warmer parts of the exhaust dont go near it.
A head full of fears has no room for dreams
Re: bellypan restoration
If you ride through fields and then leave the mud on it won't show.Snoogle wrote:What about the part of the exhaust the kinda peeps through the hole? My paint has started to crack there...will deffo be putting some heat proof stuff on it next timeKarlosVTR wrote:the warmer parts of the exhaust dont go near it.
It's not falling off, it's an upgrade opportunity.

Re: bellypan restoration
I have manage to get heat damage on my bellypan where it is actually touching against the pipe that runs under the sump [the Moriwaki style hasnt got the peep hole for that bit of the pipe] but have fitted heat reflective tape now and it gets no worse. But I would take care in modding the brackets to get more clearance to the pipes, as I have also damaged mine by dragging it in the road when lent right over in RH corners and hitting a bump mid bend!..........
The good thing is that it is black gelcoat, not paint on a light primer, so the burn & scrape marks dont show unless you look real close, so Tony has the best answer, paint it Matt black and keep it dirty.
The good thing is that it is black gelcoat, not paint on a light primer, so the burn & scrape marks dont show unless you look real close, so Tony has the best answer, paint it Matt black and keep it dirty.
AMcQ
Re: bellypan restoration
Wasn't that first suggested by the Stones?AMCQ46 wrote:I have manage to get heat damage on my bellypan where it is actually touching against the pipe that runs under the sump [the Moriwaki style hasnt got the peep hole for that bit of the pipe] but have fitted heat reflective tape now and it gets no worse. But I would take care in modding the brackets to get more clearance to the pipes, as I have also damaged mine by dragging it in the road when lent right over in RH corners and hitting a bump mid bend!..........
The good thing is that it is black gelcoat, not paint on a light primer, so the burn & scrape marks dont show unless you look real close, so Tony has the best answer, paint it Matt black and keep it dirty.
Carpe diem, quam minimum credula postero
F3, 954 USD front, K Tech springs, Braced swinger, Ohlins shock, Six spoke Mockesini wheels, Harris rearsets, QaT, Flywheel diet!, A&L stacks, stick coils, K&N, FP Ti jets, Mori pipe's [colour]
F3, 954 USD front, K Tech springs, Braced swinger, Ohlins shock, Six spoke Mockesini wheels, Harris rearsets, QaT, Flywheel diet!, A&L stacks, stick coils, K&N, FP Ti jets, Mori pipe's [colour]
Re: bellypan restoration
Maybe, but don't get your ya ya's out.Kev L wrote:Wasn't that first suggested by the Stones?AMCQ46 wrote:I have manage to get heat damage on my bellypan where it is actually touching against the pipe that runs under the sump [the Moriwaki style hasnt got the peep hole for that bit of the pipe] but have fitted heat reflective tape now and it gets no worse. But I would take care in modding the brackets to get more clearance to the pipes, as I have also damaged mine by dragging it in the road when lent right over in RH corners and hitting a bump mid bend!..........
The good thing is that it is black gelcoat, not paint on a light primer, so the burn & scrape marks dont show unless you look real close, so Tony has the best answer, paint it Matt black and keep it dirty.
It's not falling off, it's an upgrade opportunity.