
Well you asked for another Ducati build
-
lloydie

- Posts: 20928
- Joined: Mon Jan 17, 2011 11:16 pm
- Location: In the garage somewhere in Coventry
Re: Well you asked for another Ducati build
Enjoy the sun but not to much as I want to see this one getting done 

Re: Well you asked for another Ducati build
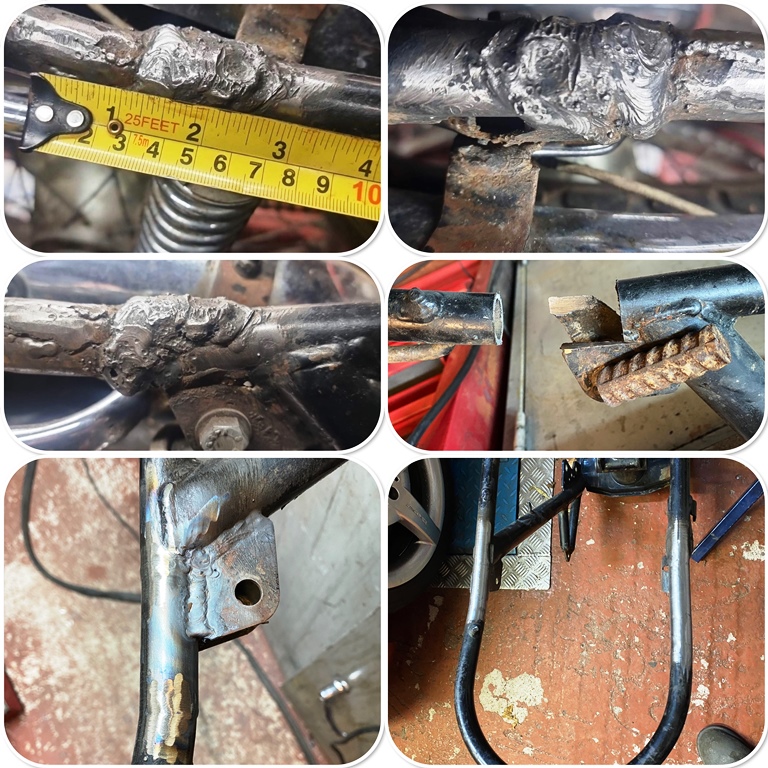
back from holiday, and the first job was a frame repair on a Triumph... I don't do work for other people these days, but one of my best mates asked me if I could repair this Triumph frame for him. How the hell do people think using rebar and welding like that is acceptable?
all done now though and once its powder coated it will be like new.
all done now though and once its powder coated it will be like new.
Re: Well you asked for another Ducati build
The welding looks a mess though
Good job repairing it properly, I'm sure your friend knew what he was doing when he asked you to repair it
Chris.
Re: Well you asked for another Ducati build
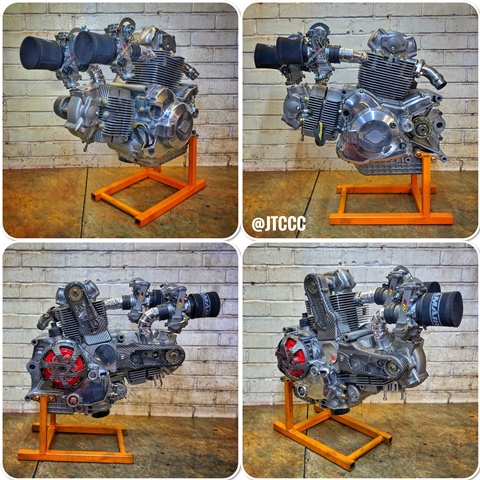
Started the engine build… these are simple engines to build, just a couple of points to remember… There is one special bolt in the crankcase that has an oil feed hole in it. Its also much easier to pop the piston into the bore, and then put the pin in, the rings are very fragile (and expensive!) make sure you have some rag in holes though, those pin circlips have a life of their own! in one of the pictures you can see a plate which holds the flywheel… this is necessary as the alternator nut and crank nut are VERY tight and need torqueing to 190 NM.
I would like to thank the local council for the steel to make the engine stand. Leaving a large sign in the hedge at the side of the road for 2 years, I felt I had to re-cycle it
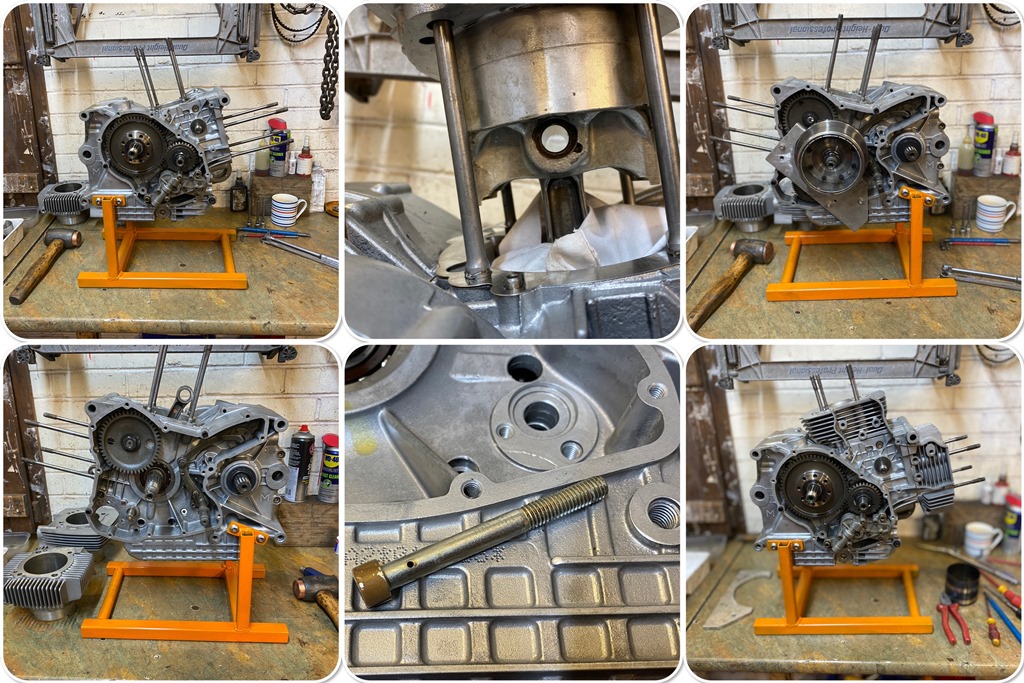
I would like to thank the local council for the steel to make the engine stand. Leaving a large sign in the hedge at the side of the road for 2 years, I felt I had to re-cycle it

Re: Well you asked for another Ducati build
I know what you mean about gudgeon pin circlips having a mind of their own
Chris.
Re: Well you asked for another Ducati build
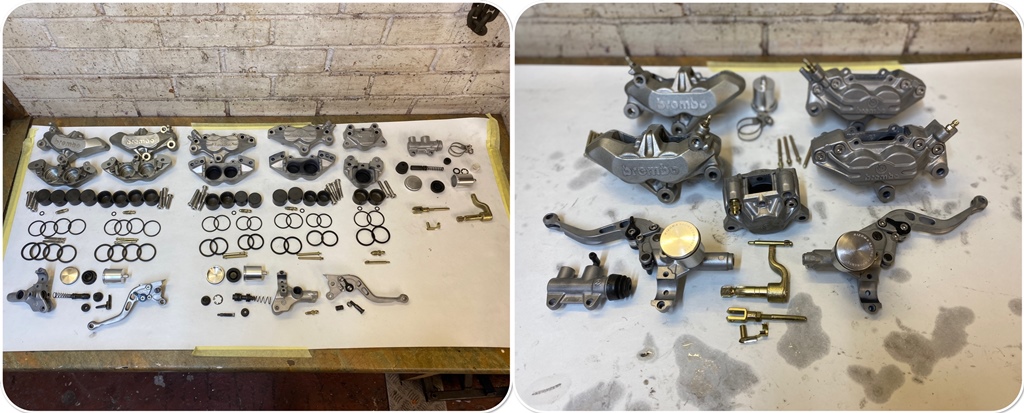
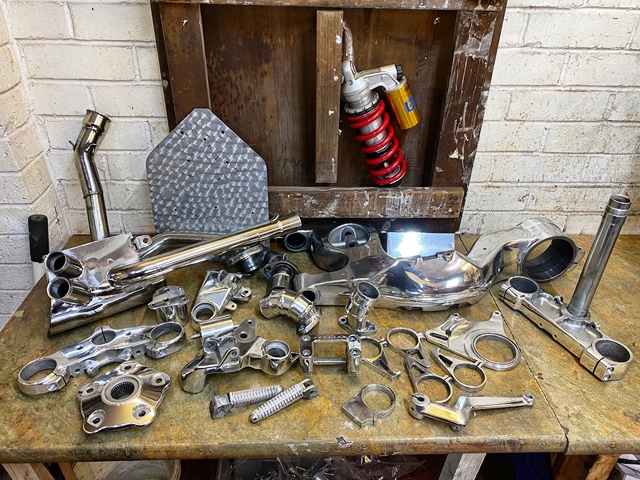
Waiting for a few engine parts so I switched onto the hydraulics. Not sure which front callipers to use yet, so I built both sets. Everything was in great condition so I didn’t change the seals as they were all good.
Re: Well you asked for another Ducati build
I wanted the belts and pulleys to be on show, but I am not keen on open belts… all it takes is one stone! I have made these before out of the original covers. Start by cutting holes with a hole saw, and then cut the oval out. for this I use a saw in the dremel but a saw is OK. Then I marked the profile on some 3mm polycarbonate and cut that to shape. With that in the cut out, I drilled some 3mm holes half in the cover half in the poly. the windows are held in with some 3mm flanged bolts, washers and nylock nuts. I did ad a dab of high strength nutlock and some small neoprene washers as well.
I then hydrodipped them. I know that fake carbon is not everyone’s thing but I like it, and when covered with a lacquer its VERY durable and UV stable, unlike the real stuff! The actual process is easy, and the film and activator is cheap. link to a video below of how its done.
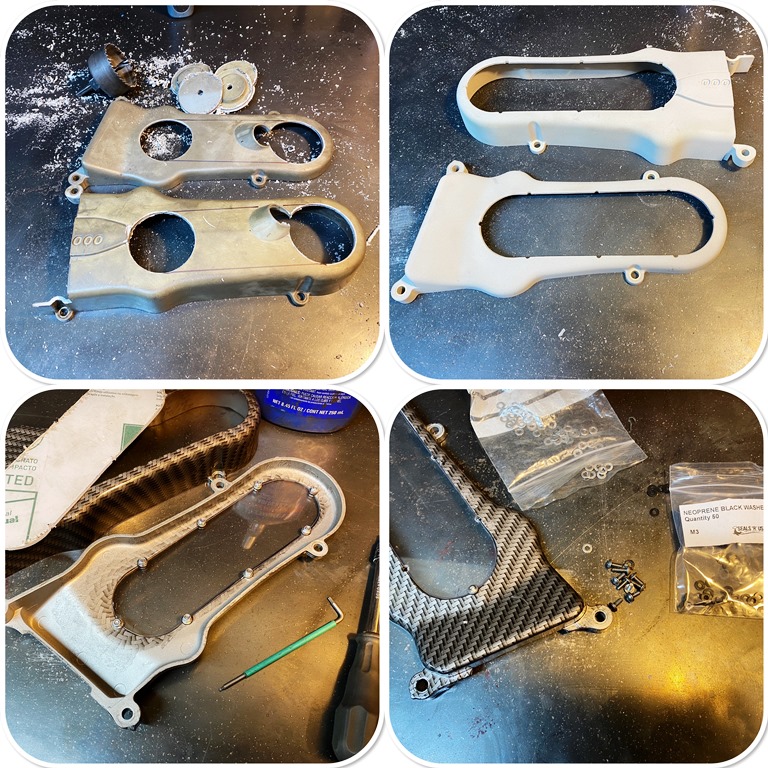
https://www.youtube.com/watch?v=jh6Hh1F0-Yg
I then hydrodipped them. I know that fake carbon is not everyone’s thing but I like it, and when covered with a lacquer its VERY durable and UV stable, unlike the real stuff! The actual process is easy, and the film and activator is cheap. link to a video below of how its done.
https://www.youtube.com/watch?v=jh6Hh1F0-Yg
Re: Well you asked for another Ducati build
Those could pass for shop bought 
Chris.
Chris.
Re: Well you asked for another Ducati build
Polishing day… I did the engine cases a few weeks ago. I then set a side a full day to polish the rest of the alloy… its a dirty, hard, and somewhat dangerous job! the swinging arm took ages! I used to do it in the workshop, but it made such a mess I now do it on the drive. I have a 2.5 HP 3000 RPM motor that I use that is an absolute beast and takes no prisoners if you get it wrong.
Its mentally draining to do actually, thinking about the angle you present the item to the wheel each time. I sand everything with 400 Mirka Abranet first (if you have not come across that product its a game changer, you will never use wet and dry again!) I use an 8" closed stitched mop and medium compound, followed by a loose mop with fine compound. I use some very fine compound on the stainless.
That evening I had a bath as I was so filthy. I actually used fairy liquid to clean me off as ordinary soap doesn’t touch it. Next day I absolutely ached all over!
-
lloydie
- Posts: 20928
- Joined: Mon Jan 17, 2011 11:16 pm
- Location: In the garage somewhere in Coventry
Re: Well you asked for another Ducati build
Wow they look great
Re: Well you asked for another Ducati build
That is some serious polishing
the older i get,the faster i was 
Re: Well you asked for another Ducati build
Too right that is some serious polishing 
At least you have that part done now
That swingarm must have been a challenge, what with it being so big and heavy compared to most of the other bits, I bet your arms were hanging off
Thanks for the tip's on polishing
Chris.
At least you have that part done now
That swingarm must have been a challenge, what with it being so big and heavy compared to most of the other bits, I bet your arms were hanging off
Thanks for the tip's on polishing
Chris.
Re: Well you asked for another Ducati build
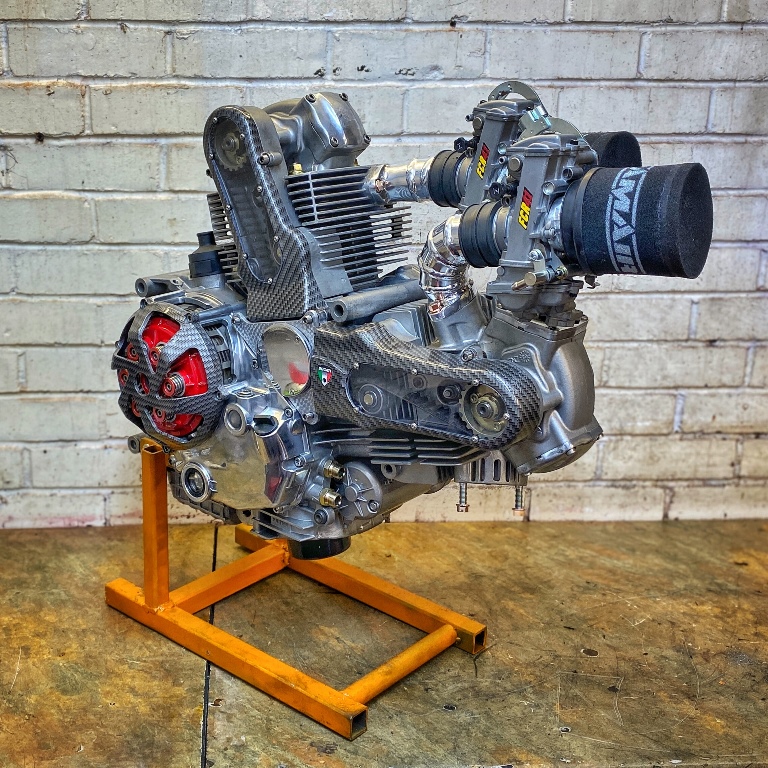
the engine parts I had been waiting for came, and I finished off the belt covers. I also made the housing for the hall effect triggers, the most accurate bit of machining I have done in years as I needed to locate the sensors exactly 135 degrees apart. I will post some pictures later on that. But for now here is the engine!
-
lloydie
- Posts: 20928
- Joined: Mon Jan 17, 2011 11:16 pm
- Location: In the garage somewhere in Coventry
Re: Well you asked for another Ducati build
The engine looks fantastic well done , keep the updates coming 