
If you can see blue smoke from the exhaust, it's burning oil.
Chris.
oil light
-
lloydie

- Posts: 20928
- Joined: Mon Jan 17, 2011 11:16 pm
- Location: In the garage somewhere in Coventry
Re: oil light
Or smell it .sirch345 wrote:If you can see blue smoke from the exhaust, it's burning oil.
Chris.
My old one never smoked but you could smell it
Re: oil light
True, you can't always see it yourself when revving the bike either. Someone following you out on the road has a better chance of seeing blue smoke,
Chris.
Chris.

Re: oil light
no blue smoke a little bit of smoke starting from cold but that`s normal i think
i should have the oil on monday and do a change with filter ... im gona see how much i have in it and try to find why oil level is going down that fast...acording to manual there could be several reasons .....just hope its not the pistons and rings on the way out ...as that will hurt the bank
i should have the oil on monday and do a change with filter ... im gona see how much i have in it and try to find why oil level is going down that fast...acording to manual there could be several reasons .....just hope its not the pistons and rings on the way out ...as that will hurt the bank
Aha you know what it is black and yellow...black and yellow !!!
Re: oil light
White smoke at starting this is the condensation evaporating. To loose that amount of oil is concerning. You have checked inside the airbox to see if is not flooding into there from the rocker cover breathersgabi81 wrote:no blue smoke a little bit of smoke starting from cold but that`s normal i think
i should have the oil on monday and do a change with filter ... im gona see how much i have in it and try to find why oil level is going down that fast...acording to manual there could be several reasons .....just hope its not the pistons and rings on the way out ...as that will hurt the bank
Re: oil light
so took bike to local garage for a quick test (oil pressure) compression tests to try and identify the oil loss
after all tests been done they suspect valves and stem seal that might be faulty or old...but the thing is that after the tests i started the bike at home and within 5 seconds the wall behind exhausts went black!!
so here is my question i do plan on doing my ccts and while i have the engine apart is it possible to get to the seal in question?
thanks
Aha you know what it is black and yellow...black and yellow !!!

Re: oil light
Mmm so after all that it is smoking and your are burning the oil.
I take it the compression test showed good compression and with the same reading with a teaspoon of oil added to the cylinders then?
OK the reasonably cheap and easy bit is replacing the valve stem seals. OM seals are approx a fiver each and you will need a couple of head gaskets. The hard bit, well not hard but a lot of work, is getting to them. You will have to remove the cylinder heads, hence replacement head gaskets, and remove the valves to get to them. A valve spring compressor is required to remove the valves which you can get in Halfords for about £20-£30 but it's a tool for life
The seals sit under the valve springs on the end of the valve guide. The guides themselves are not easy to check without the right measuring device and don't even think about changing them without the skill and right tools for the job. 9 times out of 10 though if not too high a mileage or anything more serious like valves that have crashed into a piston, it's the seals that have perished or hardened causing excess oil to leak past them along the guide and into the cylinder. A small amount should trickle past as this lubricates the guides and valve stems.
It sounds worse than what it is. And while you in there you may as well give everything a good clean up, remove excess carbon build up and lightly regrind the valves back into their seats in case you not getting the best seal there. Valve clearances will need to be re-done afterwards.
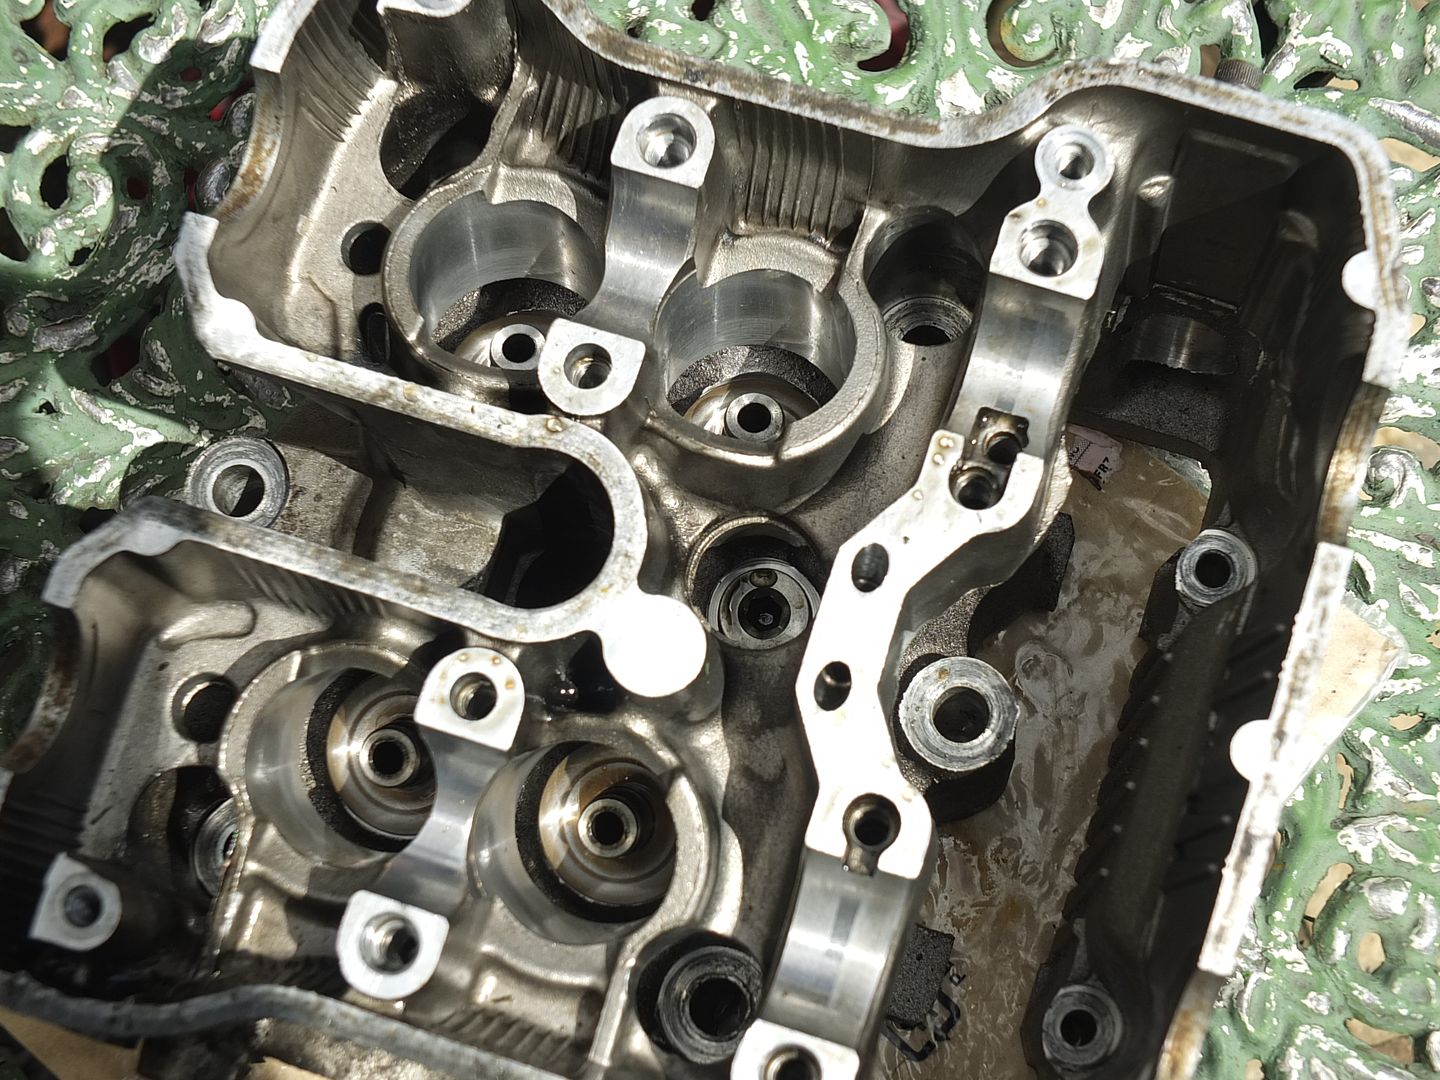
You can see the tops of the guides where the seals sit just above the spring seats in the following pic
So as you can see it's a fair bit of work. Still it's better than having bad piston rings if the garage have confirmed it's not them.
(:-})
I take it the compression test showed good compression and with the same reading with a teaspoon of oil added to the cylinders then?
OK the reasonably cheap and easy bit is replacing the valve stem seals. OM seals are approx a fiver each and you will need a couple of head gaskets. The hard bit, well not hard but a lot of work, is getting to them. You will have to remove the cylinder heads, hence replacement head gaskets, and remove the valves to get to them. A valve spring compressor is required to remove the valves which you can get in Halfords for about £20-£30 but it's a tool for life
The seals sit under the valve springs on the end of the valve guide. The guides themselves are not easy to check without the right measuring device and don't even think about changing them without the skill and right tools for the job. 9 times out of 10 though if not too high a mileage or anything more serious like valves that have crashed into a piston, it's the seals that have perished or hardened causing excess oil to leak past them along the guide and into the cylinder. A small amount should trickle past as this lubricates the guides and valve stems.
It sounds worse than what it is. And while you in there you may as well give everything a good clean up, remove excess carbon build up and lightly regrind the valves back into their seats in case you not getting the best seal there. Valve clearances will need to be re-done afterwards.
You can see the tops of the guides where the seals sit just above the spring seats in the following pic
So as you can see it's a fair bit of work. Still it's better than having bad piston rings if the garage have confirmed it's not them.
(:-})
==============================Enter the Darkside
Re: oil light
IM scared now....just got over the fear of doing ccts and now i need to dig deeper in the belly of the beast
Aha you know what it is black and yellow...black and yellow !!!
Re: oil light
That's not good. Don't be scared of engines, embrace them 
And the oil seal a stupidly silly little part, all 8 of them.

See the little spring bit at the top. These sometimes become weak which opens up the gap in the middle bit more so oil get through. The rubber also hardens with time and perishes at the edge which allows oil through.
It's an easy job, just time consuming. The hardest part for a first timer is most likely operating a valve spring compressor and getting the collets off and on the valves they can be fiddly and tedious at times. At the end of the day it's down to how confident you are. The most important thing is take ones time and be organised and not mix up cams, buckets, shims, springs, valves etc and keep them all numbered to the cylinder/port they came out from and put the same ones back in the same place as they came from as all parts will be worn in to their surroundings if that makes sense.
Like I said it sounds worse than what it is. Luckily these engines are really basic and very simple to work on with everything being the size of a small car engine. A job like this you would treat in 3 stages. 1)remove both cylinder heads from bike 2) work on both heads, strip down and rebuild 3)put both heads back on bike, time and check valve clearances....done.
I suggest you do some reading through the workshop manual if you decide to take this job on, get yourself familiar with how to remove and strip down a cylinder head. Your half way to getting the heads off with the strip down in my MCCT thread. If you have a willingness to learn and understand engines then this is a perfect top end learning curve.
(:-})
And the oil seal a stupidly silly little part, all 8 of them.
See the little spring bit at the top. These sometimes become weak which opens up the gap in the middle bit more so oil get through. The rubber also hardens with time and perishes at the edge which allows oil through.
It's an easy job, just time consuming. The hardest part for a first timer is most likely operating a valve spring compressor and getting the collets off and on the valves
Like I said it sounds worse than what it is. Luckily these engines are really basic and very simple to work on with everything being the size of a small car engine. A job like this you would treat in 3 stages. 1)remove both cylinder heads from bike 2) work on both heads, strip down and rebuild 3)put both heads back on bike, time and check valve clearances....done.
I suggest you do some reading through the workshop manual if you decide to take this job on, get yourself familiar with how to remove and strip down a cylinder head. Your half way to getting the heads off with the strip down in my MCCT thread. If you have a willingness to learn and understand engines then this is a perfect top end learning curve.
(:-})
==============================Enter the Darkside