Come to papa....Chris58 wrote: ↑Tue Mar 13, 2018 7:47 pm Received JE custom 99mm 11.5:1 pistons today, getting block bored next week.
I dealt with a guy named Bryant.. I would highly recommend dealing with him.
Heres a few pictures with a bit of useful info. Notice on the spec sheet it has a job # for reordering...
Engine rebuild - cylinder re-sleeve
Re: Engine rebuild - cylinder re-sleeve
99 VTR1000F Firestorm, a.k.a. The Carbon Express

Re: Engine rebuild - cylinder re-sleeve
I have an update on the progress..took a few pics along the way.
Finally got my block back with fresh bores, so I spent a couple nights gettiner back together. I'll write up a bit of a tutorial of how it went for anyone interested.
Here's how it went:
First I started pulling bags of parts out of my parts fridge to be cleaned (they stay fresh In there). I cleaned everything thoroughly with varsol, brake clean, hot soap and water, and dried with compressed air/wd40.
I assembled lower case with assembly lube (Lucas oil stabilizer) on all bearing surfaces and tranny gears etc.. Replaced all the bearings and checked clearances with plastigauge. All was good.
Next I filed rings to spec with a small file clamped to a flat piece of steel, and orientated them on pistons. Then Installed the pistons on rods, making sure the intake valve reliefs were orientated. I don't have a ring compressor..so I compressed the rings with my fingers and used my third hand to push the piston in.
New rod bolts were used, and torqued to spec.
To mate the cases I used anaerobic case sealer. I also found a primer for it to be sure it cures, I have a hard time trusting it because the excess doesn't dry..
After bolting up the cases, the oil pump and pan was installed.
I use Right Stuff to seal just about everything (oil pan, side cases), highly recommended product.. guarenteed best gaslet maker/silicone you will ever buy.
After that I Installed the shift mechanism, cam chain/guides, oil pump and water pump drive/chain , then the primary gear, and timing reluctor(In that order I think). When installing the clutch primary gear, I used a screwdriver to preload the anti-rattle gear. Next the clutch was assembled.. until I realized I am waiting on new springs.
So I moved on to the other side installing the starter gear/clutch, lightened flywheel, and stator using a thin coat of right stuff with the paper gasket.
Next the heads were installed, I used high tack on the head gasket surfaces with new gaskets. Evenly torqued them to spec, plus a few pounds...
Next I timed the cams, had to follow the manual for that one. The marks didn't line up perfectly... but Tony says don't worry.
One tooth was slightly too advanced, one too retarded. I went with the retarded tooth which would be better power up top.
That's it so far
- Attachments
-
-
-
-
-
-
-
-
Re: Engine rebuild - cylinder re-sleeve
I love the build of a new engine.
All the care and plans, all the shiny new parts going in, it's almost better than riding it.
All the care and plans, all the shiny new parts going in, it's almost better than riding it.
It's not falling off, it's an upgrade opportunity.
Re: Engine rebuild - cylinder re-sleeve
You know it Tony, gotta love getting in the zone putting a fresh engine together..
It's just starting to get warm enough to ride where I am.. can't wait to get this thing back out on the road
It's just starting to get warm enough to ride where I am.. can't wait to get this thing back out on the road
Re: Engine rebuild - cylinder re-sleeve
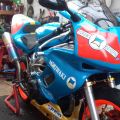
Did a bit more today. Got the engine in the frame. There was no need for those special tools for the frame spacer nuts.. Just had to line it up perfectly and pry a bit.
Also installed a wideband o2 gauge/ sensor. I mounted it in the outer race of a bearing and welded a bit to it to mount off of the mirror, and a light (the little red one beside speedo) to tell me when the meth kicks on.
Also installed a wideband o2 gauge/ sensor. I mounted it in the outer race of a bearing and welded a bit to it to mount off of the mirror, and a light (the little red one beside speedo) to tell me when the meth kicks on.
- Attachments
-
-
-
Re: Engine rebuild - cylinder re-sleeve
This build is finally done...time to start the break in period. fired it up today for the first time. It runs great, idled great, no leaks, not burning oil 
The a/f ratio gauge shows the carbs are jetted good, I took it for a spin and it read anywhere from 12.5 to 13.5 on accel.
After running it for about a half hour I changed the oil.. expecting to see lots of filings in the oil.
There were none to be found! Most likely thanks to the second machinist who re-honed the bores to a much nicer finish.
- Attachments
-

Re: Engine rebuild - cylinder re-sleeve
must feel good to know all the work has been done and it works
AMcQ
Re: Engine rebuild - cylinder re-sleeve
Well done, it'll all feel worth it in the end, after its been run in.
It's not falling off, it's an upgrade opportunity.
Re: Engine rebuild - cylinder re-sleeve
Yea for sure, what a great feeling after putting all that work into getting it right.
I had it out today for the first good ride. I don't want to ride it too hard yet, but from what i can tell there is for sure a major improvement all around.
A real dyno will tell a little better than my pants dyno. I need to do a bit of tuning, and get it run in for a bit first
I'll post the dyno results whenever I get over there

Re: Engine rebuild - cylinder re-sleeve
Hey well done, good work 
I bet it was magic to get it back together and fire it up
Thanks for the detailed write-up and photo's Handy information to have. I had to look up the anaerobic case sealer, that is a new one to me,
Chris.
I bet it was magic to get it back together and fire it up
Thanks for the detailed write-up and photo's
Chris.
Re: Engine rebuild - cylinder re-sleeve
great to see it alive again. tho taking an engine that far down fills me with dread  .
.
the older i get,the faster i was 
Re: Engine rebuild - cylinder re-sleeve
Thanks, I figured a little write up and pics might help out some fellow storm riders.. good to see you learned something new. Regular sealant can open up your main bearing clearence too much.
It also fills me with dread.. Sometimes I still wonder if I tightened all the bolts in there haha
Re: Engine rebuild - cylinder re-sleeve
Its the day you press your finger on the loud button that scares me lol 
the older i get,the faster i was
-
Ace VenTRa
- Posts: 86
- Joined: Sun Feb 23, 2020 8:32 pm
Re: Engine rebuild - cylinder re-sleeve
Just to clarify,
Were you able to determine if the 1mm OS pistons would work on the stock sleeves? I know Honda only offers .25 or .50mm, but I have always wondered if on my next build I could go 1mm.
Thanks for any input
AV
Were you able to determine if the 1mm OS pistons would work on the stock sleeves? I know Honda only offers .25 or .50mm, but I have always wondered if on my next build I could go 1mm.
Thanks for any input
AV

Re: Engine rebuild - cylinder re-sleeve
99 mm bore is maximum to go for sufficient cooling, according to Roger.Ace VenTRa wrote: ↑Mon Feb 24, 2020 10:05 pm Just to clarify,
Were you able to determine if the 1mm OS pistons would work on the stock sleeves? I know Honda only offers .25 or .50mm, but I have always wondered if on my next build I could go 1mm.
Thanks for any input
AV